



Contents: Front seats ↡ Multi-bench rear seat ↡ Additional third row folding seats ↡ Bringing to the marching position ↡ Dismantling ↡
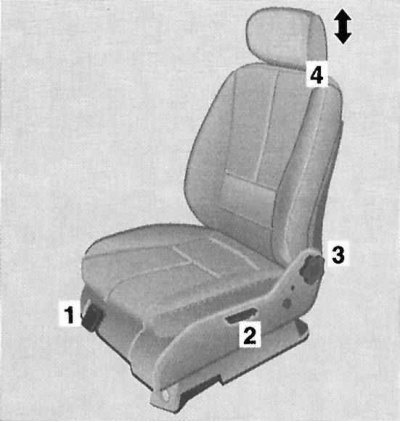
Elements of the mechanical drive for adjusting the position of the front seat (1 of 2)
1 - Seat position adjustment lever in the longitudinal direction; 2 - Seat cushion tilt adjustment lever; 3 - Seat backrest tilt adjustment handle; 4 - Headrest guide release button
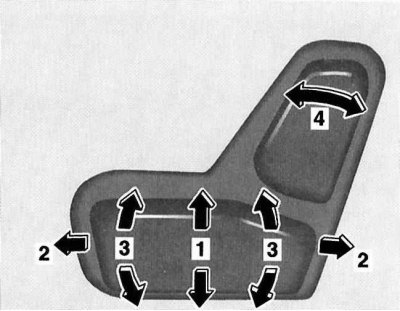
The electric drive design allows flexible adjustments of up to six seat parameters - use the appropriate section of the switch
1 - Adjusting the seat position in the vertical direction; 2 - Adjusting the seat position in the longitudinal direction; 3 - Adjusting the tilt of the seat cushion; 4 - Adjusting the backrest angle
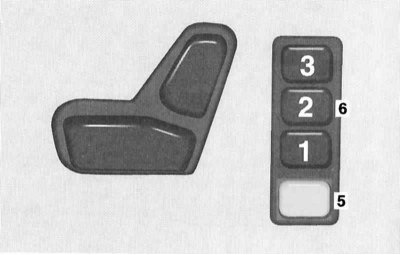
Seat adjustment settings memorization/recall buttons
5 - Memory access button for recording
6 — Buttons for recording/calling selected parameters
Front seats
General information
The seat should be set in a position that provides the driver with maximum comfort when operating the pedals, steering wheel and switches on the instrument panel. In addition, a good view through the windshield and reliable fixation of the driver's body with a seat belt should be ensured.
The rear of the central console is equipped with an adjustable folding armrest for the front seats, or an armrest combined with the lid of the console storage compartment.
Seat adjustments must be made before driving.
The use of any additional pillows or other objects placed on the seat cushion or back is not permitted.
Remember that excessively reclining the seat back significantly reduces the effectiveness of the seat belt!
Mechanical seat adjustment drive
The mechanical seat position control elements are located in front under the cushion (seat longitudinal adjustment lever) and from the outside of the cushion/backrest (adjustable pillow and backrest tilt).
Pull the control lever (1) located at the front under the seat cushion towards you and move the seat assembly to the desired position. Once you have finished adjusting, release the lever and make sure the seat is securely locked by moving it back and forth.
The seat cushion tilt is adjusted using the lever (2) - pull the lever up and turn the cushion so that it provides soft support for the thighs.
The backrest tilt is adjusted using a rotary handle (4) mounted in the outer side wall of the backrest.
The height of the head restraint is increased by pulling it upwards from the backrest guides. To lower the head restraint, press the button (4) releasing the guide lock. The tilt of the head restraint is adjusted manually by turning it forward or backward. A description of the procedures for removing and installing the front head restraints is given in Section Interior controls and equipment.
Electric seat adjustment drive
The front seat adjustment switches are located on the outer sides of the seat assemblies. The electric drive can only operate in positions 1 and 2 of the ignition switch (on some models also in position 0 with any of the front doors open).
The design of the electric drive allows adjustment of up to four seat parameters.
In addition, it is possible to enter up to three selected sets of parameters into the on-board processor memory with subsequent quick recall of the saved data.
To enter the seat settings into the processor memory, press the memory access button (5), then, after a delay of no more than 3 seconds, press any of the three function buttons (6).
Note: In parallel with the seat parameters, the parameters for installing the rear-view mirrors are entered into the processor memory (see Section Interior controls and equipment).
The parameters stored in the processor memory are recalled by holding down the corresponding function button.
Note: Before calling up the settings after folding the seat, first bring the seat back to the upright position.
The headrest position is adjusted manually, just like on seats with a mechanical drive (see above).
Multi-bench rear seat
Note: For a description of the procedures for removing and installing the rear seat head restraints, see Section Interior controls and equipment.
In order to increase the volume of the luggage compartment, the models of cars under consideration have the ability to slide and fold the multi-seat rear seat.
Sliding the seat assembly
To release the seat assembly lock, pull the handle located on the side wall of the cushion, then slide the seat assembly to the desired position.
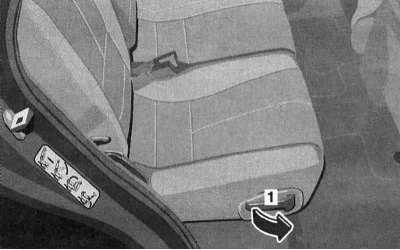
Rear bench seat assembly release handle
Folding the backrest
Note: The right and left sections of the rear bench seat backrest can be folded individually.
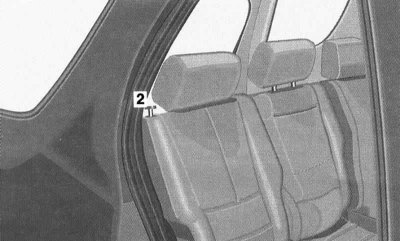
Rear seat back release button
If necessary, the seat back can be folded forward - move the front seats forward (see above), remove the rear head restraints (see Section Interior controls and equipment), slide the rear seat assembly forward (see above), then, pulling the locking button up, lower the corresponding section of the backrest, - make sure that the latch for fixing the backrest in the folded position is activated (the red marking on the button should not be visible).
The removed head restraints should be stored in special pockets under the luggage compartment floor lids.
When returning the backrest to the vertical position, make sure that the lock is securely locked - the red marking on the button should not be visible.
Folding the seat assembly
Note: The right and left sections of the rear bench seat assembly can be folded individually.
Flip down
Move the front seats forward (see above) and remove the rear cup holder (see Section Interior controls and equipment).
Lower the rear seat back (see above).
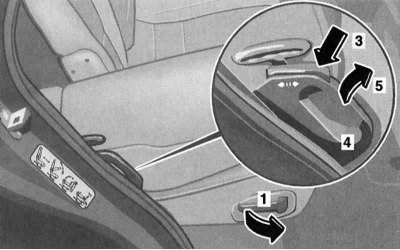
Releasing the rear seat assembly lock
Unlock the seat using the handle (1) while pulling the knob (4) in the direction of the arrow (5), then press the seat assembly down until the lock clicks into place.
Flip up
To fold the seat up, pull the handle (1).
Folding the right section to provide access to the third row folding seats
Slide the right front seat forward (see above), slide the rear seat forward slightly (see above), lower the right rear head restraint to the lowest position and fold it forward.
Unlock and fold forward the right section of the rear seatback (see above).
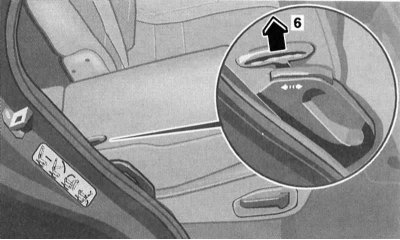
Handle (6) for releasing the lock of the right section of the rear seat
Original source of information: mercedesman
Pull up the handle (6) and fold the right section of the seat forward, lifting it by the rear edge.
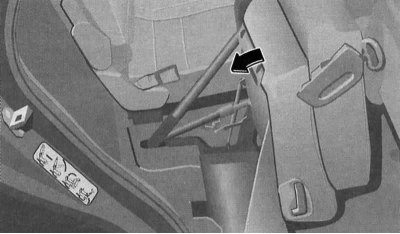
To return the right section of the rear seat to its normal position, lower its rear edge
The seat is returned to its original position by pressing the rear edge of the assembly downwards - make sure that the lock is securely latched.
Return the seat back to the vertical position (see above) and adjust the head restraint as required - the rear head restraints are adjusted in the same way as the front ones (see above).
Additional third row folding seats
Bringing into working position
After removing the third row folding seats (see below), remove the luggage compartment floor covers (see Section Luggage compartment equipment).
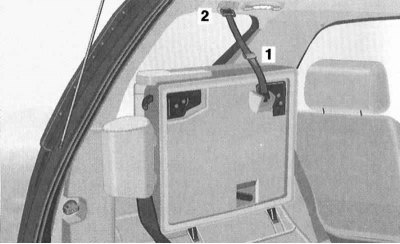
Releasing the folding seat fastening elements
1 - Tie-down lock
2 — Hook of the fastening belt
To loosen the fastening strap, turn the buckle (1) to the horizontal position, unhook the strap hook (2), and use the Velcro strap to attach the strap to the underside of the seat.
Lower the backrest down until it is fully locked.
Pull the handle (3), release the lock and fold the backrest upwards, making sure that the lock is securely locked in place. Install the headrest on the backrest - the removal, installation and adjustment of the headrests of the folding seats is carried out in the same way as the corresponding procedures for the headrests of the front and rear seats (see Section Interior controls and equipment).
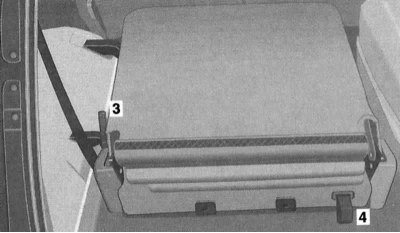
Moving the folding seat back to the vertical position
3 — Lock release handle
4 — Loop for moving the seat to the stowed position
Bringing to the marching position
Remove the headrest and secure it to the seat cushion by pulling the locking handle (3), lower the seat back until you hear a characteristic click.
Pull the loop (4) to raise the seat vertically and hook the hook (2) of the fastening belt. Pull the free end to tighten the belt.
Dismantling
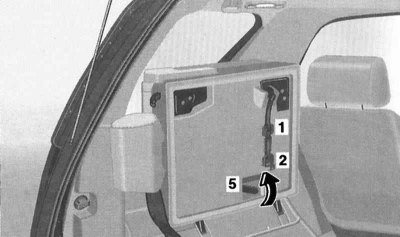
Removal the folding seat of the third additional row
1 - Tie-down lock
2 — Hook of the fastening belt
5 — Lock release handle
To loosen the fastening strap, turn the buckle (1) to the horizontal position, unhook the strap hook (2), and use the Velcro strap to attach the strap to the underside of the seat.
Press the release handle (5) upwards and remove the seat assembly.
Installation is carried out in the reverse order - make sure that the seat fits correctly into the receiving sockets and that the fasteners snap into place securely.