
Cars BMW Cars Volkswagen Cars Chevrolet Cars Land Rover Cars Lada Cars Honda Cars Peugeot
English Русский
Български
Беларускі
Український
Српски
Hrvatski
Română
Polski
Slovenský
Magyar
Bookmark News and articles Sitemap Feedback Site search
MercedesMan.ru


A-Class C-Class E-Class G-Class M-Class S-Class Others
W168 (1997-2004)
  • Main
  • A-Class
  • W168 (1997-2004)
  • General information
  • Maintenance
  • Parking brake — checking operation, running-in and adjustment

Parking brake — checking operation, running-in and adjustment (Mercedes-Benz A-Class W168)

0
Contents: Checking the parking brake ↡ Adjusting the parking brake ↡ Parking brake running-in ↡
The parking brake shoes are driven by cable rods.

Checking the parking brake


1. Perform a test drive and stop on a road with a slope.

2. Apply the parking brake to three notches of the sector, releasing the foot brake pedal.

The parking brake can be considered effective if, in this position, it does not allow the car to roll away and holds it in place.

Adjusting the parking brake


The parking brake adjustment should only be performed once during the first extended service.

3. Tighten the parking brake one notch using a dynamometer. If the applied force is less than 80 N or 8 kg, the parking brake should be adjusted.

Caution! The parking brake cable should be slightly taut when released, not slack.


4. Remove the engine splash guard, see the relevant chapter.

5. Loosen lock nut 1 on the parking brake cable equalizer (see illustration).
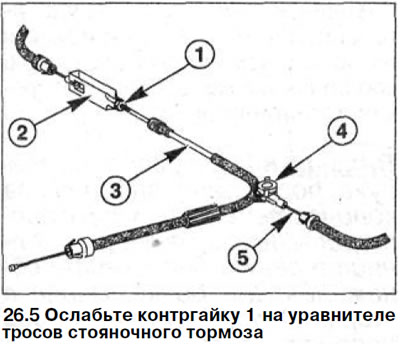
5. Loosen lock nut 1 on the parking brake cable equalizer (see illustration).


6. Screw on equalizer 2 so that the brake shoes are in contact with the brake drum and the wheels cannot be turned (see illustration 26.5).

7. Release the equalizer so that the wheels rotate freely. To check, you can measure the force required to tighten the parking brake lever by one sector tooth. This force should be 110-150 N (11-15 kg).


8. Tighten the lock nut until it is flush with the equalizer.

9. Reinstall the engine splash guard, see the relevant chapter.

The parking brake functions effectively if the vehicle is held securely on a slope.

Parking brake running-in


10. Test drive on a dry, free-traffic road.

Caution: When applying the parking brake during a test drive, do not allow the lever to be locked with the locking button.


11. At a speed of approximately 50 km/h, shift into neutral or depress the clutch, pull the parking brake lever and stop the vehicle. Stop the vehicle by pulling the parking brake 2-3 times with a force of 200 N (20 kg).

Attention! When the car is stopped with the parking brake, the brake lights do not light. Therefore, be careful and watch the traffic behind you.


12. Continue your journey, maintaining a speed of 50 km/h.

13. Tighten the parking brake lever for approximately 10 seconds using a force of 200 N (20 kg).

Attention! If the parking brake does not work effectively enough, then after the brake drums have cooled down, the running-in process can be repeated.


If the parking brake does not work effectively after the check, or the car pulls to one side when braking, then it is necessary to check the brake pads, brake drums or discs and the parking brake cable, and replace them if necessary.
This article is available at: russian, bulgarian, belarusian, ukrainian, serbian, croatian, romanian, polish, slovak, hungarian
The article has been verified: Lukyanov Nikita Ilyich
Share with friends:
◀ Previous
A-Class W168 / Maintenance
Next ▶

Drum brake shoes — checking the remaining thickness
Brake pads — checking residual thickness
Brake fluid — checking the level
Brakes, tires, wheels
Rear Suspension Trailing Arm Support Play — Check
Brake fluid — replacement
Wheels and tires
Body — interior equipment
Seat belts — visual inspection
Dust/Combination Filter — Replacement
More similar articles for repairing other models

☛ Parking brake — checking operation Mercedes 190 (W201) (1982-1993)
☛ Checking and replacing the parking brake pads Mercedes W123 (1976-1985)
☛ Checking the brake system Mercedes W463 (1999-2019)
☛ Checking the brake system Mercedes W163 (1997-2005)
☛ Checking the brake system Mercedes W140 (1991-1998)
☛ Checking the brake fluid level Mercedes Sprinter (1995-2000, diesel)
Link in different formats to this article
Comments and feedback from visitors
No comments yet


How much will 26 + 40 ?


W168 (1997-2004) 
  • General information
  • User manual
  • Maintenance
  • Troubleshooting
  • Power unit
  • Engine repair
  • Cooling and heating
  • Injection system (gasoline)
  • Fuel system (diesel)
  • Fuel system
  • Exhaust system
  • Ignition system
  • Transmission
  • Clutch
  • Transmission
  • Chassis
  • Brake system
  • Suspension
  • Steering
  • Body
  • Interior (all models)
  • Interior (since 1997)
  • Interior (since 2001)
  • Exterior
  • Doors and windows
  • Electrical equipment
  • Equipment and devices
  • Power devices
  • Windshield wipers and washers
  • Headlights and lighting
  • Electrical circuits
 
MercedesMan.ru © 2017–2026 · Mobile version · Read about Mercedes · Sitemap: EN BG BY UA RS HR RO PL SK HU · Feedback · Site search · Bookmark A-Class (W168) · C-Class (W201) · C-Class (W202) · C-Class (W203) · E-Class (W123) · E-Class (W124) · E-Class (W210) · G-Class (W463) · M-Class (W163) · S-Class (W116, petrol) · S-Class (W126, petrol) · S-Class (W140) · S-Class (W220) · Sprinter · Vito 1 · Vito 2 · Vario 814D ·
 
We only use cookies without which some of the site's features may not be available.