
- consignment key for unscrewing the fitting for bleeding the hydraulic drive of the brake mechanism;
- transparent hose with an inner diameter of 6 mm;
- container for collecting brake fluid;
- viewing pit or platform for lifting a car.
Necessary materials:
- DOT 4 specification brake fluid.
Attention! The use of brake fluid of a different specification is not allowed.
Refueling volumes:
- A-class - about 0.60 l
- VANEO (depending on configuration) approximately - 0.76 l or 0.83 l
Attention! Take precautions when working with brake fluid.
Attention! Do not drink used brake fluid or dispose of it with household waste. Brake fluid must be taken to a recycling center.
Brake fluid absorbs moisture from the air through the pores in the brake hoses. This leads to a decrease in the boiling point of the brake fluid over time.
With a heavy load on the brakes in such cases, vapor locks can form in the pipelines, which significantly impairs the functioning of the brake system.
Brake fluid should be changed every 2 years, preferably in the spring.
When driving frequently in mountainous areas, on roads where a sand-salt mixture is used in winter, and when the vehicle is operated in salty sea air, the brake fluid should be replaced at shorter intervals.
In a workshop or service station, bleeding the brake system is carried out using a special device that pours new fluid into the expansion tank and simultaneously bleeds the brake system.
In this case, the brake pedal is held in the depressed position. You can do without such a device. However, in this case, an assistant is needed who will press the brake pedal.
1. Disconnect the wire from the negative pole of the battery. The ignition must then be switched off.
Attention! If the radio has a security code, check and write down the code before disconnecting the battery.
2. Mark the brake fluid level on the expansion tank with a felt-tip pen. When replacing fluid, pour into the tank up to this mark. This will prevent liquid from splashing out through the filler neck of the expansion tank when replacing the brake pads.
3. Remove the cap from the expansion tank. Wipe the cover with a clean cloth before removing it.
4. Take out the brake fluid from the expansion tank, leaving a layer of liquid about 10 mm thick in it.
Attention! Do not take all the brake fluid from the expansion tank, because in this case air will enter the brake system. If one of the chambers of the expansion tank is empty, then fill the expansion tank with brake fluid and bleed the air from the brake system. However, in this case, the removal of air should be carried out in a specialized workshop, and not independently.
5. Fill the expansion tank with fresh fluid up to the MAX mark.
Attention! Jacking up the vehicle or placing it on jack stands is associated with a risk of injury. Therefore, it is recommended that you familiarize yourself with the safety precautions outlined in chapter «car jacking».
6. Place the vehicle horizontally on jack stands.
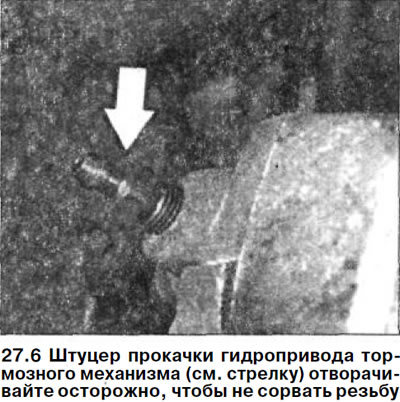
Attention! The union of prorolling of a hydraulic drive of the brake mechanism (see arrow in illustration) unscrew carefully so as not to strip the thread. It is recommended to lubricate the fitting with a rust converter two hours before. If the fittings cannot be unscrewed, contact the workshop.
Pumping order:
- 1 - brake caliper of the rear right wheel;
- 2 - brake caliper of the rear left wheel;
- 3 - brake caliper of the front right wheel;
- 4 - brake caliper of the front left wheel;
- 5 - clutch cylinder.
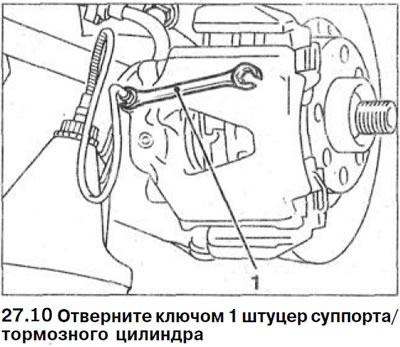
7. Attach an appropriate wrench to the rear right wheel brake cylinder nipple, and then put a clean hose on the nipple.
8. Dip the free end of the hose into a container filled with brake fluid. This container should be approximately 30 cm above the hydraulic drive bleeder so that the pressure is equalized and air does not enter the brake system through the fitting thread. The end of the hose must always be in the brake fluid.
9. Ask the assistant to slowly press the brake pedal until resistance appears.
10. Unscrew with a key 1, with the brake pedal pressed by the assistant, the fitting of the right rear caliper / brake cylinder (see illustration). Close the fitting when the pedal reaches the front end position and hits the floor. Have an assistant take your foot off the brake pedal.
11. Repeat this procedure (about 10 times) until fresh, bubble-free brake fluid flows through the hose at the fitting. Fresh brake fluid differs from used brake fluid in a lighter color.
Attention! The escaping brake fluid must be clear and free of air bubbles. Approximately 80 cm3 of brake fluid must come out of each caliper/wheel brake cylinder.
12. Wrap the union with application of small effort. For fittings with an O-ring, the tightening torque is 10 Nm, and without an O-ring, 7 Nm.
In a similar way, remove the old brake fluid from the remaining calipers, strictly following the specified procedure for bleeding the hydraulic drive.
Attention! When removing air, constantly monitor the amount of liquid in the expansion tank and replenish it. Do not expose the bottom of the tank, otherwise air will again enter the brake system.
13. Lower the car on wheels.
14. Add brake fluid to the expansion tank up to the mark made before changing the fluid.
15. Screw on a cover of a broad tank.
16. Check the operation of the brakes. With the engine off, the brake pedal travel should be sufficiently elastic. If necessary, pump the hydraulic drive again or contact the workshop.
17. Connect wire terminal «masses» (-) to the negative pole of the battery. The ignition must then be switched off.
18. Enter the passcode into the radio and set the clock.
Attention! Carry out an appropriate inspection of the vehicle and ensure that:
- A) brake hoses are securely connected;
- b) brake hoses are fixed with clamps;
- V) the fittings for bleeding the hydraulic drive of the brake system are wrapped;
- G) There is enough brake fluid in the expansion tank.
19. Start the engine and check the brake system for leaks.
To do this, press the brake pedal with a force of 200-300 N (20-30 kg) and hold it in this position for about 10 seconds. The resistance of the brake pedal should not decrease.
Check all connecting joints on the brake system for tightness.
20. Take a test drive. Slow down a few times along the way. Brake at least once until the vehicle comes to a complete stop to activate the ABS. Perform this braking, for example, on an unpaved road. When the ABS is activated, there is a pulsation in the brake pedal.
Attention! When braking, make sure that you do not create a dangerous situation for the vehicle following you.