
When replacing a disk, one should take into account not only its width and diameter, but also the pressing depth. The pressing depth is the distance from the middle of the disc to the contact surface of the wheel disc to the brake disc. All disc wheels are made with an annular ledge. The annular protrusion is a bead pressed onto the landing shelf, which, even with a very sharp turn of the car, does not allow the disc to squeeze the tubeless tire.
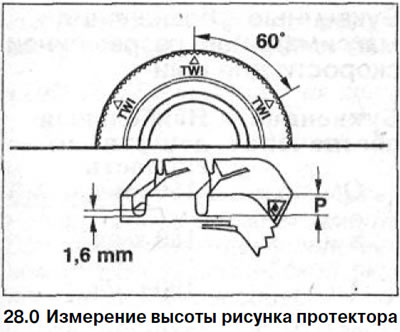
Tread Height Measurement
According to existing legislation, it is allowed to use tires with a residual pattern height of at least 1.6 mm along the entire tread tread.
For safety reasons, it is recommended to replace summer tires already at a residual tread height of 2 mm, and winter tires at 4 mm.
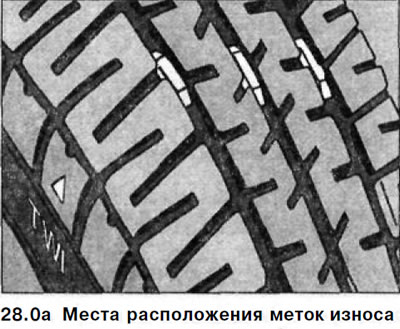
The tread height should be measured at the points of greatest wear. At the bottom of the longitudinal grooves of the tread there are marks of tire wear (TWI). The locations of the marks are marked on the sidewall of the tire with the letters TWI or triangles (see illustration 28.0a). The height of the wear marks is 1.6 mm. When measuring the remaining tread height, the height of the wear marks is not taken into account.
The determining factor is the height of the figure P in the place of greatest wear (see illustration 28.0).
Tires of balanced wheels, while maintaining the prescribed pressure in them, correctly adjusting the wheel alignment angles and impeccable operation of the shock absorbers, wear out approximately evenly over the entire tread.
For uneven wear, see the Tire Fault List.
It is not possible to say anything definite about the service life of tires from different manufacturers. this period depends on various factors, namely:
- road surface;
- tire pressure;
- the nature of driving;
- weather conditions.
Rapid tread wear is favored primarily by sporty driving, rapid acceleration and heavy braking.
If the tread height approaches the legal minimum residual height of 1.6 mm, the tire must be replaced.
Attention! M + S tires are only effective in mud and snow when the minimum remaining tread height is 4 mm.
Attention! Check the tires for cuts and, if present, use a small screwdriver to set their depth. If cuts reach the carcass, then the steel cord of the tire begins to rust under the influence of penetrating water. Because of this, the tread can peel off from the carcass and the tire breaks. Therefore, for deep cuts in the tread, for safety reasons, the tires must be replaced.
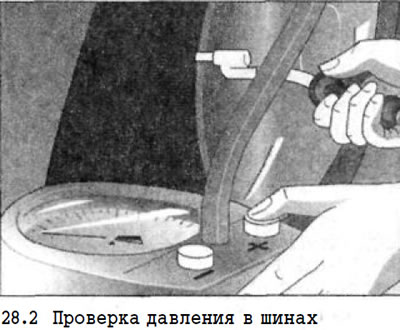
Tire pressure - check
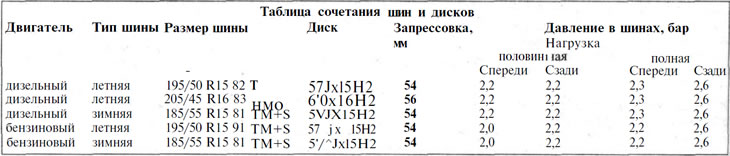
The tire pressure is set by the vehicle manufacturer depending on various parameters. These include the vehicle load and the maximum permitted speed. For MERCEDES A-class vehicles, wheels of different tire and rim diameters are allowed (see table).
It is important to maintain the correct pressure in the correct size tires. The required tire pressure is indicated on the label affixed to the inside of the fuel tank cap. Compliance with the prescribed tire pressure is of great importance for driving safety, as well as for the life of the tyres.
For this reason, it is recommended to check the tire pressure at least once a month and before every long trip (including the spare wheel).
1. Unscrew the protective cap of the tire valve.
2. Check pressure only when tires are cold. This means that the maximum driving time of the vehicle before checking the tire pressure should be no more than 5 minutes. Excessive tire pressure resulting from a long journey must not be relieved.
The tire pressure increases by about 0.2-0.4 bar during continuous driving. Winter tyres, as a rule, are operated with overpressure, i.e. about 0.2 bar higher than summer tires. The values recommended by the winter tire manufacturer must be observed.
If winter tires have a speed limit, the corresponding maximum speed must be indicated on a sticker that must be within the driver's field of vision.
When driving with a trailer, the tire pressure must be brought to the values indicated in the column «Full load». The prescribed tire pressure can be found in the owner's manual for the vehicle. When checking tire pressure as part of maintenance, check the pressure on the spare wheel as well.
3. Screw on the valve cap.
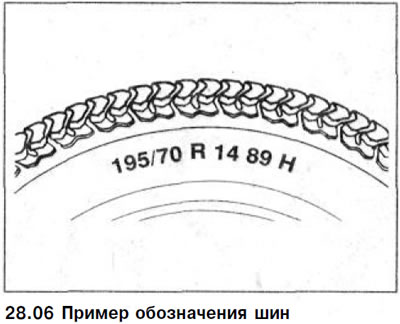
Tires and wheels - symbols
- 195 - tire profile width in mm;
- /70 - height to width ratio (the height of the tire profile is 70% of the width);
If there is no special profile height designation, (e.g. 155 R13), then this means that in this case the usual or «normal» ratio. For radial tires it is 82%.
- R - radial tire;
- 14 - landing diameter in inches;
- 89 is a number indicating the allowable load on the tire.
Attention! If there is M + S between the designations 14 and 89, then we are talking about a tire with a winter tread pattern.
- H - the letter indicating the maximum permitted speed for these tires (in this case up to 210 km/h).
The letter indicating the maximum permitted speed for these tires is placed after the tire size.
The designation of the maximum permitted speed applies to both summer and winter tires (see illustration 28.06).
Letter designations of the maximum permitted speed for tires
| Letter designation | Maximum allowable speed |
| Q | 160 km/h |
| S | 180 km/h |
| T | 190 km/h |
| H | 210 km/h |
| V | 240 km/h |
| Z | over 240 km/h |
Attention! If the tire designation is followed by the word «reinforced», then we are talking about tires with a reinforced structure.
Date of tire manufacture
The date of manufacture is stamped on the tire as a manufacturer's code.
Example: DOT CUL2 UM8 5103 TUBELESS
- DOT - Department of Transport (US Department of Transportation).
- CU is the abbreviation for the tire manufacturer.
- L2 - tire size.
- VM8 - tire construction.
- 5103 - release date,
- 51st working week 2003
Note: If only a 3-digit number followed by a symbol is shown instead of a 4-digit number code, this means that the tire was manufactured in the past decade. For example, the designation 509 stands for the 50th production week of 19U9.
- TUBELESS - tubeless tire (TUBETYPE - tube tire).
Attention! Starting from 10/98, new tires must additionally have an ECE control number (Economic Commission for Europe) UN, which is applied to the sidewall of the tire. This number confirms that the tire complies with the ECE standard. If, however, after 10/98, tires without the EZh control number are installed, the vehicle operating permit will be cancelled.
Example of designation on disc wheels: 5½J x 15 H2
- 5½ - disc width in inches;
- J - letter indicating the height and contour of the side (B - low board); x - designation of a solid disk;
- 15 - landing diameter in inches;
- H2 - the inner and outer profile of the disc with an annular ledge that prevents the tire from slipping off the disc.
Wheel balancing
Serially produced wheels are balanced at the factory. Balancing is necessary to even out different weight distributions and material inaccuracies. In the process of movement, unbalanced wheels manifest themselves through shocks and shaking. Steering wheel shakes at high speed.
As a rule, this jitter occurs only in a certain speed range and stops when the speed increases or decreases. Over time, wheel imbalance can lead to suspension, steering, and shock absorber failures.
It is necessary to balance the wheels after each tire repair, because due to tire wear and repair, the weight distribution of the tire material changes.
Changing/Changing Wheels
It is impractical to change the direction of tire rotation when changing wheels, because Tires are only run in to the new direction of rotation after heavy wear. With noticeably greater wear on the front wheels, it is recommended to swap them with the rear ones. This ensures approximately equal service life of all four wheels.
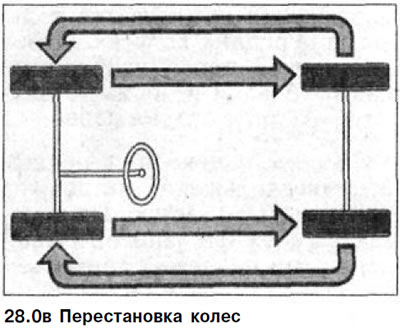
Attention! Change tires not separately, but at least the tires of both wheels of one axle. In this case, tires with a larger residual tread depth must always be installed at the front. Both wheels should only be fitted with tires of the same type, with the same type of tread pattern, from the same manufacturer. Tires that are more than 6 years old should only be fitted if absolutely necessary and be extremely careful when driving. When replacing a disc or tire, be sure to change the valve as well.
Tires with the prescribed direction of rotation, which can be identified by the arrow on the sidewall indicating the direction of travel, must always be installed in the direction of travel (see illustration 28.0g).
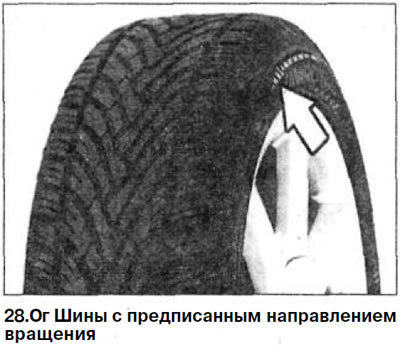
This ensures optimum tire performance in terms of aquaplaning, road grip, driving noise and wear.
If it is necessary to install a spare wheel with the prescribed direction of rotation instead of «let down», but the prescribed direction will not be preserved, then such a replacement should be temporary. In this case, it is recommended, especially on a wet track, to observe the speed limit.
Removing the wheel
4. Mark with paint the position of the wheel on the hub if the wheel is to be installed again. Thanks to the marks, the balanced wheel can be set to its original position.
5. Position the vehicle so that it does not roll when the wheel is removed. To do this, tighten the parking brake, and set the gear lever to reverse gear or engage first gear. On vehicles with an automatic transmission, the gearshift control lever. drive to position P. In addition, place a stop shoe under the wheel located at the opposite end of the diagonal relative to the one being removed.
6. Loosen the wheel bolts with the vehicle on wheels by 1/2 turn.
7. Jack up the vehicle until the wheel being removed is not in contact with the ground or floor.
8. Unscrew bolts of fastening and remove a wheel.
Wheel installation
9. Lubricate the wheel centering saddle on the hub with a thin coat of bearing grease.
10. Clean dirty wheel bolts and bolt hole threads. Do not grease wheel bolts.
11. Install the wheel in accordance with the labels applied before removal
12. Screw in the wheel bolts and tighten them in a criss-cross pattern without much effort.
13. Lower the car on wheels.
14. Tighten the wheel bolts in a criss-cross pattern in several passes. Always use a torque wrench to tighten the wheel bolts. This ensures that the bolts are tightened securely and to the correct torque. The bolt torque for both steel and aluminum wheels is 110 Nm.
15. Fasten the wheel cap first near the tire valve, and then push the hub cap into place on the wheel.
Wheel rims and wheel bolts are matched to each other.
If tires are being remounted to other rims, for example, from aluminum rims to steel rims, then the wheels must be fastened with bolts intended for steel rims and vice versa. The fastening of the wheels and the functioning of the brake system depend on the wheel bolts.
Attention! The light metal alloy rims are coated with a clear lacquer to protect against corrosion. Be careful not to damage this protective lacquer layer when changing wheels. If necessary, paint over the damaged area with a transparent varnish.
If, when changing tires, it turns out that the wheel bolts are rusty and difficult to tighten, they should be replaced with new ones as soon as possible. Before replacing these bolts, drive at medium to moderate speed.
Attention! One-sided or uneven tightening of the wheel bolts can cause the wheel or hub to seize.
After changing tires, be sure to check the pressure and, if necessary, bring it to the norm.
Anti-skid chains
Snow chains may only be used on the front wheels. Before installing the chains, remove the caps and reinstall them after removing the chains.
Driving speed with snow chains must not exceed 50 km/h. On roads without snow drifts and ice, the chains must be removed.
Some tips for caring for tires
Tires have a peculiar «memory», and mishandling them, and this includes, for example, quick or frequent crossings over curbstones or rails, often results in their failure. And this happens only some time later and at the most inopportune moment.
Tire cleaning
Do not wash tires with a steam jet. If the nozzle of this device is held too close to the tire, then its rubber layer is irreversibly destroyed within a few seconds, which cannot be repaired even by applying cold water.
Tires cleaned in this way must be replaced for safety reasons. Tires that have been in contact with oil or grease for a long time must also be replaced.
In this case, the tire first swells, and then returns to its normal shape and looks intact on the outside, but the tire's load-bearing capacity is reduced.
Tire storage
Tires should be stored in a cool, dark and dry place. They must not come into contact with lubricants, oils or fuels. Store wheels lying flat or suspended from rims in a garage or basement. If tires are not mounted on rims, they must be stored in a standing position. Increase tire pressure slightly before removing wheels (by about 0.3-0.5 bar). For winter tires, use your own rims, since remounting tires for summer rims does not justify itself in terms of economy.
Tire break-in
The new tires have a particularly smooth surface. This is due to the manufacturing process. For this reason, new tires, including a new spare wheel, must be run in.
During the running-in process, as a result of the onset of abrasion, the smooth surface becomes rough. Before driving the first 300 km with new tires, the driver must be especially careful when driving on wet roads.
Incorrect tire wear
First of all, you need to maintain the prescribed pressure in the tires. Moreover, the pressure check should be carried out at least once every four weeks and without fail - before each long trip.
Check pressure only when tires are cold. When driving fast, it rises due to the heating of the tires. However, of course, you should not bleed air from heated tires. For front wheels, slightly more wear on the shoulder of the tread than wear on the middle of the tread is normal.
Moreover, due to the slope of the road, the wear of the tread shoulder facing the middle of the road (for the left wheel - the outer shoulder, for the right - the inner), may be more pronounced.
Uneven tire wear is mostly the result of too low or too high tire pressure. Uneven wear can be caused by improper wheel alignment, poor wheel balance, and defective shock absorbers and discs.
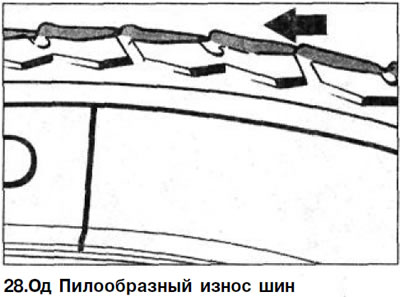
If the pressure is too high, the middle of the tread wears out more, as the tread bends under the influence of high internal pressure. If the pressure is too low, there is a greater load on the tread shoulder, and the middle of the tread flexes inward, hence more wear on the tread shoulders. Sawtooth tread wear is usually due to vehicle overload.
Tire sealant TIREFIT - expiration date check
Depending on the vehicle equipment, there may be a can of TIREFIT tire sealant instead of a spare wheel.
16. Open the trunk and, in an A-class car, remove the trunk floor covering. For VANEO, open cover 1 on the left side of the trunk (see illustration).
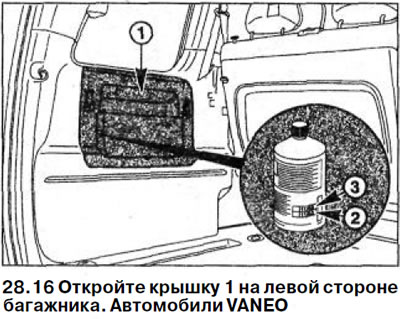
17. Remove the can of sealant and check the date 2 until which the sealant can be used (see illustration 28.16).
The shelf life of the sealant is three years, counting from the production date, which is indicated on the label. If the shelf life has expired, the sealant should be replaced with a new one.
18. Replace the can of sealant, lay the trunk floor covering or close the side cover and close the trunk.
Tire valve check
Required special tools:
- metal cap-key for valve or HAZET 666-1.
Examination
19. Unscrew the protective cap of the tire valve.
20. Lubricate the opening of the valve with soapy water or spit it. If a bubble forms, tighten the spool 3 with the other end of the protective cap 2 (see illustration).
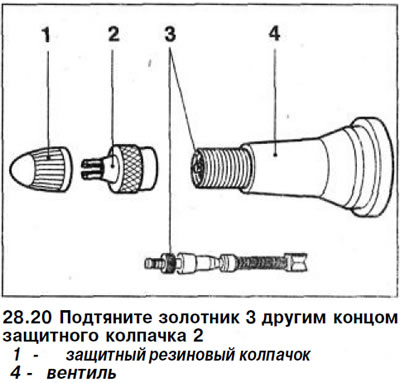
Attention! To tighten the valves, use only metal protective caps 2 valves. Metal protective caps can be purchased at gas stations. The valves can be tightened using the HAZET 666-1 tool.
21. Check valve again. If bubbles continue to form and the valve no longer tightens, replace it. Entrust the work to the workshop.
22. Screw on the protective cap.