



Contents: Disc designations ↡ Tyre designation ↡ Date of tire manufacture ↡ Examples of typical tire tread wear ↡ Wheel rotation ↡ Wheel replacement ↡
1. Depending on the model and equipment, tires and wheels of different sizes may be installed. The wheels have a pressing depth of 38 mm. The pressing depth is the distance from the center of the wheel to the thrust surface of the brake disc or drum.
Wheel bolts for steel and alloy wheels are the same size.
Note: When installing alloy wheels from other manufacturers, different bolt sizes may be required.
Technology is improving. It may be that older models may have different tire pressure values. The dimensions specified in the vehicle documents are decisive.
2. For sporty driving, it is recommended to increase the pressure in the front and rear tires by 0.2 atm. When increasing the pressure, you should proceed from the base value for different load conditions.
3. Winter tires usually have a pressure 0.2 atm. higher than summer tires. The recommendations of winter tire manufacturers should be taken into account.
4. Since winter tires have a speed limit, a sign indicating the maximum speed must be affixed within the driver's field of vision.
Disc designations
Example: 6 J x 15
- 6 - rim width in inches
- J - letter designation of the height and contour of the side flange of the disk rim
- x - designation of a solid deep disk
- 15 - disk diameter in inches
- Permissible lateral runout on the side edge of the disc: 0.8 mm;
- Permissible radial runout on the disk seat: 0.5 mm.
Tyre designation
Example: 195/70 R 14 89 H
- 195 - tire width in mm
- /70 - height to width ratio (the height of the tire cross-section is 70% of the width). If there is no separate information about the width to height ratio (for example, 175 R 14), then we are talking about a "normal" ratio. It is 82%.
- H - speed class, H: up to 210 km/h (on new tires it is not always given).
- R - radial design
- 14 - disk size in inches
- 89 - load capacity parameter
Note: If there is an M+S designation between data 14 and 89, these are winter tyres.
H designation of the permissible maximum speed.
The speed letter is located after the tire size. Speed symbols apply to both summer and winter tires.
The letter designations of speed are given in Specifications.
Date of tire manufacture
The date of manufacture of the tire is indicated on the tire in the manufacturer's code
Example: DOT CUL2 UM8 4600 TUBELESS
- DOT - Department of Transportation (US Department of Transportation)
- CU - abbreviation of the manufacturer's name
- L2 - tire size
- UM8 - bus design
- 4600 - date of manufacture - 46th working week of 2000
- TUBELESS - tubeless (TUBETYPE - tire with tube)
Regularly checking your tires will help you avoid the hassle of being stopped on the road due to a flat tire. In addition, such checks provide valuable information about possible problems with the steering and suspension before serious damage occurs.
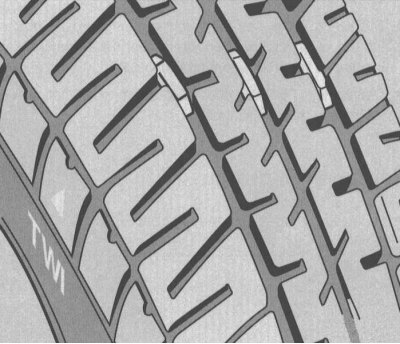
The tires are equipped with built-in tread wear indicator strips that are exposed when the tread depth decreases to 1.6 mm, after which the tires are considered worn. This value represents the minimum permissible tread depth; in most cases, it is recommended to replace tires with a tread depth of 2 mm or less. Tread depth can also be determined using a simple and inexpensive device known as a tread depth gauge.
Pay attention to any unusual tread wear. Tread defects such as cavities, bulges, flat spots and more severe wear on one side indicate a violation of the front wheel alignment angles and/or wheel balancing. If any of these defects are detected, contact a tire repair shop for correction.
Check the tire carefully for cuts, punctures, and stuck nails or tacks. Sometimes, after a nail has punctured the tire, it will hold pressure for a while or deflate very slowly.
If you suspect a "slow puncture," first check the valve nipple for leaks. Then inspect the tread for any foreign objects lodged in it or previously repaired punctures that have begun to leak air again. If you suspect a puncture, you can verify its presence by wetting the suspected area with soapy water. If there is a leak, the solution will begin to bubble. If the puncture is not too large, the tire can usually be repaired at any tire shop.
Carefully inspect the inside sidewalls of the tires for signs of brake fluid leakage. If any, have the brake system checked immediately.
Maintaining the correct tire pressure increases their lifespan, helps save fuel, and improves overall driving comfort. A special pressure gauge is required to check the pressure.
Recommendations: Always keep an accurate pressure gauge in your glove compartment. Gauges built into air hose nozzles at service stations are often inaccurate.
Always check tire pressure when tires are cold (i.e. before traveling by car). If you check the pressure on warm or heated tires, this will lead to overestimation of the pressure gauge readings due to thermal expansion of the tires. In this case, you should never lower the pressure, because after the tire cools down, it will be lower than normal.
Unscrew the protective cap from the inflation valve protruding from the wheel rim or hub cap, then firmly press the pressure gauge nozzle onto the valve. Read the readings and compare them with those recommended in the Specifications. Remember to replace the protective cap to prevent dirt and moisture from entering the valve mechanism. Check the pressure in all four tires and inflate them to the recommended pressure if necessary.
Don't forget to maintain the required pressure in the spare tire.
Checking the air pressure in the tires
Checking the air pressure should only be done on cold tires.
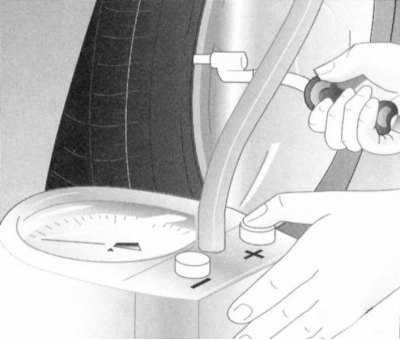
1. Unscrew the valve cap.
2. Tire pressure is checked once a month and also during maintenance (including spare tire).
3. In addition, air pressure must be checked before each long trip, since in this case the temperature load on the tires increases.
4. The required air pressure in the tires is indicated on the sticker located on the inside of the fuel tank cap.
Note: When using winter tires, the air pressure should be increased by 0.2 atm in relation to the set value.
5. The air pressure of narrow spare tires is indicated on the sidewall of the rim.
The air pressure in the tires changes depending on the change in the ambient air temperature by 10°C by approximately 0.1 atm. This should be taken into account when checking the air pressure in the tires in the garage - especially in winter.
Example:
- The temperature in the garage is about + 20°C
- Outside air temperature is around 0°C
- The set air pressure in the tires = the prescribed air pressure + 0.2 atm.
The tire pressure values given for a light vehicle load are the minimum values that ensure comfortable driving.
Increased air pressure in the tires, provided for with increased vehicle load, has a positive effect on the vehicle's handling also with a small load and is quite acceptable. However, the smoothness of rolling is somewhat reduced.
Checking the tire valve
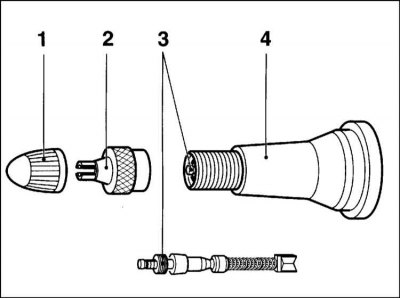
Tire valve
1 and 2 - Rubber and metal caps
3 — Valve
4 - Valve body
Note: The valve extensions used must be checked for damage and contamination that could cause leaks. If necessary, the extensions must be replaced.
1. Unscrew the protective cap and extension.
2. Apply a small amount of soap solution or saliva to the valve. If an air bubble forms, tighten insert 3 with protective cap 2.
Note: Only the protective cap 2 should be used to tighten the valve. 1 rubber protective cap, 4 valve.
3. Check the valve again. If bubbles appear and the valve cannot be tightened, it should be replaced (work of the service station).
4. Be sure to reinstall the protective cap.
Examples of typical tire tread wear
Lateral wear
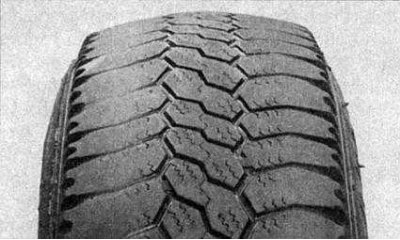
Underinflation causes the tire to overheat while driving due to excessive deflection, which means the tread is not pressed down sufficiently onto the road surface. This results in loss of traction and excessive tread wear, not to mention the risk of tire failure due to overheating.
Check and adjust pressure.
Incorrect wheel alignment (wear on one side)
Repair or replace suspension parts.
Too sharp turns.
Slow down!
Central wear
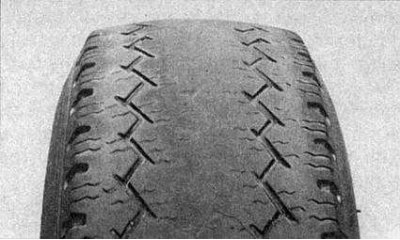
Excessive pressure
Overinflation of a tire results in accelerated wear of the center tread, reduced traction, harsher ride, and an increased risk of fatal tire damage.
Check and adjust pressure.
If you have had to inflate your tyres to the pressure specified in the Specifications for heavy loads, be sure to deflate them when returning to normal operation.
Uneven wear
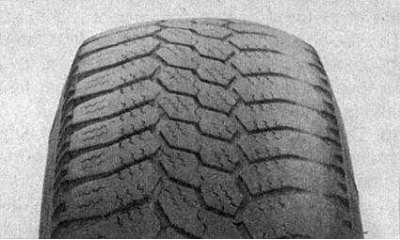
The tires of the front wheels may wear out unevenly as a result of incorrect adjustment of the wheel alignment angles. You can check and adjust the installation angles for a reasonable fee in most tire repair shops.
Incorrect camber or runout
Repair or replace suspension parts.
Suspension defect
Repair or replace suspension parts.
The wheels are out of balance
Balance the wheels.
Front wheel alignment is incorrectly set
Adjust the front wheel alignment angles.
Note: Frayed edges of the tread pattern, which is a sign of wear, are best detected by touch.
Wheel rotation
Wheel rotation is only permitted if the front and rear wheels are the same size.
Rotate the wheels every 5,000-10,000 km depending on tire wear. Keep the direction of rotation of the wheels the same.
Rotation must be performed before characteristic signs of tire wear appear. A characteristic sign of wear for front tires is wear of the shoulder area of the tread, and for rear tires - wear of the middle of the tread.
Each time you rotate the wheels, you should thoroughly clean the inside of them. After rotating the wheels, check and, if necessary, adjust the air pressure in the tires (see above).
Wheel mounting bolts may become loose if they have not been tightened to the specified torque. Check the tightening torque after replacing wheels.
Use only genuine "MB" mounting bolts marked with a star "Mercedes-Benz". Other bolts may come loose.
Lightweight spare wheel
If a tire is damaged, the lightweight spare tire can be used as a normal tire; it is recommended, however, to replace it with a normal wheel as soon as possible, as it is designed for a limited mileage of up to 20,000 km.
When changing tires, the spare tire can be mounted on the working wheel if the tire matches the design of the working wheel tires. If the tire is older than 6 years, it is recommended to use it only if the tire is damaged.
Models with 245/45R18 tires:
If a spare wheel of a lightweight design is mounted, then due to different tire sizes, it is necessary to take into account the change in the dynamic properties of the car. Adjust your driving style to the traffic situation.
Replace the lightweight spare tire with a standard tire as soon as possible.
Models with AMG equipment
There is a risk of accident!
If a spare wheel of a lightweight design is mounted, then due to different tire sizes, it is necessary to take into account the change in the dynamic properties of the car. Adapt your driving style to this situation.
It is therefore intended only for short-term use, subject to the prescribed tyre pressure and a maximum speed of 80 km/h.
Operation with more than one lightweight spare wheel is not permitted.
Wheel replacement
The car jack is intended only for short-term lifting of the car when changing a wheel.
The support area of the car jack must be firm and level. In case of loose soil, use a car jack pad.
To carry out work under the vehicle, it is necessary to use support stands.
1. Park the vehicle on a level surface if possible. Press the parking brake pedal firmly. Do not release the parking brake while the vehicle is raised.
2. Move the AT selector lever to the "P" position. Prevent the car from rolling away by placing wheel chocks, etc.
3. On a level road: Place chocks under the diagonally positioned wheel at the front and rear.
4. On uphill and downhill slopes: Place chocks under both wheels of the other axle facing downhill.
5. Remove the two-piece wheel wrench from the on-board tool kit and assemble it.
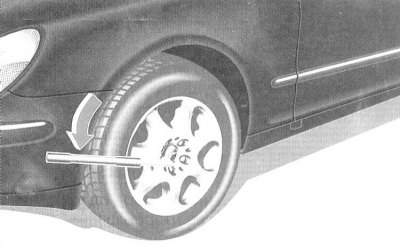
6. Loosen the wheel mounting bolts with a wrench, but do not remove them completely yet.
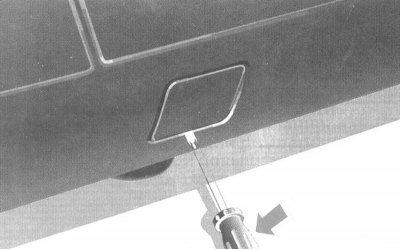
7. Remove the cover from the car jack mounting hole.
The holes for installing a car jack are located behind the wheel arches of the front wheels and in front of the wheel arches of the rear wheels.
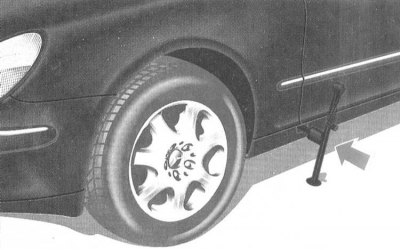
8. Fully insert the jack support pin into the jack installation hole.
The car jack must always stand vertically - also on slopes.
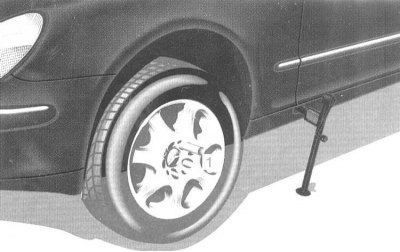
9. Raise the vehicle until the wheel is off the ground.
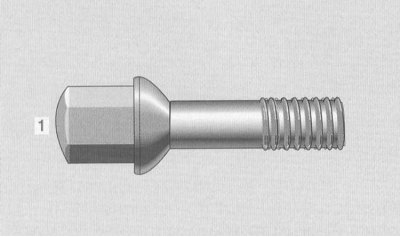
9. To prevent the vehicle from slipping, insert the jack support pin fully (until it stops) into the installation hole 10. Unscrew the upper mounting bolt. Screw the centering pin "1" from the on-board tool kit into the threaded hole. Unscrew the remaining wheel mounting bolts. Do not place the wheel mounting bolts on sand or mud.
1 - Suitable for all factory offered wheels
11. Remove the wheel.
Wheel mounting bolts
1. Replace wheel mounting bolts that are damaged or show signs of rust.
2. Do not lubricate bolts with oil or grease.
If the thread in the wheel hub is damaged, you cannot continue driving. You must contact a service station "Mercedes-Benz".
3. Clean the mating surface of the wheel and hub.
Use only genuine "MB" mounting bolts, marked with a three-pointed star "Mercedes-Benz".
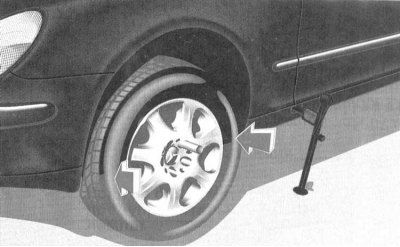
4. Place and press the wheel.
5. Screw in the wheel mounting bolts and tighten lightly.
6. Unscrew the centering pin and screw in the last wheel mounting bolt.
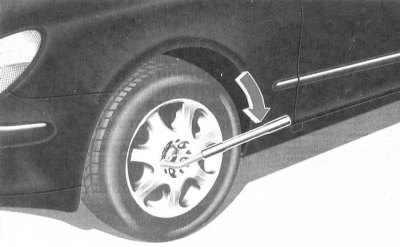
7. Lower the vehicle. Remove the vehicle jack and install the cover on the jack mounting hole.
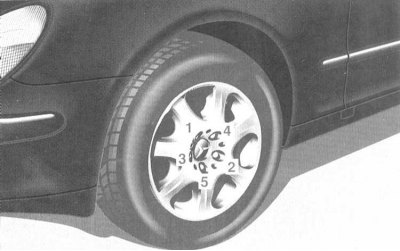
8. Tighten all wheel mounting bolts evenly. The tightening diagram is shown in the accompanying illustration. The tightening torque is given in the Specifications.
There is a risk of accident!
Wheel bolts may become loose if they are not tightened to the correct torque, so be sure to check the tightening torque immediately after changing wheels.
Note: Before placing the car jack in the additional compartment under the trunk floor, rotate the jack support pin back almost to the support.
Disassemble the wheel wrench and place it in the on-board tool kit.
Check and, if necessary, adjust the air pressure in the tires.