



Contents: Signs of a problem with the brake…↡ Brake lines and hoses ↡ Checking the thickness of brake pads ↡ Front disc brake ↡ Rear wheel disc brake ↡ Parking brake ↡
Warning! Dust from lining wear that collects on brake components may contain asbestos, which is hazardous to health. Do not blow out this dust with compressed air or inhale it! Do not use gasoline-based solvents to remove dust. Dust should be washed off with a special brake system cleaner or methylated spirits into a drain container. After wiping the brake components with a damp cloth, keep the cloth and the contents of the drain container in a closed and labeled container. In the future, try to use asbestos-free components whenever possible.
Note: In addition to checking at specified intervals, the brake system condition should be checked whenever the wheels are removed or when the system shows signs of malfunction. The following brake system checks are the most important of all the vehicle maintenance procedures you will perform to ensure safe driving.
Signs of a problem with the brake system
1. Disc brakes may have built-in friction lining wear indicators that signal that the lining wear has reached a critical level. In this case, the linings should be replaced immediately, otherwise the brake discs will be damaged and will require expensive repairs.
2. Any of the following symptoms may indicate a potential defect in the brake system:
- When you press the brake pedal, the car "pulls" to one side
- The brakes make scraping or squealing sounds when braking
- The brake pedal has excessive travel
- The brake pedal is pulsating (this is normal only when the ABS system is working)
- Brake fluid leaks are observed (usually on the inside of a tire or wheel)
3. If you notice any of these signs, inspect the brake system immediately.
Brake lines and hoses
Note: The brake system uses mostly steel brake lines, with the exception of flexible reinforced hoses at the front wheels and as connections at the rear axle. Regular inspection of all these lines is very important.
1. Park the vehicle on a level surface and turn off the engine. Remove the wheel caps. Loosen, but do not remove, the lug nuts on all four wheels.
2. Jack up the vehicle and securely place it on supports.
3. Remove the wheels (refer to Section Checking the condition of tires and their pressure. Designation of tires and wheel rims. Rotation and replacement of wheels and the materials of the chapter User manual).
4. Check all brake lines and hoses for cracks, abrasions in their outer coating, leaks, bulges and deformations. Check the brake hoses at the front and rear of the vehicle for signs of softening, cracks, deformations or wear due to friction with other components. Check all fittings for signs of leaks and make sure that all bolts and clamps on the brake hoses are securely fastened.
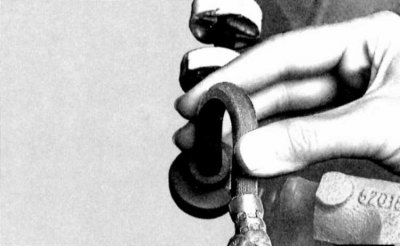
5. Bend the brake hose in both directions with your hands to identify damage. Do not twist the hoses. Follow the direction of the color line on the hose!
6. Turn the steering wheel to the right and left until it stops. The hoses should not touch the vehicle's structural elements.
7. If any fluid leaks or damage are found, they should be repaired immediately. For a more detailed description of the brake system repair procedure, refer to Chapter Brake system.
Checking the thickness of brake pads
Note: The thickness of the outer brake pads can be checked through the opening in the wheel disc using a flashlight.
The inner pad can be checked with a flashlight and a mirror. If you need to estimate the pad thickness more accurately, remove the wheel and measure the pad with a caliper.
Front disc brake
Note: Experience shows that brake pad wear on the front passenger side wheel is greater than on the driver side.
Therefore, to check the thickness of the brake pad, it is recommended to remove the wheel from the front passenger side.
1. Mark the position of the front wheel in relation to the hub with paint. This will allow the balanced wheel to be set in its working position. Loosen the wheel mounting bolts. The car must be on the ground.
2. Raise the front of the car and place it on stands. Remove the front wheel.
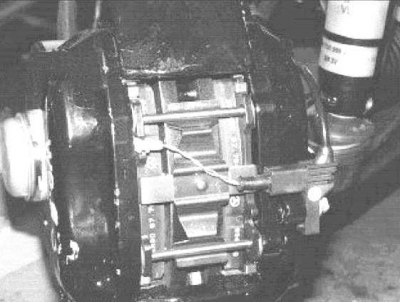
3. Measure the thickness of the pad with a metal lining on the inner and outer brake pads using a caliper.
4. The wear limit of the front pad is considered to be 7 mm thick (with base plate). In this case, the brake pad must be replaced, refer to Chapter Brake system.
5. Install the front wheel so that the markings applied during removal match. Do not lubricate the wheel mounting bolts. Install the wheel mounting bolts.
6. Lower the vehicle onto its wheels and tighten the bolts.
Note. According to experience, 1 mm of brake pad wear corresponds to at least 1000 km of vehicle mileage. This rule corresponds to unfavorable vehicle operating conditions. Under normal conditions, pad wear is significantly less. With a pad thickness of 10.0 mm (with base plate) the pad can still be used for at least 3000 km.
Rear wheel disc brake
1. Check the thickness of the outer brake pad through the opening in the wheel disk, using a pocket flashlight if necessary. There is no need to remove the wheel disk. If there is a wheel cap, it must be removed.
2. Check the inner shoe using a lamp and a mirror.
3. The wear limit of the rear and front wheel brake pads is considered to be a thickness of 7 mm, including the base plate.
Parking brake
The simplest, and perhaps most obvious, way to test the parking brake is to park the vehicle on a steep hill with the brakes applied and the transmission in neutral (you must be in the car during the check). If the parking brake does not prevent the vehicle from rolling, it should be adjusted as described in Chapter Brake system.
Article obtained from this portal: www.mercedesman.ru