



Contents: General information ↡ Vacuum hoses ↡ Fuel hoses ↡ Metallic lines ↡ Power steering hoses ↡ Cooling system hoses ↡
Warning! Air conditioning hoses must be replaced at a dealership service station or a specialist workshop equipped to safely relieve system pressure. Never disconnect system hoses or remove system components without first relieving the pressure.
General information
Exposure to high temperatures in the engine compartment will gradually deteriorate the rubber and plastic hoses used in various systems. Hoses should be checked regularly for cracks, loose clamps, hardening of materials, and signs of leaks.
Information regarding coolant hoses is provided below, and information regarding brake hoses is provided in Section Checking the brake system.
Most (but not all) hoses are secured with clamps. Where clamps are used, check that they are securely fastened to prevent leaks. If clamps are not used, check that the hose at the fitting has not swollen and/or hardened, allowing leaks.
If there are signs that there is a leak of some kind of fluid, but you cannot identify the type of fluid or the exact source, then you should leave the car for a long time and put a large piece of paper or rag under the car. This will help to find the place of the leak and also help to identify the fluid by color. But keep in mind that some leaks may only appear when the engine is running.
Vacuum hoses
1. Vacuum hoses, especially those used in emission control systems, are usually color-coded or have colored stripe inserts. Different systems require hoses with different wall thicknesses, heat resistance, and resistance to collapse. When replacing hoses, make sure the material of the new hose matches the material of the old one.
2. Often the only reliable way to check the condition of a hose is to remove it completely from the vehicle. If removing more than one hose, be sure to clearly label the hoses and fittings to ensure proper reassembly.
3. When checking the vacuum hoses, be sure to also check the plastic T-joints. Inspect them for cracks that could cause leaks.
Caution: When using this type of stethoscope, be careful not to allow contact with moving components in the engine compartment, such as the drive belt, cooling fan, etc.)
4. A leak in the vacuum hose means that air is being sucked into the hose (but it doesn't come out of the hose), making the leak very difficult to detect. A small piece of vacuum hose can be used as a stethoscope to detect vacuum leaks. When the end of the hose is directly over the leak, a hissing sound will be clearly audible through the hose. Listen to all vacuum hoses and connections for the characteristic hissing sound that indicates a leak. Avoid contact with hot or moving parts, as the engine must be running during testing.
Fuel hoses
Warning! When inspecting or servicing fuel system components, certain precautions must be taken. Perform all work in a well-ventilated area and keep away from open flames (for example, lit cigarettes) or unprotected lampshades to the work site. Immediately collect spilled fuel with rags, which are then placed in a place where it cannot spontaneously ignite. If fuel gets on your skin, immediately wash it off with plenty of water and soap. When working with the fuel system, wear safety glasses and always have a fire extinguisher at hand.
1. Fuel hoses are usually under pressure, so when disconnecting them, be prepared for fuel to spray out and need to be collected.
Caution: Before servicing the fuel hoses, the fuel injection system must be depressurized.
2. Check all rubber fuel hoses for signs of wear and tear. Pay particular attention to bends and in front of fittings, such as where the hose connects to the fuel pump or filter, where cracks may form.
3 Use only high quality fuel hoses. Never, under any circumstances, use unreinforced vacuum hoses, clear plastic tubing or water hoses as fuel hoses.
4. Band-type clamps are commonly used to secure fuel hoses. These clamps will loosen over time and may "pop out" when removed. When replacing hoses, replace these clamps with screw-type clamps.
5. Fuel leaks are difficult to pinpoint until the leak is significant and therefore easily visible. Fuel tends to evaporate quickly once it comes into contact with air, especially in a hot engine bay. Small droplets may disappear before you can pinpoint the leak. If you suspect a fuel leak in the engine bay area, then cool the engine and start it while it is cold with the hood open. Metal objects shrink as they cool and rubber hoses tend to loosen, so any leaks will be more obvious as the engine warms up when starting from cold.
Metallic lines
1. There are often sections of metal tubing between the fuel pump and the fuel injection system. Check these tubing carefully for dents, twists, or cracks.
2. If a section of metal line needs to be replaced, use only seamless steel tubes, as copper and aluminum tubes are not strong enough to withstand vibrations caused by engine operation.
3. Check the metal brake lines where they connect to the master cylinder and to the pressure regulator or ABS (if it exists) for cracks or loose fittings. Any signs of brake fluid leakage require immediate and thorough inspection of the entire brake system.
Power steering hoses
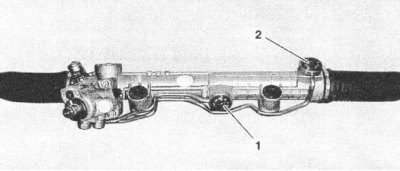
Check the power steering hoses for signs of fluid leaks, loose fittings and worn clamps. Check the lower 1 and upper 2 steering damper line connections for leaks. Leaking hoses and worn clamps should be replaced.
Cooling system hoses
1. Cooling system leaks are usually detected by a white or rust-colored coating in the area adjacent to the leak.
2. Carefully inspect the radiator and coolant hoses along their entire length. Replace any hoses that are cracked, torn, or showing signs of wear. Cracks are easier to spot if the hose is pinched. Pay particular attention to the clamps that secure the hoses to the cooling system components. Hose clamps that have been tightened too much can cause the hose to rupture or puncture, resulting in leaks in the cooling system. Inspect all hoses and hose connection surfaces for leaks. If any leaking problems of this nature are found, replace that component or gasket.