
Cars BMW Cars Volkswagen Cars Chevrolet Cars Land Rover Cars Lada Cars Honda Cars Peugeot
English Русский
Български
Беларускі
Український
Српски
Hrvatski
Română
Polski
Slovenský
Magyar
Bookmark News and articles Sitemap Feedback Site search
MercedesMan.ru


A-Class C-Class E-Class G-Class M-Class S-Class Others
W116 (1972-1980, petrol) W126 (1979-1991, petrol) W140 (1991-1998) W220 (1998-2005)
  • Main
  • S-Class
  • W220 (1998-2005)
  • General information
  • Maintenance
  • Changing engine oil and oil filter

Changing engine oil and oil filter (Mercedes-Benz S-Class W220)

0
Contents: Recommendations ↡ Removal engine oil ↡ Replacing the oil filter ↡ Filling engine oil ↡
Warning! Prolonged skin contact with used engine oil is quite dangerous. Use a protective cream and wear gloves during this procedure. Change oil-soaked clothing immediately.


Recommendations


Frequent engine oil changes are the most important preventative maintenance procedure available to the amateur mechanic. Over time, oil is susceptible to dilution and contamination, leading to premature engine wear.

Engine oil can be pumped out using a special probe (available at gas stations) through the dipstick tube. After this, it is usually necessary to fill the system with oil.

Do not dispose of used oil with household waste or in any other way. This may cause environmental pollution.

When changing the oil, it is advisable to attach a tag to the engine with the oil brand and its viscosity.

The use of oils of different types has an adverse effect on engine operation. It is also not recommended to mix different brands of oils. Engine oils of the same type and brand, but of different viscosity, can be mixed if necessary, particularly in the off-season.

Necessary tool:
  • Inspection pit or hydraulic lift with supports (if the oil is not sucked out).
  • Head for unscrewing the drain plug.
  • Special tool for unscrewing the filter (filter wrench, strap wrench or HAZET 2172 tool).
  • Oil collection container (if the oil is not sucked out) with a capacity of at least 6 liters.

Necessary spare parts and consumables:


  • Only if oil is not sucked out: aluminum or copper sealing ring for drain plug (sometimes supplied with an oil filter).
  • Oil filter.
  • Required amount of engine oil. Use oil approved by the manufacturer, refer to Specifications.

Removal engine oil


Engine oil can also be removed by suction, using a probe, through the dipstick hole.

1. Warm up the engine to operating temperature (oil temperature +60°C).

2. Raise the car horizontally.

3. Place a container under the oil pan to collect the used oil.
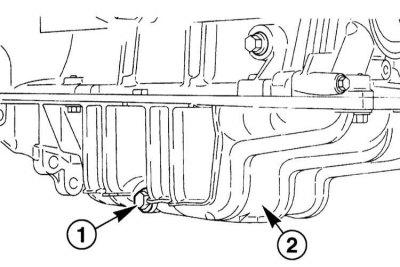
3. Place a container under the oil pan to collect the used oil.


4. Remove the drain plug from the oil pan (1 in the illustration) and drain the oil completely.

Caution! If the used oil contains a large amount of metal shavings and wear products, this indicates the presence of scoring, for example, in the crankshaft bearings and connecting rod bearings. To avoid damage after the repair, it is necessary to thoroughly clean the oil channels and hoses. Additionally, it is necessary, if any, to replace the oil radiator.


5. Then screw in the drain plug with a new sealing ring. Do not exceed the tightening torques specified in the Specifications, otherwise this may lead to leakage and damage.


6. Lower the car onto its wheels.

Replacing the oil filter
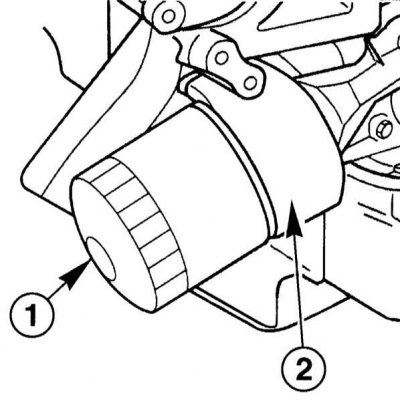


Replacing the oil filter


1. Unscrew the oil filter from below. There is a special tool for unscrewing the oil filter, for example, HAZET 2172. You can also insert a pointed screwdriver into the filter from the side. After this, the oil will immediately start pouring out - place a container underneath.

2. Clean the oil filter flange with fuel. Remove any remaining gasket from the flange.

3. Lubricate the new oil filter gasket with a thin layer of engine oil.

4. Tighten the new oil filter securely using finger force only. After the gasket is seated against the flange, tighten the filter another half turn. Pay attention to the notes on the filter housing.

5. Tighten the drain plug with a new ring to the torque specified in the Specifications.

Filling engine oil


Caution! When starting the turbodiesel for the first time after changing the oil, it is necessary to ensure that the engine first runs at idle speed until the oil pressure indicator lamp goes out. Only after reaching the required oil pressure can the gas be increased. If the gas is given when the indicator lamp is lit, the turbocharger may be damaged due to insufficient oil.


Publication reprinted from this resource [mercedesman]

1. Open the cap and pour new oil into the filler neck of the cylinder head cover.

2. When changing the oil, use new oil of the same type and, if possible, the same brand. Each time you change the oil, attach a plate to the engine indicating the brand and viscosity of the oil you have added.

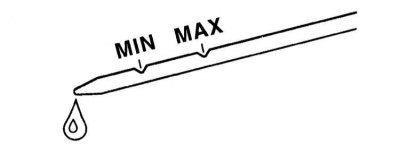
Attention! It is recommended to initially fill in 0.5 l less oil. Warm up the engine and after a few minutes, check the oil level using the indicator, top up if necessary. Remove excess oil, otherwise the engine seals and catalytic converter may be damaged.

Attention! It is recommended to initially fill in 0.5 l less oil. Warm up the engine and after a…


3. Add oil up to the MAX mark. If the oil level is higher, the oil must be sucked out.

4. After a test drive, check the drain plug and oil filter for leaks and carefully top up with oil if necessary.

5. After 3 minutes from stopping the engine, check the oil level again and add or remove oil if necessary.
This article is available at: russian, bulgarian, belarusian, ukrainian, serbian, croatian, romanian, polish, slovak, hungarian
The article has been verified: Khromov Roman Mikhailovich
Share with friends:
◀ Previous
S-Class W220 / Maintenance
Next ▶

Checking the condition of tires and their pressure. Designation of tires and wheel rims. Rotation and replacement of wheels
Checking fluid levels, leak control
General information about the setup
Schedule of current maintenance
Active Maintenance Warning System (ASSYST)
Checking the brake system
Checking the fuel system
Checking the condition and replacing engine compartment hoses, localizing leaks
Checking the condition of the ribbed belts of the serpentine drive of auxiliary units
Checking the cooling system operation and frost resistance. Liquid replacement
More similar articles for repairing other models

☛ Engine Oil and Oil Filter — Replacement Mercedes W168 (1997-2004)
☛ Changing engine oil and oil filter Mercedes W203 (2000-2007)
☛ Changing oil and oil filter, checking oil level Mercedes W123 (1976-1985)
☛ Changing engine oil and oil filter Mercedes W463 (1999-2019)
☛ Changing engine oil and oil filter Mercedes W163 (1997-2005)
☛ Changing engine oil and oil filter Mercedes Vito 1 (1996-2003)
Link in different formats to this article
Comments and feedback from visitors
No comments yet


How much will 36 + 44 ?


W220 (1998-2005) 
  • General information
  • Introduction to guide
  • User manual
  • Maintenance
  • Power unit
  • Engine repair
  • Cooling and heating systems
  • Power and exhaust systems
  • Ignition and control system
  • Charge and launch systems
  • Transmission
  • Automatic gearbox
  • Drive shafts
  • Chassis
  • Brake system
  • Front suspension
  • Rear suspension
  • Steering
  • Body
  • Body elements
  • Electrical equipment
  • Equipment and devices
  • Electrical circuits
W140 (1991-1998) 
  • User manual
  • Controls and instruments
  • Driving and operation
  • Maintenance
  • Power unit
  • Petrol engine V6
  • Petrol engine V8
  • Petrol engine V12
  • Diesel engine OM603
  • Diesel engine OM606
  • Cooling system
  • Power supply and injection system
  • Control system HFM-SFI
  • Control system LH-SFI
  • Control systems ME-SFI
  • Diesel control system
  • Ignition system
  • Charge and launch system
  • Transmission
  • Mechanical gearbox 717.438
  • Mechanical gearbox 717.454
  • Automatic gearbox 722.5
  • Automatic gearbox 722.6
  • Clutch and drive shafts
  • Differential
  • Chassis
  • Brake system
  • Steering
  • Front suspension
  • Rear suspension
  • Body
  • Exterior (external elements)
  • Interior (internal elements)
  • Electrical equipment
  • Equipment and devices
  • Electrical circuits
W126 (1979-1991, petrol) 
  • Power unit
  • Engine repair
  • Ignition system
  • Lubrication system
  • Cooling system
  • Fuel system
  • Fuel injection system
  • Transmission
  • Clutch and cardan
  • Mechanical gearbox
  • Automatic gearbox
  • Chassis
  • Front suspension
  • Rear suspension
  • Steering
  • Brake system
  • Electrical equipment
  • Power devices
  • Electrical circuits
W116 (1972-1980, petrol) 
  • General information
  • Introduction to guide
  • Power unit
  • 8-cylinder V8 engine
  • 6-cylinder I6 engine
  • Cooling and lubrication system
  • Power system (carburetor)
  • Fuel injection system
  • Ignition system
  • Transmission
  • Clutch and cardan
  • Car gearbox
  • Chassis
  • Front suspension
  • Rear suspension
  • Steering
  • Brake system
  • Electrical equipment
  • Power devices
  • Electrical circuits
 
MercedesMan.ru © 2017–2026 · Mobile version · Read about Mercedes · Sitemap: EN BG BY UA RS HR RO PL SK HU · Feedback · Site search · Bookmark A-Class (W168) · C-Class (W201) · C-Class (W202) · C-Class (W203) · E-Class (W123) · E-Class (W124) · E-Class (W210) · G-Class (W463) · M-Class (W163) · S-Class (W116, petrol) · S-Class (W126, petrol) · S-Class (W140) · S-Class (W220) · Sprinter · Vito 1 · Vito 2 · Vario 814D ·
 
We only use cookies without which some of the site's features may not be available.