
Cars BMW Cars Volkswagen Cars Chevrolet Cars Land Rover Cars Lada Cars Honda Cars Peugeot
English Русский
Български
Беларускі
Український
Српски
Hrvatski
Română
Polski
Slovenský
Magyar
Bookmark News and articles Sitemap Feedback Site search
MercedesMan.ru


A-Class C-Class E-Class G-Class M-Class S-Class Others
W123 (1976-1985) W124 (1984-1995) W210 (1996-2002)
  • Main
  • E-Class
  • W210 (1996-2002)
  • Gasoline engines
  • Cooling system
  • Cooling liquid

Cooling liquid (Mercedes-Benz E-Class W210)

0
Contents: Coolant level sensor ↡ Replacing the coolant ↡ Checking the coolant ↡
The coolant consists of a mixture of antifreeze and water with the addition of corrosion protection additives. Mercedes pours a concentrate into the cooling system of its engines, the chemical composition of which is developed specifically for the company's engines. The proportions of water and antifreeze depend on the total amount of coolant in the cooling system of each type of engine. The proportion of antifreeze should be 50% - this protects the liquid from freezing at a temperature of -37°C. If the antifreeze content is more than 50%, the heat transfer of the coolant worsens. If the proportion of antifreeze is less than 40%, its effect worsens, primarily anti-corrosion protection, and at negative temperatures, the coolant begins to thicken.

Important: If coolant needs to be topped up, do not add just distilled water; antifreeze and corrosion protection are also needed.

Coolant level sensor


The coolant level sensor for petrol engines has the same design as the sensor for diesel engines. All practical advice, work on checking the sensor and its operation are similar to those described for diesel engines in Section 4 "Diesel Engines".

Replacing the coolant


"120,000 km every 4 years"


4-cylinder engine


1. Carefully unscrew the expansion tank cap, release excess pressure from the cooling system.

Warning! Be careful, there is a risk of burns when the engine is hot.


2. Set the heater control on the instrument panel to the maximum heating position.

3. Remove the crankcase guard from below.
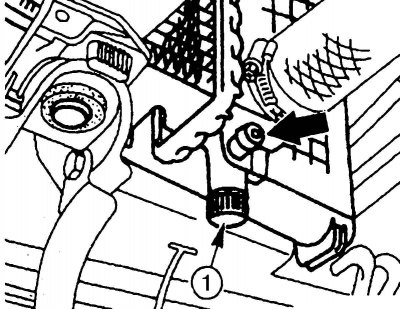
Fig. 5.26. Radiator drain plug: 1 - cork

Fig. 5.26. Radiator drain plug: 1 - cork


4. Place a collecting container under the radiator and engine, unscrew the drain plug 1 on the bottom of the radiator (Fig. 5.26) and drain the coolant. A short hose can be put on the nipple on the side (inner diameter 12 mm), to direct the liquid into the container.
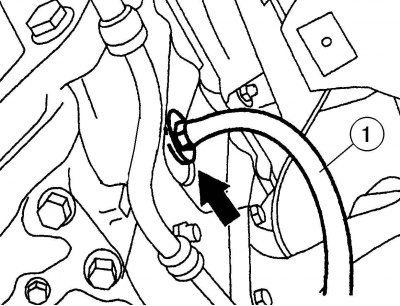
Fig. 5.27. Putting the hose on the cylinder block nipple: 1 – hose

Fig. 5.27. Putting the hose on the cylinder block nipple: 1 – hose


5. Place hose 1 (Fig. 5.27) with an internal diameter of 14 mm onto the drain nipple on the right side of the engine block and open it.


6. To help the coolant drain better, remove the cap from the expansion tank. Drain the coolant and cover the receiving container.

7. After completely draining the coolant, flush the radiator with clean water.

8. To fill the coolant, tighten the plug on the engine cylinder block and the radiator drain plug.

9. Install the crankcase guard.
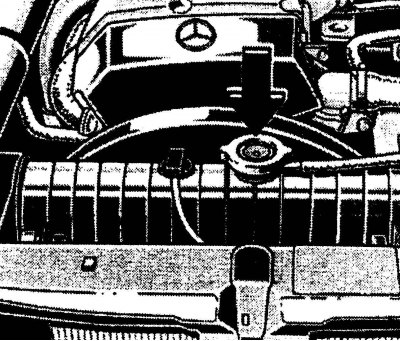
Fig. 5.28. Radiator filler neck

Fig. 5.28. Radiator filler neck


10. Slowly pour in the coolant through the filler neck (Fig. 5.28), while the liquid level should reach the ledge on the bottom of the expansion tank (visible when the lid is open), which corresponds to a distance of 5.5 cm to the upper edge of the filler pipe.

11. Start the engine and let it run at high speed for about 2 minutes. Set the heater to maximum heat. At the same time, constantly add coolant to the expansion tank.

12. Screw on the expansion tank cap.

13. Let the engine run until the fan comes on, then stop the engine.

14. Check the coolant level and top up if necessary.

15. Warm up the engine. Air from the cooling system will come out through the expansion tank cap. Check the coolant level again. Add a little water if necessary.


Features of replacing the coolant of a 6-cylinder engine


1. Turn the two-stage expansion tank cap 1/2 turn and relieve the pressure in the system. Turn the cap and remove it.

Note: The 6-cylinder engine has a two-stage pressure cap. As a result, after the engine is stopped, the pressure in the system can increase to 2 bar, and the liquid will not flow out.


2. Before filling the system, unscrew the temperature sensor on the thermostat housing.

3. Fill the cooling system until fluid begins to flow out of the thermostat hole.

4. Screw in the temperature sensor and add fluid to the norm.

5. Screw the cap on so that the protrusion on the expansion tank is fixed.

Features of replacing the coolant of an 8-cylinder engine


6. The engine has a two-stage expansion tank cap.

7. There are two drain valves on the engine cylinder block.

Checking the coolant


Regularly check the concentration of antifreeze in the coolant before the onset of cold weather, especially if you added water to the system during operation.

Publication taken from an online resource mercedesman.ru

To check, you will need a densimeter - a device for measuring density. You can convert the resulting density value into the freezing point of the coolant.

Sequence of works


1. Start the engine and warm it up until the upper coolant supply hose to the radiator becomes warm.


2. Carefully open the expansion tank cap.

Warning! There is a risk of getting burned.
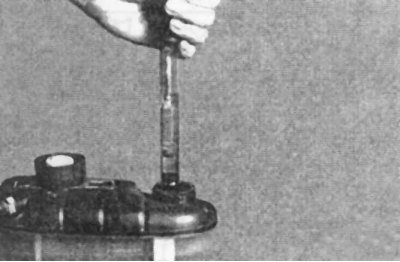

Fig. 5.29. Checking the coolant using a densimeter

Fig. 5.29. Checking the coolant using a densimeter


3. Draw in the coolant using a densimeter and determine the density based on the position of the float (Fig. 5.29).

Note: The concentration of antifreeze for our latitudes should prevent the cooling liquid from freezing to a temperature of –37°C, for regions with a cold climate – to –45°C.


Attention! Daimler-Benz permits the use of antifreezes of its own manufacture only. In case of malfunctions caused by the use of antifreezes of other manufacturers, the warranty is void.


4. Add antifreeze to the cooling system in the volume specified in Table 5.5 to ensure the required freezing temperature when operating the vehicle in a given region.

Table 5.5. Volume of antifreeze concentrate to obtain the required freezing point of the coolant
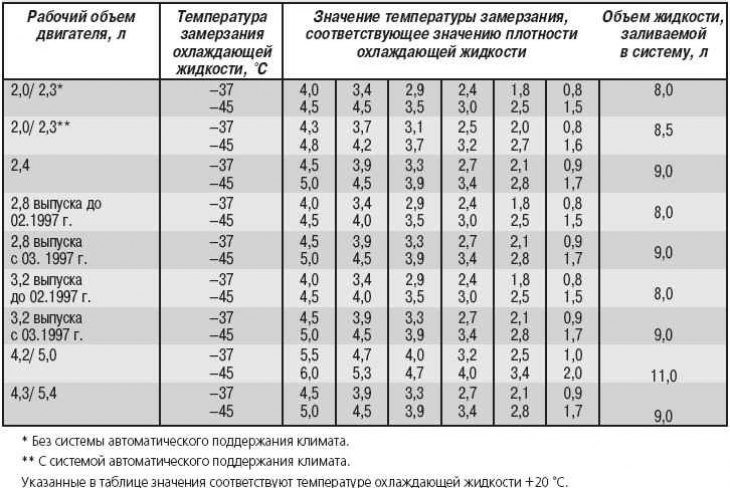


Table 5.5. Volume of antifreeze concentrate to obtain the required freezing point of the coolant

Example of using the table. If the density of the antifreeze on an engine with a working volume of 2.0 liters corresponds to a freezing temperature of -10°C, then in order to obtain a freezing temperature of -37°C, it is necessary to drain 3.1 liters of coolant and pour the same amount of antifreeze concentrate into the system. To obtain a freezing temperature of -45°C, it is necessary to replace 3.7 liters.

5. Close the expansion tank cap, take a test drive, and check the antifreeze concentration again.
This article is available at: russian, bulgarian, belarusian, ukrainian, serbian, croatian, romanian, polish, slovak, hungarian
The article has been verified: Polyakov Zakhar Grigorievich
Share with friends:
◀ Previous
E-Class W210 / Cooling system
Next ▶

Checking the tightness of the cooling system
Additional electric fan
Features of the cooling system of 6- and 8-cylinder engines
Excessive pressure in the cooling system
Coolant circulation
Thermostat — Removal, Installation and Checking
Removal and installation the radiator (for 2.0 and 2.3 l engines)
Possible malfunctions of the cooling system, their causes and methods of elimination
More similar articles for repairing other models

☛ Checking the tightness of the cooling system Mercedes W168 (1997-2004)
☛ Liquid Cooling System Pump — Removal and Installation Mercedes W202 (1993-2000)
☛ Checking the cooling system and coolant, replacing the liquid Mercedes W463 (1999-2019)
☛ Checking the cooling system and frost resistance of the coolant,… Mercedes W163 (1997-2005)
☛ Checking the functioning of the cooling system and frost resistance… Mercedes W140 (1991-1998)
☛ Checking the level of liquid in the cooling system Mercedes Sprinter (1995-2000, diesel)
Link in different formats to this article
Comments and feedback from visitors
No comments yet


How much will 35 + 26 ?


W210 (1996-2002) 
  • General information
  • Vehicle description
  • Working conditions and tools
  • Car care
  • Diesel engines
  • Engine repair
  • Lubrication system
  • Cooling system
  • Injection system
  • Supply system
  • Exhaust system
  • Gasoline engines
  • Engine repair
  • Lubrication system
  • Cooling system
  • Control system
  • Power and exhaust system
  • Transmission
  • Clutch
  • Mechanical gearbox
  • Automatic gearbox
  • Drive shafts
  • Chassis
  • Car suspension
  • Steering
  • Tires and wheels
  • Brake system
  • Body
  • Exterior (external elements)
  • Interior (internal elements)
  • Doors and windows
  • Heating and ventilation
  • Electrical equipment
  • Equipment and devices
  • Power devices
  • Lighting and signaling
  • Electrical circuits
W124 (1984-1995) 
  • General information
  • Governing bodies
  • Driving and operation
  • Weekly care
  • Maintenance (gasoline)
  • Maintenance (diesel)
  • Troubleshooting
  • Power unit
  • I4 petrol engine
  • V6 petrol engine (SOHC)
  • V6 petrol engine (DOHC)
  • Diesel engines
  • Engine overhaul
  • Cooling system
  • Heating and ventilation
  • Fuel system (carburetor)
  • Injection system «Bosch CIS-E»
  • Injection system «Bosch HFM»
  • Diesel fuel system
  • Supply system
  • Starting and charging system
  • Ignition system (I4)
  • Ignition system (V6)
  • Preheating
  • Transmission
  • Clutch
  • Mechanical gearbox
  • Automatic gearbox
  • Drive shafts
  • Chassis
  • Brake system
  • Car suspension
  • Steering
  • Body
  • Exterior (external elements)
  • Interior (internal elements)
  • Doors, locks and windows
  • Electrical equipment
  • Equipment and devices
  • Switches
  • Headlights and lighting
  • Electrical circuits
W123 (1976-1985) 
  • General information
  • Introduction to the guide
  • Power unit
  • Engine device
  • Repair M102 engines
  • Repair M110 and M123 engines
  • Cooling and lubrication (M102)
  • Cooling (M110 and M123)
  • Ignition system
  • Power system «Stromberg»
  • Power system «Solex 4A1»
  • Fuel injection «K-Jetronic»
  • Fuel injection «L-Jetronic»
  • Transmission
  • Clutch
  • Mechanical gearbox
  • Automatic gearbox
  • Cardan and rear axle
  • Chassis
  • Front suspension
  • Rear suspension
  • Steering
  • Brake system
  • Body
  • Exterior (external elements)
  • Interior (internal elements)
  • Doors, locks and windows
  • Electrical equipment
  • Equipment and devices
  • Power devices
  • Electrical circuits
 
MercedesMan.ru © 2017–2026 · Mobile version · Read about Mercedes · Sitemap: EN BG BY UA RS HR RO PL SK HU · Feedback · Site search · Bookmark A-Class (W168) · C-Class (W201) · C-Class (W202) · C-Class (W203) · E-Class (W123) · E-Class (W124) · E-Class (W210) · G-Class (W463) · M-Class (W163) · S-Class (W116, petrol) · S-Class (W126, petrol) · S-Class (W140) · S-Class (W220) · Sprinter · Vito 1 · Vito 2 · Vario 814D ·
 
We only use cookies without which some of the site's features may not be available.