
Removing
1. Disconnect a wire from the negative plug of the storage battery.
Attention! This deletes the codes entered into the memory devices, such as the radio code.
2. Remove the lower shield of the engine compartment.
3. Drain the coolant.
4. Remove the viscous fan.
5. Remove the fan shroud.
6. If there is an electric fan, remove it together with the casing.

Pic. 5.33. Disconnecting the cooling system hoses from the radiator: 1, 3 – cooling system hose; 2, 4 - oil pipeline; 5 - radiator
7. Disconnect hoses 1 and 3 from the radiator (pic. 5.33) cooling system, after loosening and sliding the fastening clamps.
For models with automatic transmission:
8. Clamp oil lines 2 and 4 with clamps (pic. 5.33), to and from the gearbox. At the same time, observe sterility. Clean the connections from the outside with alcohol.
9. After disconnection, cover the ends of the pipes with plastic bags and secure them to the pipes.
For all models:
10. Remove the air intake.
For models with air conditioning:
11. Disconnect the grille from the front transverse beam and remove it, to do this, turn the clips 90°.
For all models:
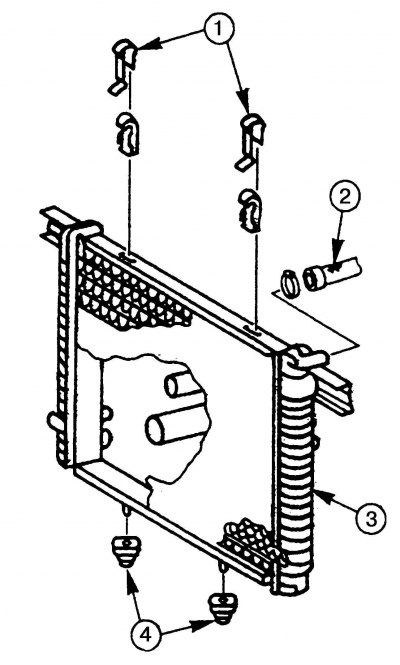
Pic. 5.34. Removing the radiator spring clips: 1 - spring clip; 2 – the top hose of a radiator; 3 - radiator; 4 - rubber radiator support
12. Disconnect from radiator 3 (pic. 5.34) radiator hose 2, after loosening and sliding the clamp back.
13. Remove spring clips 1.
For models with air conditioning:
14. Turn away five bolts and remove a forward cross member.
15. Unhook the hood opening rod from the cross member and remove it.
For all models:
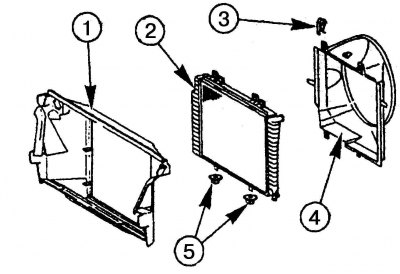
Pic. 5.35. Air duct disconnection: 1 - air duct; 2 - radiator; 3 – fan casing lock; 4 - fan casing; 5 - rubber support radiator
16. Disconnect air duct 1 (pic. 5.35) from radiator 2.
Attention! Do not open the air conditioning circuit. Refrigerant may cause local frostbite if it comes in contact with the skin.
For models with air conditioning:
17. Unscrew the condenser from the radiator and, without disconnecting the hoses, hang it up.
For all models:
18. Remove the radiator upwards.
Installation
19. Check hoses for cracks, cuts or other damage.
20. Check the condition of the rubber feet 5 (pic. 5.35).
21. Install the radiator 2 from above so that its guides fit into the holes of the rubber supports 5 on the lower cross member.
22. Attach air duct 1 to the radiator.
For models with air conditioning:
23. Attach the condenser to the radiator.
24. Install the front cross member and secure it with five bolts.
25. Fasten the hood lock opening rod to the cross member.
For all models:
26. Install the air intake.
27. Insert spring clips 1 from above (pic. 5.34) radiator.
28. Connect the cooling system hoses to the radiator and secure them with clamps.
29. Wrap the union nuts of the oil lines with a torque of 20 Nm and remove the clamps.
For models with air conditioning:
30. Install the radiator grille, insert both clips into the holes and rotate 90°to the right.
For all models:
31. Install the fan cover if removed.
32. Install a viscous fan.
33. Establish the electric fan with the directing case if it acted in film.
34. Fill the cooling system with coolant.
35. Connect a wire to the negative plug of the storage battery.
36. Start the engine and warm it up to operating temperature.
37. Check the tightness of all connections.
38. Check the coolant level, top up if necessary.
39. Enter the codes into the memory device.