
Sequence of work
Illumination in sun visors
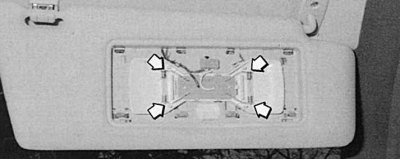
Pic. 10.20. Soffit lamps in sun visors mounted in spring contacts (arrows)
Pry off the cover with a screwdriver (hole in bottom edge) (pic. 10.20).
Glove box lighting
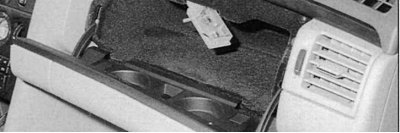
Pic. 10.21. Replacing the lamp in the glove box
To replace the soffit lamp, remove the lamp from the niche (pic. 10.21).
Light in the trunk
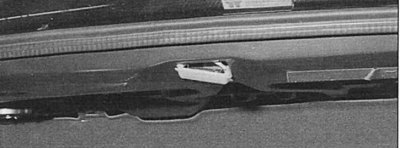
Pic. 10.22. Replacing the lamp in the trunk
With the trunk open, press the lamp at the back, remove it from the niche and replace the soffit lamp (pic. 10.22).
Instrument cluster lighting
Lamps with a glass base for lighting and very small lamps are installed in combination from the inside. Therefore, to replace them, you must first remove the instrument cluster.
Switch lighting
The backlights are partially non-removable and are replaced along with the switches. Some switches, however, have lamps with a glass base and plug-in contacts. To replace them, first remove the switch from the instrument panel.
Heating control lighting
Remove the two rotary switches for fan and air distribution using cloth-wrapped tongs. Outside, on the side of the switch axis, there is a small white cover. Slide it out and use a sharp tool to replace the glass base lamp underneath.
Light switch lighting
Pull out the rotary switch. Below it is a lamp with a glass base, which should light up when the rear fog lights are turned on.
Ashtray lighting
Remove the ashtray insert. Under the cigarette lighter, a lamp with a glass base is installed on the side. Carefully replace it with a cloth-wrapped tool.
Automatic transmission selector
Unscrew the center console trim and lift slightly. In front, on the left side of the switching mechanism, there is a plug-in lamp socket with a glass base.
Lamp replacement
If a recently replaced bulb stops working, it doesn't always mean it's burned out. As a general rule, on older machines, corrosion often interferes with the flow of current to the lamp socket. In this case, the lamp will light up if it is moved in the cartridge. In this case, clean the socket and lamp contacts. Check that the bulb is in contact with the socket.
It is easy to check with a probe lamp whether voltage is applied to the cartridge. To do this, find the lamp on the wiring diagram and check its circuit.
If you touched the glass bulb with your bare hands before installing the lamp, be sure to then wipe it with a clean cloth, because the remaining traces of moisture then evaporate from the hot lamp, causing the diffuser to become cloudy.
On the instrument cluster board, the current to the lamps passes through flat copper connecting tracks. If the resulting scratch interrupts such a track, you can make a jumper in this place from a piece of wire by soldering its ends on both sides of the scratch.