
Replacing headlights
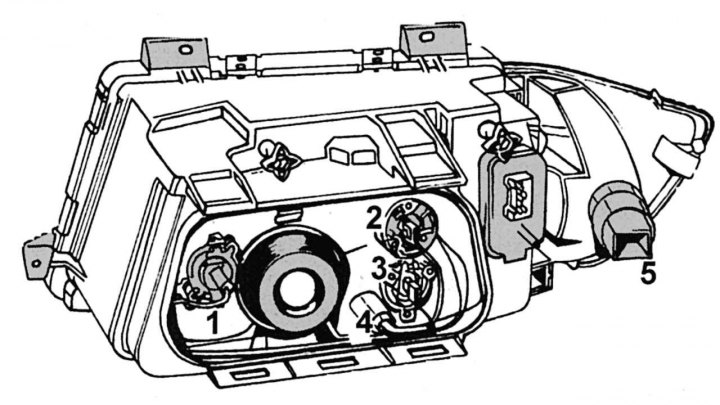
Pic. 318. Block headlight headlight from the back (with arrangement of lamps and contacts): 1 - high beam lamp, H1, 12 V, 55 W; 2 - low beam lamp, H1, 12 V, 55 W; 3 - front fog lamp, H1, 12 V, 55 W; 4 - side light lamp, 12 V, 5 W; 5 - direction indicator lamp, 12 V, 21 W (yellow glass)
Lamps are replaced from the back of the headlights. On fig. 318 shows the mounting of lamps, contacts, etc. When replacing bulbs in headlights, do the following:
- disconnect the negative terminal of the battery. Open the hood to access the headlights from the rear;
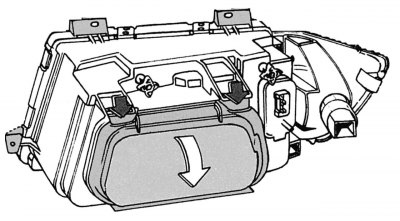
Pic. 319. Removing the cover from the back of the headlight
- remove the cover by depressing the latches (shown by arrows) from the back of the headlights, as shown in Fig. 319.
When replacing low beam bulbs
- release the fixing spring, remove the bulb 2 (see fig. 318) and disconnect the plug.
When replacing side light bulbs
- the socket with the bulb 4 is inserted from the rear side of the headlight. The cartridge is secured with a bayonet lock. To remove, press the cartridge inward and, turning, remove it.
When replacing fog lamp bulbs
- release the locking spring, pull out the bulb 3 and disconnect the plug.
When replacing headlight bulbs
- to remove the lamps, it is necessary to dismantle the headlight housing;
- release the fixing spring, remove bulb 1 and disconnect the plug;
- wrapping a new lamp with a paper towel, take it by the glass flask and install it in the cartridge. Pay attention to the correct installation.
Carry out installation work in reverse order. If the bulb was replaced in only one headlight, the adjustments should not be disturbed.