Cars BMW Cars Volkswagen Cars Chevrolet Cars Land Rover Cars Lada Cars Honda Cars Peugeot
English Русский
Български
Беларускі
Український
Српски
Hrvatski
Română
Polski
Slovenský
Magyar
Bookmark News and articles Sitemap Feedback Site search
MercedesMan.ru


A-Class C-Class E-Class G-Class M-Class S-Class Others
W116 (1972-1980, petrol) W126 (1979-1991, petrol) W140 (1991-1998) W220 (1998-2005)
  • Main
  • S-Class
  • W140 (1991-1998)
  • Electrical equipment
  • Equipment and devices
  • Replacing incandescent lamps

Replacing incandescent lamps (Mercedes-Benz S-Class W140)

0
Contents: Precautionary measures ↡ Replacing the H7 lamp ↡ Headlights with xenon low beam lamps: ↡ Direction indicators (PY 21 W,…↡ Turn signal repeater (WY 5W, yellow) ↡ Headlights ↡

Precautionary measures


Warning!
  • Incandescent lamps and lamp holders can be very hot. Therefore, wait until the lighting fixture has cooled down before replacing the lamps!
  • Keep lamps out of reach of children!
  • Do not use dropped or scratched lamps, they may burst!


Replacing the H7 lamp


The incandescent lamp is under pressure, so you should wear protective glasses and gloves.

Headlights with xenon low beam lamps:


There is a risk of injury due to high voltage!


Do not replace xenon lamps yourself. For work on low beam headlights, contact specialists.

Procedure execution order


Before replacing incandescent bulbs, turn off the lights to avoid short circuits.

Handle new lamps only using soft silk paper or thin gloves.

Use only 12V incandescent lamps of the same type and appropriate wattage.

Direction indicators (PY 21 W, yellow)
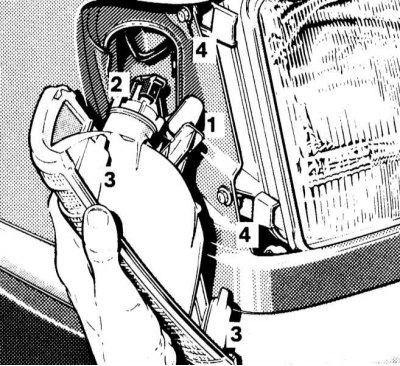


Replacing the turn signal lamp

Replacing the turn signal lamp
1 - Turn signal lamp housing clamp; 2 - Direction indicator bulb; 3 - Ledge; 4 - Guide


1. Open the hood.

2. Squeeze the clamp (1) from the engine compartment side and pull the turn signal light housing forward.

3. Turn the bulb holder with the bulb to the left and remove it. Press the bulb, turn it to the left and remove it.

4. Insert the direction indicator housing with the protrusions (3) into the guides (4) and press it back until it locks into place.

Turn signal repeater (WY 5W, yellow)


Removal


1. Move the additional turn signal lamp housing forward and remove.

2. Turn the lamp holder with the incandescent lamp to the left and remove it. Pull the incandescent lamp out of the socket.

Installation


Place the housing of the additional turn signal light on the front, press and secure it at the rear.

Headlight aiming angle


Check the headlight level regularly. The headlight leveling procedure is described in Section Decorative radiator grille - installation details Chapters Body.

Note: On models with xenon lighting, the angle of the headlight optical axes is adjusted automatically.


Headlights


Providing access to lamps in halogen headlights
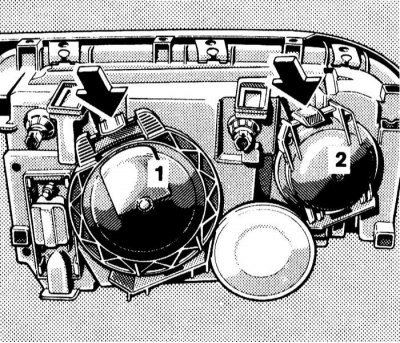


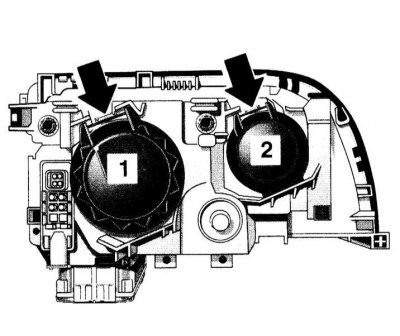
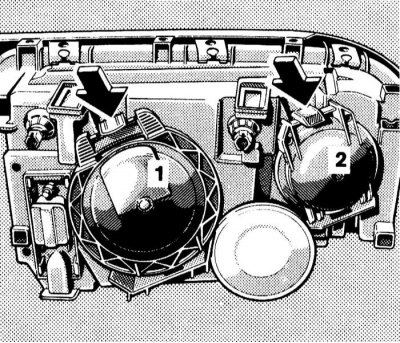
Location of access covers for halogen headlight bulbs

Location of access covers for halogen headlight bulbs
1 - Lid (parking light/one-way parking light, low beam and fog light)
2 - Lid (high beam)


Providing access to lamps in xenon headlights


Attention! Do not disconnect the plug of the low beam headlights with xenon lamps!
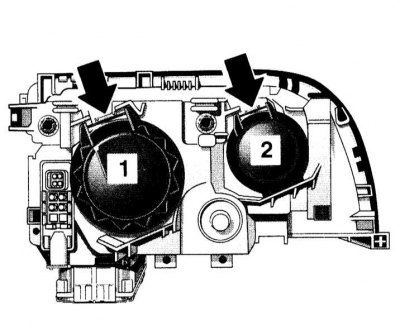

Location of xenon headlight bulb access covers

Location of xenon headlight bulb access covers
1 - Lid (parking light/one-way parking light, low beam and fog light)
2 - Lid (high beam)


Parking light/one-way parking light


Headlights with halogen lamps
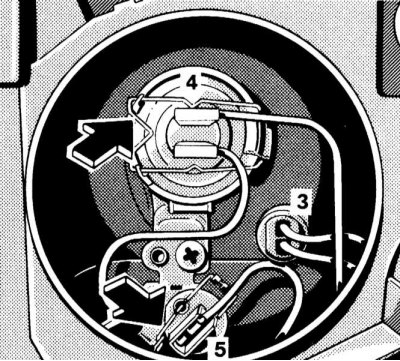


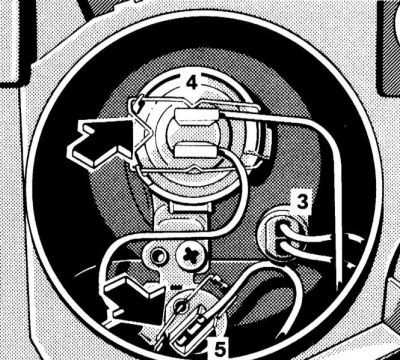
Replacing parking light bulbs (3) in halogen headlights

Replacing parking light bulbs (3) in halogen headlights
3 — Parking light/one-way parking light bulb (W 5 W)
4 — Low beam lamp (H7 55 W)
5 — Fog light bulb (H1 55 W)


1. Open the hood.

2. After pressing the retainer clip, remove the headlight housing cover (1).
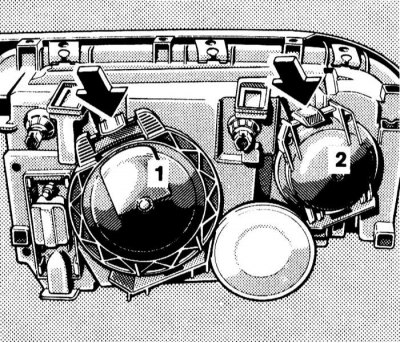
2. After pressing the retainer clip, remove the headlight housing cover (1).


3. Pull out the socket with the lamp.


4. Remove the lamp.

5. Installation is carried out in the reverse order - make sure the cartridge is securely fixed.

Headlights with xenon lamps
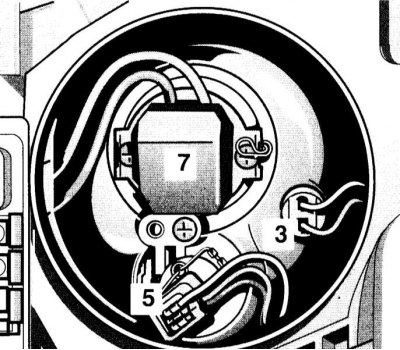


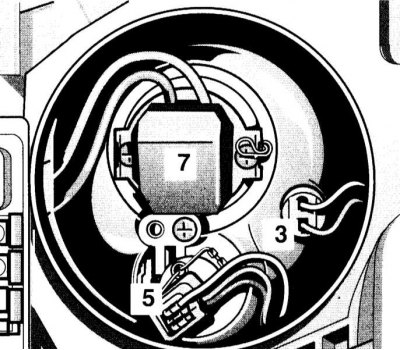
Replacing parking light bulbs (3) in xenon headlights

Replacing parking light bulbs (3) in xenon headlights
3 — Parking light/one-way parking light bulb (W 5 W)
5 — Fog light bulb (H1 55 W)
7 — Low beam lamp


1. The procedure is similar to that described above for halogen headlights.
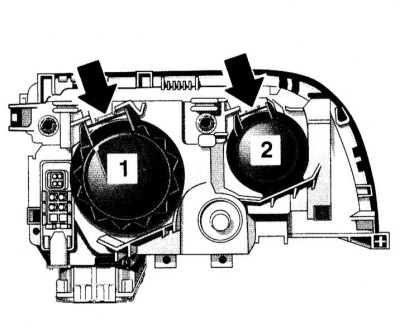
1. The procedure is similar to that described above for halogen headlights.

1. The procedure is similar to that described above for halogen headlights.


2. When installing, place the cover from below and press it from above until it locks into place.


Low beam, high beam, fog light
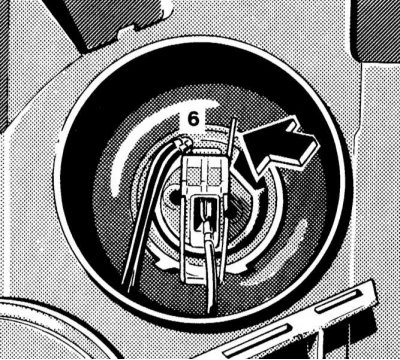


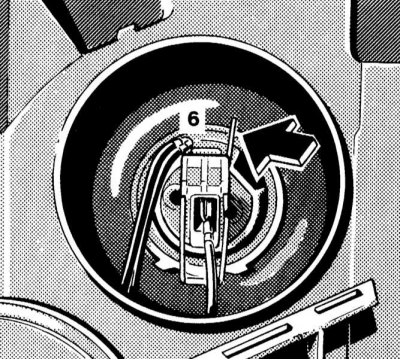
Replacing the high beam lamp (6) in xenon headlights

Replacing the high beam lamp (6) in xenon headlights
6 — High beam lamp (H1 55 W)


Warning! Risk of injury due to high voltage! Do not disconnect the plug for the low beam headlights with xenon lamps.


1. Open the hood.

2. Remove the cover above the headlight.

3. After pressing the retainer clip, remove the headlight housing cover (1) or (2).
3. After pressing the retainer clip, remove the headlight housing cover (1) or (2).

4. Disconnect the plug from the corresponding lamp.


4. Disconnect the plug from the corresponding lamp.

4. Disconnect the plug from the corresponding lamp.


5. Release the retaining spring and remove the lamp.

6. Insert the new bulb so that the base fits into the recess in the socket.

7. Place the headlight housing cover at the bottom and press at the top until it locks into place.

Attention! Rear lights
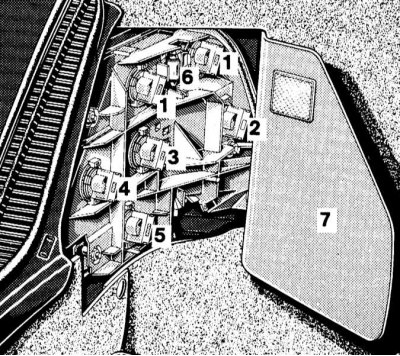

Rear combination light bulb layout diagram

Rear combination light bulb layout diagram
1 - Direction indicators (P 21 W, yellow plastic deflector/PY 21 W, yellow with grey plastic deflector)
2 — Brake light and rear side light/one-way parking light (P 21/5 W)
3 - Rear side light/one-way parking light (R5 W)

Driver's side:
4 - Rear fog light (P 21 W)
5 — Reversing light (P 21 W)
6 - Trunk lighting (With 10 W, spotlight)
7 — Access cover


1. The layout of the rear combination light bulbs is shown in the accompanying illustration.

2. Bend back the access cover panel (7).

3. Turn the lamp holder with the incandescent lamp to the left and remove it.

4. Press the bulb, turn it to the left and remove it.

5. Install the lamp holder by pressing until it locks into place.

License plate lights (With 5 W, spotlight)
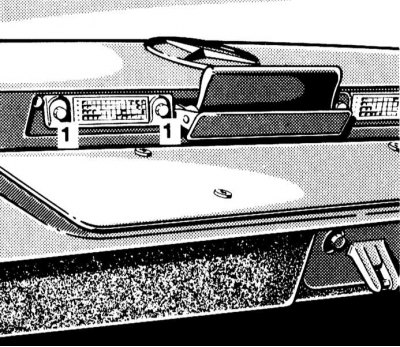


Replacing license plate light bulbs

Replacing license plate light bulbs


Unscrew the mounting screws (1) and remove the flashlight.

Attention! High-level brake light (P 21 W).


1. Press the pads on the left and right and remove the cover.
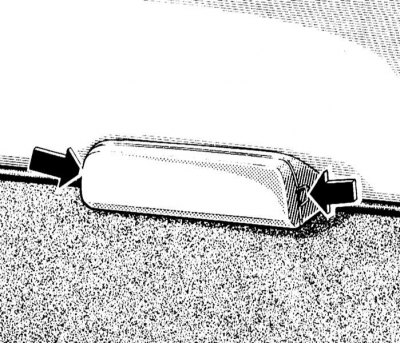
1. Press the pads on the left and right and remove the cover.


2. Turn the bulb holder with the incandescent bulb to the left and remove it. Press the bulb, turn it to the left and remove it.
This article is available at: russian, bulgarian, belarusian, ukrainian, serbian, croatian, romanian, polish, slovak, hungarian
The article has been verified: Polyakov Zakhar Grigorievich
Share with friends:
◀ Previous
S-Class W140 / Equipment and devices
Next ▶

Checking the heated rear window
Checking the windshield wiper motor
Diagnostics of faults of on-board electrical equipment — general information
Electrical Equipment Specifications
General information about on-board electrical equipment
Electrical fuses
Installation of electrical and electronic devices
Location of the main electrical components of the car body electrical system
More similar articles for repairing other models

☛ Air filter — replacing the filter element Mercedes W168 (1997-2004)
☛ Replacement of incandescent lamps for outdoor lighting devices Mercedes W203 (2000-2007)
☛ Replacing lamps Mercedes W123 (1976-1985)
☛ Instrument cluster, gauges, control lamps and indicator lights Mercedes W463 (1999-2019)
☛ Instrument cluster, gauges and control lamps and indicator lights Mercedes W163 (1997-2005)
☛ Replacing lamps Mercedes Vito 2 (2003-2014, diesel)
Link in different formats to this article
Comments and feedback from visitors
No comments yet


How much will 31 + 47 ?


W220 (1998-2005) 
  • General information
  • Introduction to guide
  • User manual
  • Maintenance
  • Power unit
  • Engine repair
  • Cooling and heating systems
  • Power and exhaust systems
  • Ignition and control system
  • Charge and launch systems
  • Transmission
  • Automatic gearbox
  • Drive shafts
  • Chassis
  • Brake system
  • Front suspension
  • Rear suspension
  • Steering
  • Body
  • Body elements
  • Electrical equipment
  • Equipment and devices
  • Electrical circuits
W140 (1991-1998) 
  • User manual
  • Controls and instruments
  • Driving and operation
  • Maintenance
  • Power unit
  • Petrol engine V6
  • Petrol engine V8
  • Petrol engine V12
  • Diesel engine OM603
  • Diesel engine OM606
  • Cooling system
  • Power supply and injection system
  • Control system HFM-SFI
  • Control system LH-SFI
  • Control systems ME-SFI
  • Diesel control system
  • Ignition system
  • Charge and launch system
  • Transmission
  • Mechanical gearbox 717.438
  • Mechanical gearbox 717.454
  • Automatic gearbox 722.5
  • Automatic gearbox 722.6
  • Clutch and drive shafts
  • Differential
  • Chassis
  • Brake system
  • Steering
  • Front suspension
  • Rear suspension
  • Body
  • Exterior (external elements)
  • Interior (internal elements)
  • Electrical equipment
  • Equipment and devices
  • Electrical circuits
W126 (1979-1991, petrol) 
  • Power unit
  • Engine repair
  • Ignition system
  • Lubrication system
  • Cooling system
  • Fuel system
  • Fuel injection system
  • Transmission
  • Clutch and cardan
  • Mechanical gearbox
  • Automatic gearbox
  • Chassis
  • Front suspension
  • Rear suspension
  • Steering
  • Brake system
  • Electrical equipment
  • Power devices
  • Electrical circuits
W116 (1972-1980, petrol) 
  • General information
  • Introduction to guide
  • Power unit
  • 8-cylinder V8 engine
  • 6-cylinder I6 engine
  • Cooling and lubrication system
  • Power system (carburetor)
  • Fuel injection system
  • Ignition system
  • Transmission
  • Clutch and cardan
  • Car gearbox
  • Chassis
  • Front suspension
  • Rear suspension
  • Steering
  • Brake system
  • Electrical equipment
  • Power devices
  • Electrical circuits
 
MercedesMan.ru © 2017–2026 · Mobile version · Read about Mercedes · Sitemap: EN BG BY UA RS HR RO PL SK HU · Feedback · Site search · Bookmark A-Class (W168) · C-Class (W201) · C-Class (W202) · C-Class (W203) · E-Class (W123) · E-Class (W124) · E-Class (W210) · G-Class (W463) · M-Class (W163) · S-Class (W116, petrol) · S-Class (W126, petrol) · S-Class (W140) · S-Class (W220) · Sprinter · Vito 1 · Vito 2 · Vario 814D ·
 
We only use cookies without which some of the site's features may not be available.