
- the car is not loaded;
- tire pressure is correct;
- the fuel tank is fully filled, otherwise put the ballast of the appropriate mass into the body;
- there must be a person on the driver's seat, otherwise put a ballast weighing 75 kg on the seat;
- the vehicle is parked on a level surface.
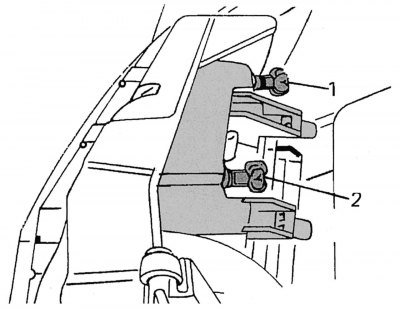
Pic. 323. Location of headlight adjusting screws: 1 - side adjustment screw; 2 - vertical adjustment screw
To adjust the light in the headlights, adjusting screws are installed on the left and right. Screw 2 (pic. 323) is intended for setting the light in height, screw 1 is for lateral adjustment.
To adjust the headlights, you must perform the following operations:
- briefly start the engine and install the headlight range control (if installed) to position 0;
- install the car about 10 m from a light-colored wall or garage door. If it is necessary to adjust only one headlight, set its light beam at the same height as the light beam of the other (regulated) headlights;
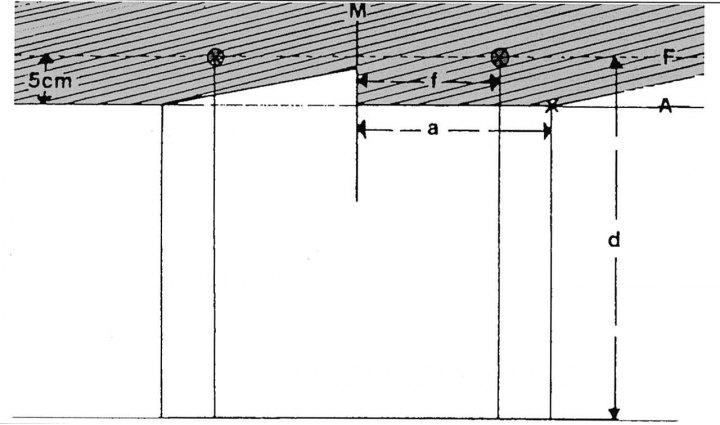
Pic. 324. Template for adjusting headlights
- if it is necessary to adjust both headlights, make appropriate markings on the wall or garage door, shown in fig. 324.
Headlight adjustment must be carried out as follows:
- position the car exactly 10 m from the wall. At height d (height from ground to center of headlights) draw a horizontal line F;
- draw a second line A parallel to the first 5 cm below. This line is for low beam adjustment;
- from the central center line M, mark the distances a with crosses (to the center of the high beam headlights) and f (to the center of the low beam headlights);
- turn on the high beam, close one of the headlights and check that the center of the beam falls on the center of the made cross of line f. If not, adjust with the screw shown in fig. 323;
- set the main beam of the other headlight in the same way;
- switch the headlights to low beam and check that the beams fall on the cross of line a.
Note. To ensure traffic safety, headlights should be adjusted at a service station that has the appropriate equipment.