
Parts of the automatic gearbox control drive
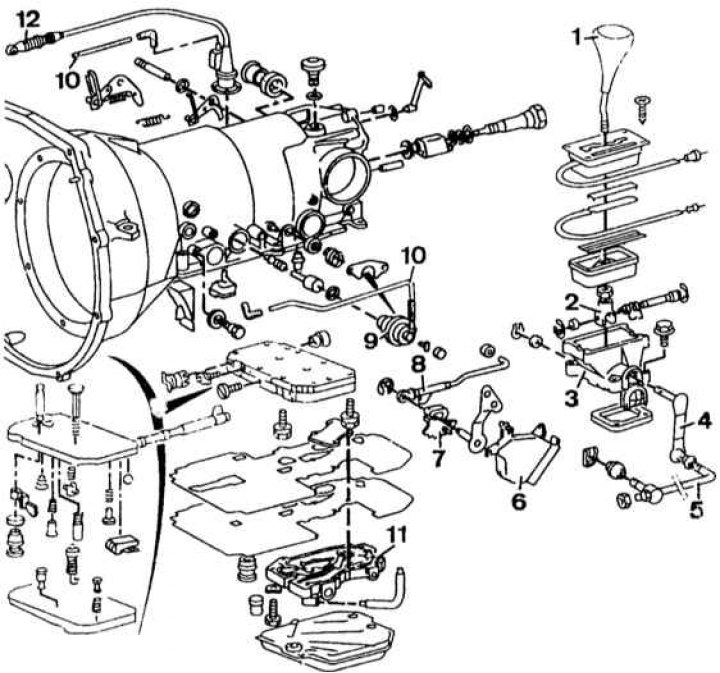
1 - selector lever handle; 2 - fork of the hinge of the selector lever; 3 - hinge body; 4 - drive lever; 5 - gear selection rods; 6 - housing of the starter blocking switch; 7 - toothed sector of the blocking device; 8 - control rod; 9 - vacuum modulator; 10 - vacuum hose; 11 - hydraulic block; 12 - thrust of the pedal switch of the lower gear
Removing
1. Put the car on a lift.
2. Disconnect the wires from the battery.
3. Remove the bracket for attaching the oil level indicator pipe in the automatic gearbox from the cylinder head.
4. Disconnect the control pressure link.
5. Drain the oil from the automatic gearbox by removing the oil sump and transformer drain plugs.
6. Remove the access hatch to the transformer lead flange bolt, then remove the six transformer mounting bolts.
7. Remove the rear suspension bracket of the automatic gearbox with support.
8. Depending on the configuration, disconnect the wire from the oxygen concentration sensor and disconnect it from the propeller shaft tunnel.
9. Having removed the mounting ladder, disconnect the bracket for mounting the exhaust pipe of the mufflers from the gearbox (put marks on the washers) and from the intake pipe.
10. Remove the flexible coupling of the gearbox output shaft flange.
11. To facilitate the removal of the gearbox, disconnect the rear of the front pipe and secure it in the lower position with a wire.
12. Remove the heat shield from the bottom of the propeller shaft intermediate support.
13. Turn away a lock nut of a flange of a cardan shaft.
14. Pull back the front part of the propeller shaft as far as possible and fix it as high as possible in the tunnel.
15. Disconnect the power wire from the low pedal switch solenoid valve.
16. Disconnect the speedometer drive flexible shaft from the gearbox rear cover and remove it from the mounting bracket or disconnect the wires from the electronic speedometer sensor.
17. Operating from the passenger compartment, disconnect the gear selection rod.
18. On vehicles with an exhaust gas neutralizer, disconnect the gearshift boost connector.
19. Disconnect starter interlock connectors and vacuum hose.
20. Having unscrewed the bolts of the lower mounting bracket, remove the oil filler pipe.
21. Disconnect the oil-water heat exchanger hoses from the gearbox and remove their fastening clamps.
22. Place a jack under the gearbox housing.
23. Turn away all bolts of fastening of a case of a transmission to the block of the engine and disconnect a mass wire.
24. Lock the transformer in the casing by screwing the bolt instead of the drain plug so that it enters the hole in the ventilation grilles.
25. Remove a transmission, having given it back for disconnection from the engine.
Installation
Installing the gearbox is not difficult and is carried out in the reverse order of removal, taking into account the following:
1. Tighten the screw connections to the specified torque.
2. Adjust control pressure linkage and selector linkage.
3. Fill the gearbox with oil to the correct level.