



Contents: Petrol engines 111, 112 ↡ Diesel engines ↡
The car has a three-phase alternating current generator. Depending on the model and equipment, generators of different power can be installed.
Caution! If electrical devices with high power consumption are subsequently installed on the vehicle, it is necessary to check whether the power of the existing generator is sufficient. If necessary, a new generator with higher power must be installed.
The alternating voltage created by the generator is converted by the rectifier diodes into direct voltage, which is used to charge the battery. The regulator changes the charging current so that the operating voltage remains constant regardless of the number of revolutions.
Attention! The generator can be replaced. A damaged generator is accepted for credit when purchasing a repaired or new generator. Therefore, take the broken generator with you.
Petrol engines 111, 112
Removal
1. Disconnect the negative (-) battery cable with the ignition off. The cabin air filter box must be removed first.
Warning! Before disconnecting the cable, find out the radio receiver security code, if any, refer to Section Replacing the battery. Do not connect an auxiliary power source.
2. Engine 111: Remove the air cleaner housing, refer to Section Removal and installation the air filter.
3. Engine 112: Remove the air intake duct on the front passenger side.
4. Remove the V-belt, refer to Section Removal and installation the V-belt.
5. Remove the protective cover (4) and disconnect the thick (B+) wire (1) from terminal 30.
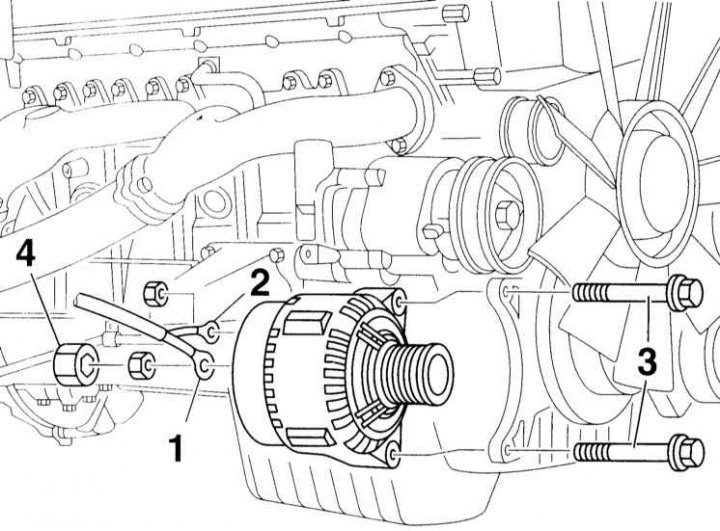
6. Disconnect (D+) wire (2) from terminal 61.
7. Remove the mounting bolts (3). Remove the spacer sleeve of the upper bolt and lift the generator upwards out of the engine compartment.
Installation
1. Install the generator in place and secure it with a torque of 42 Nm.
Note: Pay attention to the spacer sleeve of the upper mounting bolt.
2. Secure the wire to the terminal (B+) of the generator with the torque specified in the Specifications.
3. Place the protective cap on terminal 30.
4. Secure the wire to the generator (D+) with a torque of 5 Nm.
5. Put on the V-belt, refer to Section Removal and installation the V-belt.
6. Engine 111: Install the air cleaner housing, refer to Section Removal and installation the air filter.
7. Engine 112: Install the air intake duct.
8. Connect the battery ground (-) cable with the ignition off. Reinstall the cabin air filter box. If necessary, enter the radio code and set the clock.
Diesel engines
Removal
1. Disconnect the negative (-) battery cable with the ignition off. The cabin air filter box must be removed first.
Warning! Before disconnecting the cable, find out the radio receiver security code, if any, refer to Section Replacing the battery. Do not connect an auxiliary power source.
2. Remove the engine cover, refer to Section Removal and installation the top engine cover.
3. Remove the V-belt, refer to Section Removal and installation the V-belt.
4. Remove the air intake duct and hose from the front passenger side.
5. Disconnect the clamp and the charge air hose from the turbocharger pipe.
6. Unscrew the 3 mounting bolts and remove the pipe.
7. Raise and support the front of the vehicle.
8. Remove the bottom cover, refer to Section Checking the engine with a vacuum gauge.
9. Drain the radiator, refer to Section Coolant Replacement - General Notes.
10. Disconnect the coolant supply line from the generator.
11. Remove the front suspension stabilizer bar, refer also to Chapter Suspension and steering.
12. Remove the protective cover and disconnect the thick wire (B+) from terminal 30 (1).
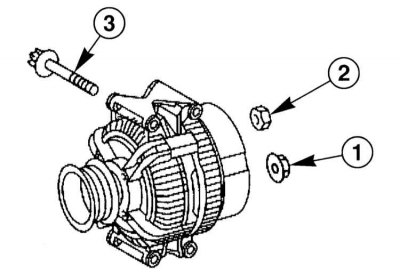
13. Disconnect the wire (D+) from terminal 61 (2).
14. Remove the 2 mounting bolts and move the high pressure steering line to the side.
15. Unscrew the 3 mounting bolts and remove the holder.
16. Unscrew the mounting bolts (3) and remove the generator downwards from the engine compartment.
Installation
1. Install the generator in place and secure it with bolts to a torque of 20 Nm. At the same time, replace the gasket between the radiator housing flange and the engine crankcase.
2. Secure the coolant supply line to the generator, replacing the sealing ring.
3. Secure the holder.
4. Secure the high pressure power steering line.
5. Secure the wire (B+) to the generator with a torque of 14 Nm and put the protective cap on terminal 30.
6. Secure the wire (D+) to the generator.
7. Reinstall the stabilizer.
8. Fill the system with coolant, refer to Section Coolant Replacement - General Notes.
9. Install the bottom cover, refer to Section Checking the engine with a vacuum gauge.
10. Lower the car onto its wheels.
11. Secure the charge air pipe to the turbocharger and connect the hose.
12. Reinstall the air intake duct and hose.
13. Put on the V-belt, refer to Section Removal and installation the V-belt.
14. Install the engine cover, refer to Section Removal and installation the top engine cover.
15. Connect the battery ground (-) cable with the ignition off. Reinstall the cabin air filter box. If necessary, enter the radio code and set the clock.