
Cars BMW Cars Volkswagen Cars Chevrolet Cars Land Rover Cars Lada Cars Honda Cars Peugeot
English Русский
Български
Беларускі
Український
Српски
Hrvatski
Română
Polski
Slovenský
Magyar
Bookmark News and articles Sitemap Feedback Site search
MercedesMan.ru


A-Class C-Class E-Class G-Class M-Class S-Class Others
190 (W201) (1982-1993) W202 (1993-2000) W203 (2000-2007)
  • Main
  • C-Class
  • W203 (2000-2007)
  • Power unit
  • Cooling system
  • Replacing the coolant

Replacing the coolant (Mercedes-Benz C-Class W203)

0
Contents: Removal ↡ Filling the system with liquid ↡ Bleeding air from the cooling system ↡
Please also refer to Section Checking the functioning of the cooling system and frost resistance of the coolant. Replacing the liquid.

The coolant must be replaced when the cooling system is repaired, in which the liquid is drained. In the event that the head, block, cylinder head gasket, radiator, heat exchanger or engine are replaced during repair, the coolant must be replaced. During circulation, anti-corrosion additives are deposited on new light metal parts and thus form a durable anti-corrosion layer. The anti-corrosion additive in the used coolant is usually no longer sufficient to form a sufficient protective layer on new parts.

Caution! Drained coolant must not be reused. Coolant is toxic and must not be disposed of with household waste.


Removal


1. Set the interior heater control to the maximum temperature setting.

2. Raise the vehicle and place it horizontally on stands. The operation of lifting and placing the vehicle on stands is associated with danger! Therefore, before carrying out the operation, read Section Jacking and towing Introduction to the manual.

Caution! When the engine is hot, cover the expansion tank with a thick cloth before opening it to prevent burns from hot coolant and steam. The cap should only be removed when the coolant temperature is below +90°C.
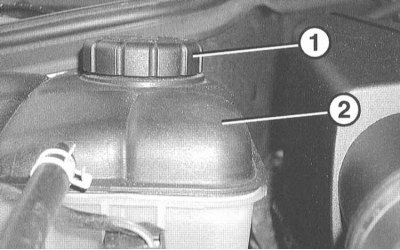

3. Open the cap (1) of the expansion tank (2). When the engine is warm, place a thick rag on the…


3. Open the cap (1) of the expansion tank (2). When the engine is warm, place a thick rag on the cap. Turn the cap slightly to the left and release the pressure in the cooling system. Then unscrew the cap completely.


Original can be found on the website Mercedesman.ru

4. Place a clean container under the radiator and cylinder block.

5. Open the drain plug (3) on the radiator (4) and allow the coolant to drain into a container.


5. Open the drain plug (3) on the radiator (4) and allow the coolant to drain into a container.

Note: To ensure that the liquid accurately enters the container, place a hose on the nozzle (5).


The coolant can also be drained from the cylinder block. In this case, place the hose on the drain nipple on the right side of the cylinder block. Open the nipple using the hexagon and drain the liquid into a container. The tightening torque is specified in the Specifications.

6. Drain the liquid completely.

7. Replace the drain plug on the radiator and remove the drain hose.

8. Lower the car onto its wheels.

Filling the system with liquid


1. Prepare new coolant.

2. Fill the liquid through the expansion tank.

Caution: Fill the system with liquid slowly, making sure that no air pockets are formed.


3. Check the coolant level, refer to Section Checking fluid levels, leak monitoring.

Bleeding air from the cooling system


1. Start the engine with the expansion tank cap removed and let the engine idle.


2. Set the heater control in the passenger compartment to the maximum temperature setting.

3. Monitor the fluid level in the expansion tank, topping it up to the MAX mark.

4. Warm up the engine until the coolant temperature reaches 60–70°C or until the upper radiator hose is warm. Then close the expansion tank cap.

5. Let the engine run at 1500-2000 rpm until the radiator fan turns on and then off again.

6. After this, stop the engine.

7. Visually check the cooling system, in particular the hose connections, as well as the drain plug and coolant pump for leaks.

8. Allow the engine to cool down and check the coolant level, top up if necessary.
This article is available at: russian, bulgarian, belarusian, ukrainian, serbian, croatian, romanian, polish, slovak, hungarian
The article has been verified: Rodionov Artyom Semyonovich
Share with friends:
◀ Previous
C-Class W203 / Cooling system
Next ▶

Antifreeze is a means of protection against freezing
General description of the cooling system
Cooling and Heating System Specifications
Removal and replacing cooling system hoses
Removal and installation the thermostat
Checking the Thermostat
Checking the cooling system under pressure
Removal and installation the coolant pump
More similar articles for repairing other models

☛ Coolant — Checking the Level Mercedes W168 (1997-2004)
☛ Replacing the coolant Mercedes W210 (1996-2002)
☛ Checking the cooling system and coolant, replacing the liquid Mercedes W463 (1999-2019)
☛ Checking the cooling system and frost resistance of the coolant,… Mercedes W163 (1997-2005)
☛ Checking the functioning of the cooling system and frost resistance… Mercedes W140 (1991-1998)
☛ Replacing the coolant Mercedes Sprinter (1995-2000, diesel)
Link in different formats to this article
Comments and feedback from visitors
No comments yet


How much will 30 + 22 ?


W203 (2000-2007) 
  • General information
  • Introduction to guide
  • User manual
  • Maintenance
  • Power unit
  • Gasoline engines
  • Diesel engines
  • Cooling system
  • Ventilation and heating
  • Supply system
  • Injection system (gasoline)
  • Injection system (diesel)
  • Exhaust system
  • Ignition and control system
  • Charge and launch systems
  • Transmission
  • Mechanical gearbox
  • Automatic gearbox
  • Clutch and drive shafts
  • Differential
  • Chassis
  • Brake system
  • Car suspension
  • Steering
  • Body
  • Exterior (external elements)
  • Interior (internal elements)
  • Electrical equipment
  • Equipment and devices
  • Lighting system
  • Electrical diagrams (2000)
  • Electrical diagrams (since 2001)
W202 (1993-2000) 
  • General information
  • User manual
  • Driving a car
  • Car care
  • Maintenance
  • Power unit
  • Gasoline engines
  • Diesel engines
  • Lubrication system
  • Cooling system
  • Heating and ventilation
  • Ignition system
  • Fuel system
  • Injection system (gasoline)
  • Injection system (diesel)
  • Exhaust system
  • Transmission
  • Clutch
  • Car gearbox
  • Chassis
  • Suspension, wheels and tires
  • Steering
  • Brake system
  • Body
  • Exterior (external elements)
  • Interior (internal elements)
  • Doors and windows
  • Electrical equipment
  • Equipment and devices
  • Power devices
  • Lighting system
  • Electrical circuits
190 (W201) (1982-1993) 
  • General information
  • Introduction to the guide
  • Operation and care
  • Maintenance (gasoline)
  • Maintenance (diesel)
  • Troubleshooting
  • Power unit
  • Petrol engine I4
  • Petrol engine V6
  • Diesel engines
  • Engine overhaul
  • Cooling and heating
  • Power system (carburetor)
  • Injection system (gasoline)
  • Injection system (diesel)
  • Exhaust system
  • Charge and start system
  • Ignition system (I4)
  • Ignition system (V6)
  • Diesel heating system
  • Transmission
  • Clutch
  • Mechanical gearbox
  • Automatic gearbox
  • Cardan shaft and axle shafts
  • Chassis
  • Brake system
  • Car suspension
  • Steering
  • Body
  • Exterior (external elements)
  • Interior (internal elements)
  • Doors, locks and windows
  • Electrical equipment
  • Equipment and devices
  • Electrical circuits
 
MercedesMan.ru © 2017–2026 · Mobile version · Read about Mercedes · Sitemap: EN BG BY UA RS HR RO PL SK HU · Feedback · Site search · Bookmark A-Class (W168) · C-Class (W201) · C-Class (W202) · C-Class (W203) · E-Class (W123) · E-Class (W124) · E-Class (W210) · G-Class (W463) · M-Class (W163) · S-Class (W116, petrol) · S-Class (W126, petrol) · S-Class (W140) · S-Class (W220) · Sprinter · Vito 1 · Vito 2 · Vario 814D ·
 
We only use cookies without which some of the site's features may not be available.