



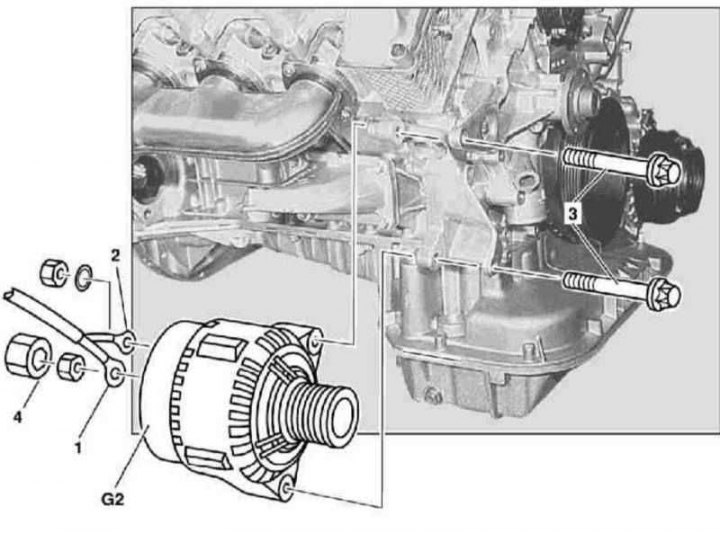
Generator installation details for gasoline models
1 - Terminal 30 (B+); 2 - Terminal 61 (D+); 3 - Bolts; G2 - Generator
1. The details of the generator installation on gasoline models are shown in the illustration, to which all references in the text refer.
2. Disconnect the negative cable from the battery.
3. Loosen the alternator drive belt.
4. If equipped, remove the protective caps and disconnect the wiring from terminals 30 (1) and 61 (2) of the generator.
5. Unscrew the mounting bolts (3) and remove the generator (G2).
6. Installation is carried out in reverse order.
7. Finally, do not forget to perform the procedures related to connecting the battery.
Diesel models
M612
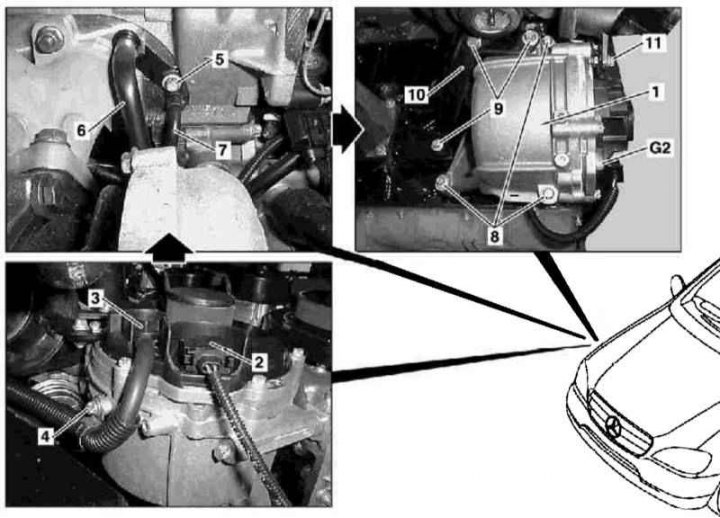
Generator installation details on diesel models 163.113 (612 series engine)
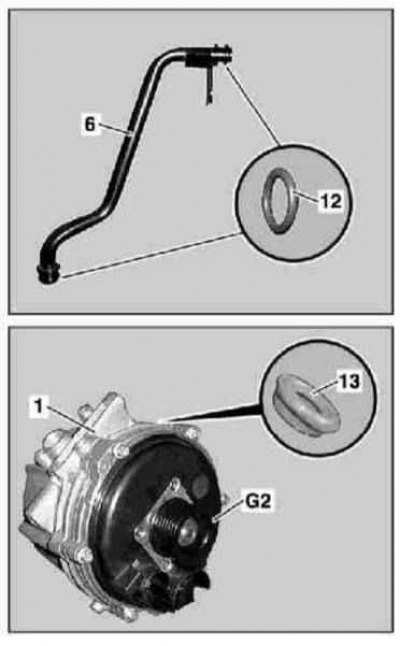
Generator installation details on diesel models 163.113 (612 series engine)
1. Generator installation details on models 163.113 (612 series engine) are shown in the illustrations, to which all references found in the text refer.
2. Disconnect the negative cable from the battery.
3. Remove the right front wheel and wheel arch protection liner.
4. Remove the sound insulation.
5. Disconnect the clutch (2), loosen the fastener and disconnect the electrical wiring from the generator.
6. If equipped, remove the protective cap and, having blocked the wire on terminal 30 (3), unscrew the screws (4).
7. Drain the cooling system (see Chapter Checking the cooling system and frost resistance of the coolant, replacing the liquid).
8. Remove the air cleaner housing (see Chapter Removal and installation air intake tract components).
9. Loosen and remove the drive belt.
10. Remove the screws (5) and disconnect the oil line (7) from the turbocharger.
11. Remove the coolant supply line (6).
12. Unscrew the mounting bolts (9) and remove the bracket (10).
13. Remove the bolt (11) of the vibration damper bracket.
14. Unscrew the bolts (8) securing the cooler casing (1).
15. Remove the generator (G2) by lowering it down together with the cooler casing (1).
16. Installation is carried out in the reverse order - do not forget to replace the sealing elements (12 and 13). If there are signs of leaks developing, remove the generator from the cooler casing and replace the sealing ring. Finally, connect the negative cable to the battery.
M628
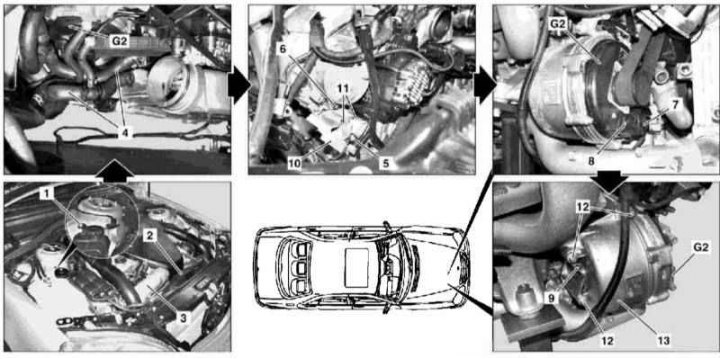
Generator installation details on diesel models 163.128 (628 series engine)
1 - Nut; 2 - Fan assembly casing; 3 - Air tract cooler; 4 - Cooling tract hose; 5 - Bolt; 6 - Bolt; 7 - Clutch; 8 - Terminal 30; 9 - Bolt; 10 - Bracket; 11 - Bolt; 12 - Bolt; 13 - Cooler casing; G2 - Generator
1. Generator installation details on models 163.128 (628 series engine) are shown in the illustration, to which all references found in the text refer.
2. Disconnect the negative cable from the battery.
3. Remove the lower section of sound insulation.
4. Drain the cooling system (see Chapter Checking the cooling system and frost resistance of the coolant, replacing the liquid).
5. Remove the air cleaner (see Chapter Removal and installation air intake tract components).
6. Remove the fan assembly (see Chapter Cooling, heating and air conditioning systems).
7. Remove the air duct bypass sleeve (see Chapter Removal and installation air intake tract components).
8. Move the cooling tract hose (4) to the side to provide access.
9. Remove the drive belt.
10. Unscrew the bolt (5) securing the cooling tract line.
11. Disconnect the clutch connector (7).
12. Disconnect the electrical wiring from terminal 30 (8).
13. Remove the bracket (10).
14. Remove the screws (12).
15. Press the generator (G2) together with the cooler housing (13) to the right and remove the assembly from the engine compartment.
16. Installation is carried out in reverse order.
17. Finally, check the cooling system for signs of developing leaks.
18. Connect the negative cable to the battery (see Section Battery - general information, maintenance recommendations).