
Cars BMW Cars Volkswagen Cars Chevrolet Cars Land Rover Cars Lada Cars Honda Cars Peugeot
English Русский
Български
Беларускі
Український
Српски
Hrvatski
Română
Polski
Slovenský
Magyar
Bookmark News and articles Sitemap Feedback Site search
MercedesMan.ru


A-Class C-Class E-Class G-Class M-Class S-Class Others
Sprinter (1995-2000, diesel) Vito 1 (1996-2003) Vito 2 (2003-2014, diesel) Vario 814D (1996-2003, diesel)
  • Main
  • Mercedes-Benz
  • Sprinter (1995-2000)
  • Power unit
  • Lubrication system
  • Removal and installation the oil pan

Removal and installation the oil pan (Mercedes-Benz Sprinter 903)

0
Mercedes service stations use special devices to support the engine when removing the crankcase. After all, this requires dismantling the cross beam, as a result of which the engine and gearbox are deprived of their lower support. Therefore, when removing the beam, you should place a jack under the engine or use a manual overhead crane.

Removal and installation of the oil pan is carried out as follows:
  • place a suitable container underneath and unscrew the oil drain plug. Drain all the oil into a prepared container. The oil filler cap must be removed to allow the oil to drain better. It is better to drain oil from a warm engine, so you need to warm up the engine before starting work. Screw the oil drain plug back in (use a new gasket);
  • if the vehicle is equipped with an electronic idle speed control system, unscrew the speed sensor;
  • from the top side, use a socket wrench with an extension to loosen the nuts securing the front engine mounts. Raise the engine from its mounts and remove the cross beam fasteners;
  • unscrew the oil pipes going from the crankcase to the oil radiator;
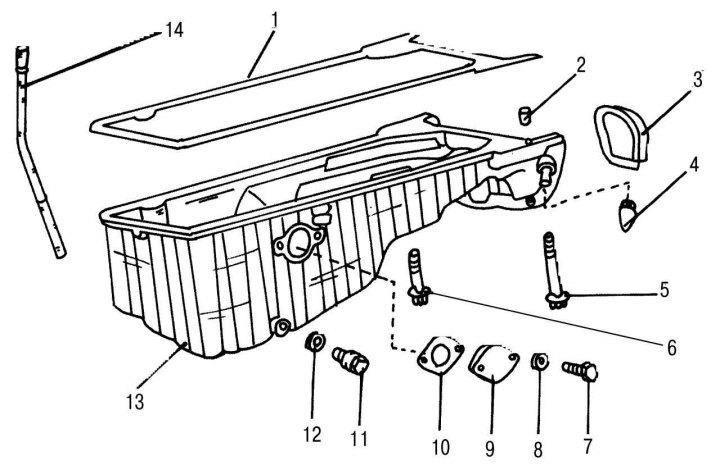
Figure 127. Engine crankcase (mod. 602): 1 - crankcase gasket; 2 - mounting pin; 3 — lid; 4 —…

Figure 127. Engine crankcase (mod. 602): 1 - crankcase gasket; 2 - mounting pin; 3 — lid; 4 — piston position sensor hole plug; 5 - long crankcase mounting bolt; 6 - short crankcase mounting bolt; 7 — plug bolt; 8 - spring ring; 9 - plug (on the crankcase without an oil level indicator); 10 - plug gasket; 11 — oil drain plug; 12 — gasket; 13 — crankcase; 14 — oil dipstick guide tube


  • unscrew and remove the crankcase. If it needs to be replaced, carry it out using the drawing as a guide 127;
  • the installation of the oil pan is carried out in the reverse order of removal. Upon completion of the work, pour the required amount of oil into the engine.


(Original material on the website: Mercedesman.ru)
This article is available at: russian, bulgarian, belarusian, ukrainian, serbian, croatian, romanian, polish, slovak, hungarian
The article has been verified: Levin Kirill Glebovich
Share with friends:
◀ Previous
Mercedes Sprinter / Lubrication system
Next ▶

Removal and installation the oil pump
Brief description of the lubrication system
Do-it-yourself engine oil change
Oil change at the service
Causes of sediment formation in oil
Removal and installation the oil filter
Oil radiator — removal and installation
Oil dipstick
Turbodiesel engine oil lines
Lubrication System Specifications
Link in different formats to this article
Comments and feedback from visitors
No comments yet


How much will 37 + 48 ?


Vario 814D (1996-2003, diesel) 
  • General information
  • Maintenance
  • Power unit
  • Engines 602.984/985
  • Engines 904.908/914/923/936
  • Transmission
  • Clutch
  • Manual gearbox 711.613
  • Manual gearbox 710.64/66
  • Manual gearbox 715.051
  • Automatic gearbox 723.345
  • Power take-off box
  • Chassis
  • Front suspension
  • Rear suspension
  • Steering
  • Brake system
  • Body and electrical equipment
  • Interior (internal elements)
  • Exterior (external elements)
  • Heater and air conditioner
  • Electrical diagrams
Vito 2 (2003-2014, diesel) 
  • General information
  • User manual
  • Maintenance
  • Diesel engine OM646
  • Engine repair
  • Cooling and lubrication system
  • Power and exhaust system
  • Transmission
  • Clutch
  • Car gearbox
  • Chassis
  • Front suspension
  • Rear suspension
  • Steering
  • Brake system
  • Body
  • Body elements
  • Electrical equipment
  • Equipment and devices
  • Security systems
  • Electrical circuits
Vito 1 (1996-2003) 
  • General information
  • User manual
  • Maintenance
  • Petrol engines 2.0 l
  • Engine repair
  • Lubrication system
  • Cooling system
  • Power and control system
  • Petrol engines 2.8 l
  • Engine repair
  • Lubrication system
  • Cooling system
  • Power and control system
  • Diesel engines 2.3 l
  • Engine repair
  • Cooling system
  • Lubrication system
  • Turbocharging and recycling
  • Power and control system
  • Diesel engines 2.2 l
  • Engine repair
  • Cooling system
  • Lubrication system
  • Turbocharging and recycling
  • Power and control system
  • Transmission
  • Clutch
  • Mechanical gearbox
  • Automatic gearbox
  • Chassis
  • Front suspension and wheels
  • Rear suspension
  • Steering
  • Brake system
  • Body
  • Exterior (external elements)
  • Interior (internal elements)
  • Electrical equipment
  • Equipment and devices
  • Heater and air conditioner
  • Electrical circuits
Sprinter (1995-2000, diesel) 
  • General information
  • Introduction to the guide
  • Maintenance
  • Power unit
  • Engine repair
  • Lubrication system
  • Cooling system
  • Power and exhaust system
  • Transmission
  • Clutch
  • Mechanical gearbox
  • Automatic gearbox
  • Front axle
  • Rear axle and cardan
  • Chassis
  • Car suspension
  • Steering
  • Brake system
  • Tires and wheels
  • Electrical equipment
  • Equipment and devices
  • Headlights and lighting
  • Power devices
  • Electrical circuits
 
MercedesMan.ru © 2017–2026 · Mobile version · Read about Mercedes · Sitemap: EN BG BY UA RS HR RO PL SK HU · Feedback · Site search · Bookmark A-Class (W168) · C-Class (W201) · C-Class (W202) · C-Class (W203) · E-Class (W123) · E-Class (W124) · E-Class (W210) · G-Class (W463) · M-Class (W163) · S-Class (W116, petrol) · S-Class (W126, petrol) · S-Class (W140) · S-Class (W220) · Sprinter · Vito 1 · Vito 2 · Vario 814D ·
 
We only use cookies without which some of the site's features may not be available.