
- when carrying out all work, observe maximum cleanliness;
- before loosening any connections, the surrounding surface must be thoroughly cleaned;
- put all removed parts on a clean surface and cover if necessary;
- when working, do not use fleecy rags;
- remove new parts from the packaging immediately before installation;
- use only original spare parts;
- do not refill the drained liquid into the system.
To remove the steering, perform the following operations:
- place the car in front on supports, unscrew the wheels. Be sure to make sure that the car cannot jump off the supports. After removing the front wheels, you can put them behind and in front to stop one of the rear wheels. Otherwise, put stops under the rear wheels;
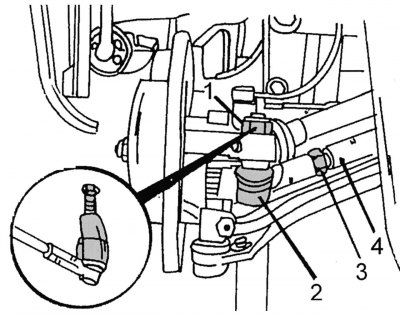
Pic. 258. Tie rod connection with steering knuckle lever: 1 - hex nut; 2 — the hinge of a tip of steering draft; 3 - locknut; 4 - steering rod
- unscrew nut 1 (pic. 258) and using a special puller, disconnect the tie rod end to the steering knuckle. The figure shows a suitable puller, which can be replaced with a universal puller if necessary. Do the same on the other side. After loosening the lock nut 3, unscrew the hinge of the left handpiece from the rod 4. When unscrewing, the number of revolutions should be counted (up to half a turn). When installing, the hinge should be screwed in by the same number of revolutions - this will save the setting of the toe angle;
Pic. 259. Marks indicating the central position of the steered wheels
- set the wheels straight. Securely fix the steering wheel in this position. Just in case, you should check that the marks on the steering gear and the steering gear housing match (pic. 259);
- using a syringe, take fluid from the hydraulic booster reservoir;
- disconnect both pipelines from the steering gear: one of them is a hose (elastic) high pressure, the other - reverse. Installed O-rings must be replaced. Drain the leaked liquid into a container or collect with a rag. When assembling, tighten the high-pressure hose with a torque of 45–50 Nm, return hose - 30–32 Nm;
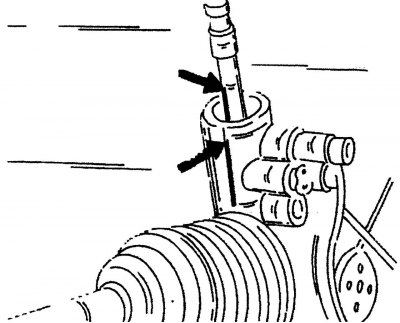
- unscrew the bolt from the universal joint of the steering shaft with a Torx head and remove the joint from the shaft;
- unscrew the steering gear from the front axle. To do this, tilt forward and pull it to the right.
Installation must be carried out in reverse order, taking into account the following:
- before installing the steering gear, turn its shaft all the way in one direction, then turn it all the way in the other direction, counting the number of revolutions. Now again rotate the shaft in the other direction by exactly half the number of revolutions obtained. With the exact center position, the marks on the gear and the steering gear housing will coincide (see fig. 259);
- insert the steering mechanism from the left side and turn upwards;
- check again if the steering gear is in the middle position (shaft gear could turn);
- install the steering mechanism in the seats and tighten the bolts evenly crosswise with a torque of 55-60 Nm;
- Install the cardan joint on the gear shaft so that the hole in the joint coincides with the round spline on the shaft. Screw in the fixing bolt and tighten to 35 Nm. To do this, again use the special Torx head inserted into the torque wrench;
- screw the tips with hinges on the steering rods (to the previous position) and fasten them to the steering knuckles. Wrap the nuts with a torque of 120-130 Nm;
- connect both pipelines to the steering gear and tighten the fastenings of the high-pressure hose to 45–50 Nm, the return hose to 30–32 Nm;
- pour fluid into the system and bleed (described below);
- lower the car and tighten the wheel bolts to 160-180 Nm;
- next, check that the wheels and steering wheel are straight. If this is not the case, unscrew the universal joint again and rearrange it by the required number of teeth in the desired direction. One tooth shift corresponds to 6°of steering wheel turn;
- in conclusion, check the system for leaks and the fluid level in the hydraulic booster reservoir.