
Cars BMW Cars Volkswagen Cars Chevrolet Cars Land Rover Cars Lada Cars Honda Cars Peugeot
English Русский
Български
Беларускі
Український
Српски
Hrvatski
Română
Polski
Slovenský
Magyar
Bookmark News and articles Sitemap Feedback Site search
MercedesMan.ru


A-Class C-Class E-Class G-Class M-Class S-Class Others
W116 (1972-1980, petrol) W126 (1979-1991, petrol) W140 (1991-1998) W220 (1998-2005)
  • Main
  • S-Class
  • W116 (1972-1980)
  • Chassis
  • Steering
  • Steering drive

Steering drive (Mercedes-Benz S-Class W116)

0
Contents: Bipod ↡ Pendulum lever ↡ Steering rod ↡ Transverse steering rod ↡ Replacing dust caps ↡
All self-locking nuts are used only once and must be replaced after each disassembly. The ball joint pins are pressed out using a suitable puller. The removal and installation of individual steering gear components is described below.

Bipod


Place the front of the car on stands.

Loosen the two self-locking nuts securing the ball joints of the steering rod and transverse steering rod.

Using a puller, press the ball pins out of the knuckle.

Remove the steering knuckle from the steering gear shaft.

During installation, perform the following tasks:

Check the condition of the protective caps on the ball joints. If the protective caps were damaged when the joint was removed, then only they need to be replaced; if the damage is old, it is necessary to replace the ball joints as a whole.

Clean the splines on the inner surface of the pitman arm and on the steering gear shaft. They must be completely free of grease and oil residue. Lubricate the steering gear shaft "Loctite 270".

Install the bipod on the shaft so that the notch on the steering gear shaft matches the cut on the bipod.

Clean the ball joints from any remaining grease, insert them into the conical holes of the knuckle and tighten the fastening nuts to a torque of 35 Nm. When turning the joints, hold them with a hex key inserted into the joint head.

Tighten the bipod mounting nut and tighten to the specified tightening torque.


Finally check the front wheel alignment (section 13.9).

Pendulum lever


Place the front of the car on stands.

Loosen the two self-locking nuts securing the ball joints of the steering rod and transverse steering rod.

Article was borrowed from the website MercedesMan.ru

Using a puller, press out the ball joint pin of the transverse steering rod from the pendulum arm, and then the joint pin of the steering rod.

Unscrew the heat shield from the pendulum arm bracket.

Loosen the pendulum arm axle mounting nut, remove the sealing ring and remove the axle together with the pendulum arm and the dust cap located below. Sometimes there is a washer above the cap, which also needs to be removed. If desired, you can replace the rubber bushings of the pendulum arm support. To do this, lift the support seal and use a screw puller to remove the bushing from the support. Then use a puller to press out the two supports.

Lubricate the outer surfaces of the new supports and press them into the housing. Install the dust cap. Install the axle together with the pendulum lever and washer into the supports. The head of the axle bolt should be directed towards the pendulum lever. Install the sealing washer, screw in a new self-locking nut and tighten to a torque of 120 Nm.

When installing new parts, measure the height of the ball joint of the transverse steering rod and the pendulum arm, the difference should not exceed 3 mm. For adjustment, install the upper washer as mentioned above.

All further work should be performed in reverse order. Installation of ball joints is described in the last section.


Steering rod


Loosen the self-locking nuts securing the ball joints of the tie rod.

Using a puller, press out the ball pins from both ends of the tie rod. When removing two tie rods, mark them to avoid mixing them up when installing.

Check the condition of the protective caps as described above.

Installation is performed in the reverse order. Tighten new self-locking nuts and tighten to 35 Nm. Check and, if necessary, adjust the front wheel alignment (section 13.9.1).

Transverse steering rod


Replacing the transverse steering rod, i.e. the rod connecting the steering arm and the pendulum arm, is similar to working with the steering rods described above.

Replacing dust caps


The dust caps are secured to the ball joint with a wire ring and a plastic ring. Before installing a new cap, fill its internal cavity with the recommended grease. The new caps must be in the correct position when installed.
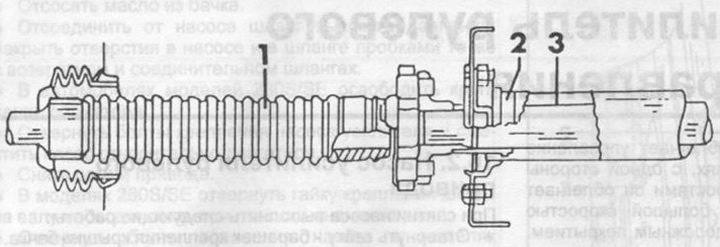
Fig. 236. Steering shafts.

Fig. 236. Steering shafts.
1 - lower steering shaft (corrugated pipe),
2 - protective cover,
3 - upper steering shaft.
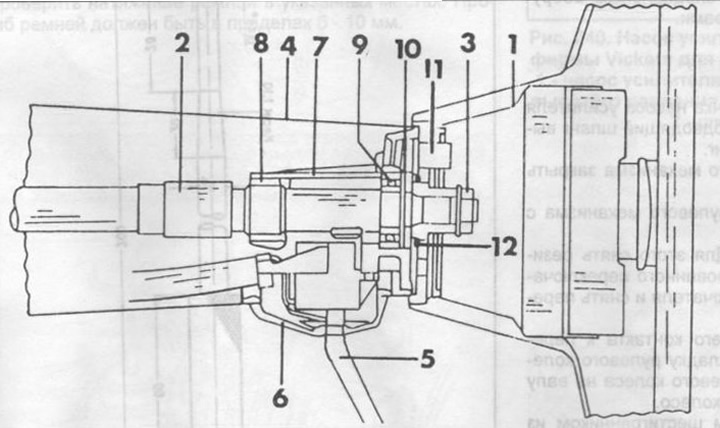

Fig. 237. Sectional view of steering wheel mount.

Fig. 237. Sectional view of steering wheel mount.
1 - steering wheel,
2 - steering shaft,
3 - hexagonal nut with spring washer,
4 - protective cover,
5 - combination switch,
6 - rubber protective cover,
7 - bearing housing,
8 - needle bearing,
9 - ball bearing,
10 - mounting ring,
11 - contact ring,
12 - locking ring.
This article is available at: russian, bulgarian, belarusian, ukrainian, serbian, croatian, romanian, polish, slovak, hungarian
The article has been verified: Panova Maya Vladimirovna
Share with friends:
◀ Previous
S-Class W116 / Steering
Next ▶

Steering — removal and installation
Power Steering — Removal
Power steering pump
Steering Specifications
Tightening torques for threaded connections
More similar articles for repairing other models

☛ Adjusting the position of the steering wheel Mercedes W168 (1997-2004)
☛ Gearbox / final drive Mercedes W202 (1993-2000)
☛ Checking and adjusting clearances in the valve drive mechanism on… Mercedes W123 (1976-1985)
☛ Evaluation of the condition of the steering drive components Mercedes W463 (1999-2019)
☛ Checking the condition of multi-rib belts for auxiliary drive units Mercedes W163 (1997-2005)
☛ Power steering pump drive V-belt, belt replacement Mercedes Sprinter (1995-2000, diesel)
Link in different formats to this article
Comments and feedback from visitors
No comments yet


How much will 24 + 32 ?


W220 (1998-2005) 
  • General information
  • Introduction to guide
  • User manual
  • Maintenance
  • Power unit
  • Engine repair
  • Cooling and heating systems
  • Power and exhaust systems
  • Ignition and control system
  • Charge and launch systems
  • Transmission
  • Automatic gearbox
  • Drive shafts
  • Chassis
  • Brake system
  • Front suspension
  • Rear suspension
  • Steering
  • Body
  • Body elements
  • Electrical equipment
  • Equipment and devices
  • Electrical circuits
W140 (1991-1998) 
  • User manual
  • Controls and instruments
  • Driving and operation
  • Maintenance
  • Power unit
  • Petrol engine V6
  • Petrol engine V8
  • Petrol engine V12
  • Diesel engine OM603
  • Diesel engine OM606
  • Cooling system
  • Power supply and injection system
  • Control system HFM-SFI
  • Control system LH-SFI
  • Control systems ME-SFI
  • Diesel control system
  • Ignition system
  • Charge and launch system
  • Transmission
  • Mechanical gearbox 717.438
  • Mechanical gearbox 717.454
  • Automatic gearbox 722.5
  • Automatic gearbox 722.6
  • Clutch and drive shafts
  • Differential
  • Chassis
  • Brake system
  • Steering
  • Front suspension
  • Rear suspension
  • Body
  • Exterior (external elements)
  • Interior (internal elements)
  • Electrical equipment
  • Equipment and devices
  • Electrical circuits
W126 (1979-1991, petrol) 
  • Power unit
  • Engine repair
  • Ignition system
  • Lubrication system
  • Cooling system
  • Fuel system
  • Fuel injection system
  • Transmission
  • Clutch and cardan
  • Mechanical gearbox
  • Automatic gearbox
  • Chassis
  • Front suspension
  • Rear suspension
  • Steering
  • Brake system
  • Electrical equipment
  • Power devices
  • Electrical circuits
W116 (1972-1980, petrol) 
  • General information
  • Introduction to guide
  • Power unit
  • 8-cylinder V8 engine
  • 6-cylinder I6 engine
  • Cooling and lubrication system
  • Power system (carburetor)
  • Fuel injection system
  • Ignition system
  • Transmission
  • Clutch and cardan
  • Car gearbox
  • Chassis
  • Front suspension
  • Rear suspension
  • Steering
  • Brake system
  • Electrical equipment
  • Power devices
  • Electrical circuits
 
MercedesMan.ru © 2017–2026 · Mobile version · Read about Mercedes · Sitemap: EN BG BY UA RS HR RO PL SK HU · Feedback · Site search · Bookmark A-Class (W168) · C-Class (W201) · C-Class (W202) · C-Class (W203) · E-Class (W123) · E-Class (W124) · E-Class (W210) · G-Class (W463) · M-Class (W163) · S-Class (W116, petrol) · S-Class (W126, petrol) · S-Class (W140) · S-Class (W220) · Sprinter · Vito 1 · Vito 2 · Vario 814D ·
 
We only use cookies without which some of the site's features may not be available.