
Cars BMW Cars Volkswagen Cars Chevrolet Cars Land Rover Cars Lada Cars Honda Cars Peugeot
English Русский
Български
Беларускі
Український
Српски
Hrvatski
Română
Polski
Slovenský
Magyar
Bookmark News and articles Sitemap Feedback Site search
MercedesMan.ru


A-Class C-Class E-Class G-Class M-Class S-Class Others
W116 (1972-1980, petrol) W126 (1979-1991, petrol) W140 (1991-1998) W220 (1998-2005)
  • Main
  • S-Class
  • W116 (1972-1980)
  • Chassis
  • Steering
  • Steering — removal and installation

Steering — removal and installation (Mercedes-Benz S-Class W116)

0
All models of cars are equipped with a steering mechanism with recirculating balls. When the steering wheel is turned, the gear ratio of the steering mechanism changes. When the angle of rotation of the steering wheels increases, the gear ratio in the steering mechanism increases proportionally, which gives certain advantages, for example, when parking a car.

The steering gear is located behind the front wheel suspension and is connected to the steering wheel by articulated steering shafts. This design allows for compact placement of the steering in the vehicle body. The steering shock absorber absorbs all shocks caused by uneven road surfaces, preventing them from affecting the steering wheel. The steering gear must not be disassembled or repaired. The power steering is installed at the customer's request and is described in section 16.

Removal and installation


Raise the front side of the car and place it on stands, or lift it using a lift or place the car on an inspection pit.

Loosen the Allen bolt connecting the steering shafts.

Loosen the nuts securing the ball joints of the steering rods and the transverse steering rod, and remove the ball joints using a puller. When installing a replacement steering gear, perform all dismantling and installation work depending on the configuration of the replacement gear.

Unscrew the shock absorber and steering mount to the bracket on the base of the car body.

Loosen the three bolts securing the steering gear to the longitudinal body reinforcement.


Disconnect the steering gear from the steering shafts and lower it down.

Before installation, unscrew the plug in the steering gear housing, check the oil level and top up if necessary.

During installation, perform the following tasks:

Set the steering gear to the middle position. To do this, turn the drive shaft so that the center of the steering gear nut hole is located exactly under the threaded hole in the steering gear cover.

Screw the control bolt into the steering gear cover and fix the steering gear nut in the middle position (see fig. 235).
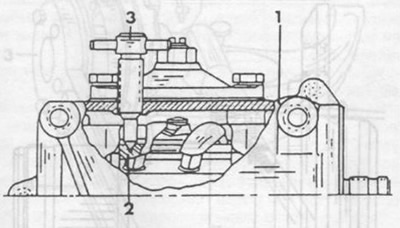
Fig. 235. Fixing the steering mechanism.

Fig. 235. Fixing the steering mechanism.
1 - steering mechanism,
2 - steering gear nut,
3 - control bolt.


Connect the steering gear screw to the steering shaft so that when the steering gear is in the vertical position, the double splines on the coupling are positioned exactly horizontally.

[Publication reprinted from this resource mercedesman.ru]

Turn the steering shaft to the middle position.

Turn the steering wheel so that the steering wheel pad is in a horizontal position. To check, remove the pad and check that the mark on the steering shaft is directed vertically upwards.


If the steering wheel has been removed, it is necessary to check that the cam of the turn signal switch on the steering shaft is in the middle of the cutout of the protective cover.

Lower the steering gear down onto the longitudinal body reinforcement, install new mounting bolts and tighten to a torque of 70-80 Nm.

Loosen the control bolt.

Screw the plug into the steering gear cover.

Insert the Allen bolt into the coupling and tighten it.

Check the rubber protective caps on the ball joints of the longitudinal steering rod. If the caps are damaged, they must be replaced; if the ball joint is also damaged, it must be replaced as an assembly. Perform a similar check of the ball joints of the steering rods. Install the ball pins of the joints in the conical holes, screw in and tighten the fastening nuts. When turning the pin in the hole, it must be held with a corresponding hex key. The fastening nuts must always be new.

After installing the steering rods, check the alignment of the front wheels as already described.
This article is available at: russian, bulgarian, belarusian, ukrainian, serbian, croatian, romanian, polish, slovak, hungarian
The article has been verified: Panova Maya Vladimirovna
Share with friends:
◀ Previous
S-Class W116 / Steering
Next ▶

 
Steering drive
Power Steering — Removal
Power steering pump
Steering Specifications
Tightening torques for threaded connections
More similar articles for repairing other models

☛ Adjusting the position of the steering wheel Mercedes W168 (1997-2004)
☛ Front axle / steering Mercedes W202 (1993-2000)
☛ Removal, disassembly and installation of the steering knuckle Mercedes W123 (1976-1985)
☛ Checking the condition of suspension and steering components Mercedes W463 (1999-2019)
☛ Checking the condition of suspension and steering components Mercedes W163 (1997-2005)
☛ Checking the Power Steering Fluid Level Mercedes Sprinter (1995-2000, diesel)
Link in different formats to this article
Comments and feedback from visitors
No comments yet


How much will 46 + 43 ?


W220 (1998-2005) 
  • General information
  • Introduction to guide
  • User manual
  • Maintenance
  • Power unit
  • Engine repair
  • Cooling and heating systems
  • Power and exhaust systems
  • Ignition and control system
  • Charge and launch systems
  • Transmission
  • Automatic gearbox
  • Drive shafts
  • Chassis
  • Brake system
  • Front suspension
  • Rear suspension
  • Steering
  • Body
  • Body elements
  • Electrical equipment
  • Equipment and devices
  • Electrical circuits
W140 (1991-1998) 
  • User manual
  • Controls and instruments
  • Driving and operation
  • Maintenance
  • Power unit
  • Petrol engine V6
  • Petrol engine V8
  • Petrol engine V12
  • Diesel engine OM603
  • Diesel engine OM606
  • Cooling system
  • Power supply and injection system
  • Control system HFM-SFI
  • Control system LH-SFI
  • Control systems ME-SFI
  • Diesel control system
  • Ignition system
  • Charge and launch system
  • Transmission
  • Mechanical gearbox 717.438
  • Mechanical gearbox 717.454
  • Automatic gearbox 722.5
  • Automatic gearbox 722.6
  • Clutch and drive shafts
  • Differential
  • Chassis
  • Brake system
  • Steering
  • Front suspension
  • Rear suspension
  • Body
  • Exterior (external elements)
  • Interior (internal elements)
  • Electrical equipment
  • Equipment and devices
  • Electrical circuits
W126 (1979-1991, petrol) 
  • Power unit
  • Engine repair
  • Ignition system
  • Lubrication system
  • Cooling system
  • Fuel system
  • Fuel injection system
  • Transmission
  • Clutch and cardan
  • Mechanical gearbox
  • Automatic gearbox
  • Chassis
  • Front suspension
  • Rear suspension
  • Steering
  • Brake system
  • Electrical equipment
  • Power devices
  • Electrical circuits
W116 (1972-1980, petrol) 
  • General information
  • Introduction to guide
  • Power unit
  • 8-cylinder V8 engine
  • 6-cylinder I6 engine
  • Cooling and lubrication system
  • Power system (carburetor)
  • Fuel injection system
  • Ignition system
  • Transmission
  • Clutch and cardan
  • Car gearbox
  • Chassis
  • Front suspension
  • Rear suspension
  • Steering
  • Brake system
  • Electrical equipment
  • Power devices
  • Electrical circuits
 
MercedesMan.ru © 2017–2026 · Mobile version · Read about Mercedes · Sitemap: EN BG BY UA RS HR RO PL SK HU · Feedback · Site search · Bookmark A-Class (W168) · C-Class (W201) · C-Class (W202) · C-Class (W203) · E-Class (W123) · E-Class (W124) · E-Class (W210) · G-Class (W463) · M-Class (W163) · S-Class (W116, petrol) · S-Class (W126, petrol) · S-Class (W140) · S-Class (W220) · Sprinter · Vito 1 · Vito 2 · Vario 814D ·
 
We only use cookies without which some of the site's features may not be available.