



Contents: Compression measurement ↡ Differences in the sequence of work…↡ Causes of low compression ↡
Measuring compression allows you to assess the technical condition (degree of wear of individual parts) engine, as well as the need for major repairs. A compression gauge is required to perform this operation.
Compression values for gasoline engines are shown in Table 5.1.
Table 5.1 Compression values of gasoline engines
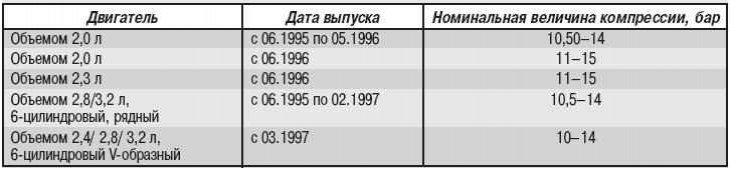
The difference in pressure in the cylinders should not be more than 1.5 bar. In old engines, compression decreases, but if the difference does not exceed the permissible norms, this is not considered a malfunction. As soon as the compression reaches the lower limit, the engine should be repaired or replaced.
If the cylinder compression differs by more than 1.5 bar, the cause should be sought in the following:
- wear of pistons or piston rings;
- sticking of rings in pistons;
- cylinder wear (often due to sticking rings);
- carbon deposits on valves and seats;
- damaged valve;
- burnt valve (when the gap is too small).
Compression measurement


1. Warm up the engine to operating temperature. After that, drive about 5 km to ensure sufficient oil temperature.
2. Stop the engine by turning off the ignition.
3. Open the hood.
4. Apply the parking brake to the vehicle.
5. Set the gear shift lever to neutral (or to position "P" in a car with an automatic transmission).
6. Remove the spark plugs.
Caution! Do not turn the crankshaft with the starter to prevent fuel from entering the cylinders and damaging the compression measuring instrument.
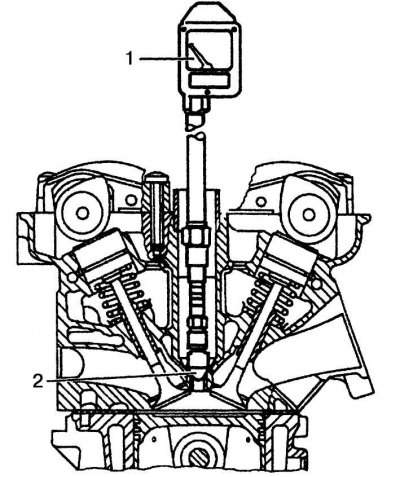
Fig. 5.3. Compression check: 1 – compression gauge; 2 – sealing cone
7. Insert compression gauge 1 (Fig. 5.3) into the threaded part for the spark plug, pressing with sealing cone 2.
8. Connect the recording device:
- unscrew the control unit cover fastening;
- in the control unit housing, disconnect the connector of terminal "50" and connect pin 1 of the connector to the control circuit wire of the recording instrument;
- remove the cover of the positive terminal "30" on the left wheel arch in the engine compartment and connect the power cable of the recording instrument to the positive terminal "30".
9. Ask an assistant to press the accelerator pedal all the way down and hold it in this position throughout the entire test.
10. Turn the crankshaft with the starter several times, pressing the contact switch of the recording instrument to throw out carbon deposits and soot from the cylinder.
11. Press the contact switch of the device and turn the engine crankshaft with the starter (not less than 9 turns), until the readings stop changing.
12. Record the obtained compression value.
13. Check all cylinders in sequence and compare the results obtained with the nominal values.
14. Screw in the spark plugs.
15. Connect the connector of terminal "50" of the control unit and install the cover.
16. Close the cover of the positive terminal "30" on the wheel arch.
17. Close the hood.
Differences in the sequence of work for the V6 engine
1. Remove the air filter with the mass air flow sensor.
2. Remove the ignition coil from the left side.
3. Remove one spark plug from each cylinder.
4. After checking the compression, have the engine fault code memory read at a specialized auto repair shop and, if necessary, erase its contents.
Causes of low compression
If the compression is low, drip a small amount of oil into the nozzle hole. Measure the compression again.
If the values obtained do not increase: the valves, valve seats, valve ports, cylinder head or cylinder head gasket may be damaged.
If you get higher results, the cause should be sought in the piston rings or in the cylinders themselves. Oil improves the sealing of the pistons and cylinder walls for a short time, so the resistance of the compressed air becomes stronger.