
Sequence of work
1. Mark the direction of travel on the outside of the belt with a felt pen. If you put on the accessory drive belt incorrectly, it will wear out quickly. When installing the belt, make sure that the grooves of the belt fit exactly into the grooves of the pulleys.
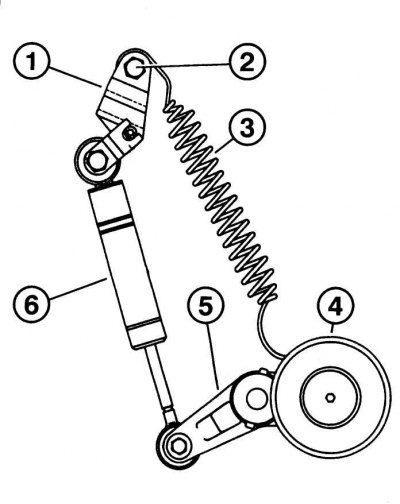
Pic. 4.26. Accessory drive belt tensioner: 1 - tensioner lever with a hole; 2 - locknut; 3 - tension spring; 4 - pulley; 5 - pulley lever; 6 - vibration damper
2. All engines except CDI: Loosen locknut 2 (pic. 4.26) at the location of the spring.
3. Insert a pry bar from above into the spring tension lever 1 and push it out just enough to remove the fixing bolt.
4. Remove the lever.
5. Slightly back pulley 4 and remove the auxiliary drive belt.
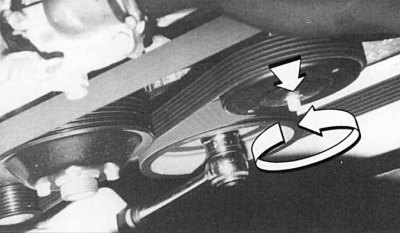
Pic. 4.27. Loose belt tension
6. On CDI engines: insert Torx key (E10) on the pulley and turn it counterclockwise (pic. 4.27) until the belt loosens. Remove the accessory drive belt.
7. Pass the belt between the impeller and fan shroud and remove it. You can detach the fan shroud from the radiator and remove the belt.
8. Check the condition of the pulleys and clean them. Pay attention to the play of the guide and idler pulleys.
9. Check the belt for wear and clean it of dirt.
Rupture of a belt of a drive of auxiliary units
If the red battery warning light comes on while driving, a broken belt may be the cause. Often, during a break, you can hear a thud against the metal in the engine compartment.
The movement cannot be continued, as the coolant pump will not work. Otherwise, the coolant will quickly boil, the engine will overheat and be seriously damaged. Do not risk moving even at low speed with stops. If you don't have a spare belt in your car, it's best to tow your car to a parking lot.
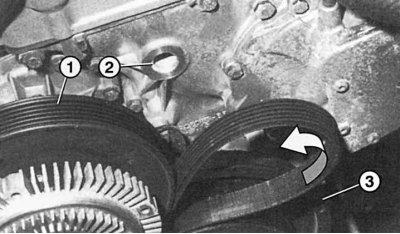
Pic. 4.28. Installing the accessory drive belt on the tensioner pulley: 1 - pulley of the cooling system; 2 - tensioner pulley (withdrawn); 3 - crankshaft pulley
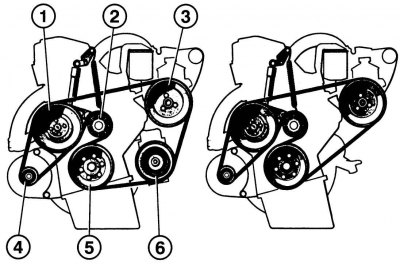
Pic. 4.29. Location of the auxiliary drive belt for engines 220 D, 290 TD, 300 D: 1 - coolant pump; 2 - tensioner pulley; 3 – servo hydraulic pump pulley; 4 – three-phase current generator; 5 - crankshaft pulley; 6 - air conditioning compressor
10. Thread the new accessory drive belt through the fan blades (pic. 4.28, 4.29).
11. Pass the belt through the pulleys, observing the order of its installation.
12. All engines except CDI: tighten the belt. To do this, use the lever to pull the tensioner spring until the tensioner bolt can be put on the lever.
13. Tighten the nut.
14. On CDI engines: To install the belt, tighten the tensioner pulley with a Torx wrench.
15. Slowly loosen the pulley until the accessory drive belt can be put on.
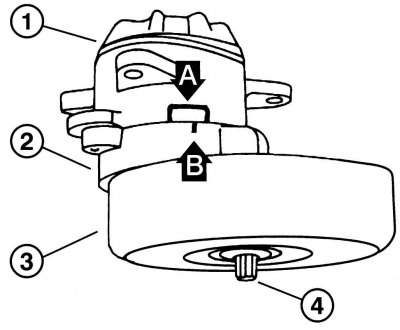
Pic. 4.30. Mutual position of pulleys: 1 - body; 2 – pulley lever; 3 - pulley; 4 - Torx screw; A - marking area «IN»; B - marking
16. Check the correct fit of the belt in the grooves of the pulleys (pic. 4.30).