
Cars BMW Cars Volkswagen Cars Chevrolet Cars Land Rover Cars Lada Cars Honda Cars Peugeot
English Русский
Български
Беларускі
Український
Српски
Hrvatski
Română
Polski
Slovenský
Magyar
Bookmark News and articles Sitemap Feedback Site search
MercedesMan.ru


A-Class C-Class E-Class G-Class M-Class S-Class Others
W123 (1976-1985) W124 (1984-1995) W210 (1996-2002)
  • Main
  • E-Class
  • W210 (1996-2002)
  • Diesel engines
  • Engine repair
  • Hydraulic tappets — checking and adjustment

Hydraulic tappets — checking and adjustment (Mercedes-Benz E-Class W210)

0
Contents: Valve knocking when starting the…↡ The principle of hydraulic…↡ Checking hydraulic tappets ↡ Working at high speeds ↡
The hydraulic valve adjustment system ensures that the valves have a gap and that the closed valves fit tightly to the seat. The hydraulic tappets are located between the camshaft cams and the end of the valve stem. The difference between a hydraulic adjustment system is that the valves run without gaps, which significantly reduces noise compared to the operation of conventional valves.

Valve knocking when starting the engine


When the engine has not been running for a long time, valve knocking is not the cause of failure. When the engine has not been running for a long time, oil flows out of the hydraulic tappets. When the engine is started, the hydraulic tappets immediately fill with oil, and the knocking disappears.

If the valve knocking in the cylinder head area continues on a warm engine, this indicates defects in one or more hydraulic tappets. They cannot be repaired, so they should be replaced.

The reasons for valve knocking may be the following:
  • 1. Before starting the engine, the oil was changed.
  • 2. The engine has not been running for more than a day.
  • 3. The engine starts after replacing the tappets.

The principle of hydraulic adjustment of thermal valve clearances
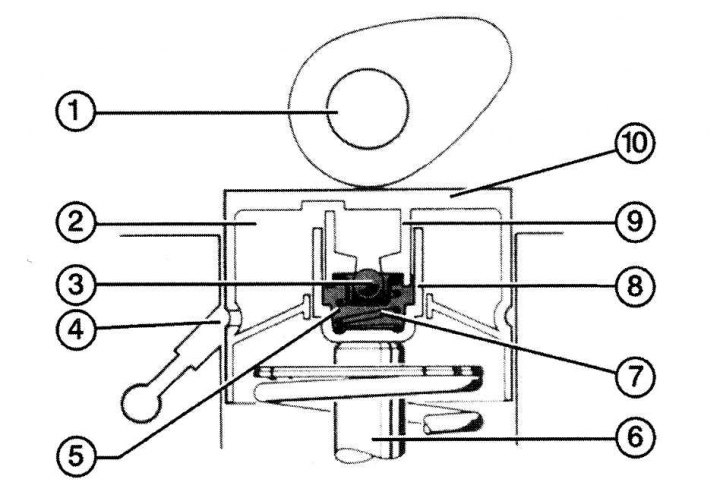


Fig. 4.18. Hydraulic pusher in section: 1 – camshaft; 2 – oil reservoir in the body; 3 – check…

Fig. 4.18. Hydraulic pusher in section: 1 – camshaft; 2 – oil reservoir in the body; 3 – check valve; 4 – oil supply channel; 5 – high pressure zone; 6 – valve stem; 7 – spring; 8 – cylinder; 9 – piston; 10 – hydraulic pusher housing


Hydraulic tappets consist of two main parts - a piston and a cylinder (Fig. 4.18). A spring presses the piston against the surface of the tappet. When the valve is closed, oil passes from the engine lubrication system through the oil gallery in the cylinder head through the bypass hole in the tappet housing into the tappet cylinder. The tappet check valve is open, and oil fills the piston grooves. When the camshaft cam presses on the tappet, its housing presses on the piston, under the influence of which the valve closes and stops the bypass of oil. Since the liquid is not compressed, the oil in this case serves as a rigid connection between the camshaft cam and the valve stem, so when pressing on the valve there is no gap. The pressure difference is compensated by the bypass of oil from the tappet cylinder into its housing, providing additional lubrication of the working parts of the camshaft cams. After the valve closes, the pressure in the pusher body drops, the check valve opens, and the cylinder is again filled with oil.

During long-term operation of the engine, the valve mechanism parts wear out, but due to the operating principle of hydraulic tappets, the valve clearances can be checked after a relatively long period of time.

Checking hydraulic tappets


1. Warm up the engine.


2. Let the engine idle until the fan turns on for the first time.

3. Let the engine run for 2 minutes at high speed (2500 min⁻¹).

4. Turn off the engine.

5. Remove the cylinder head cover.

6. Turn the engine until the camshaft lobes of the cylinder being tested point upward.
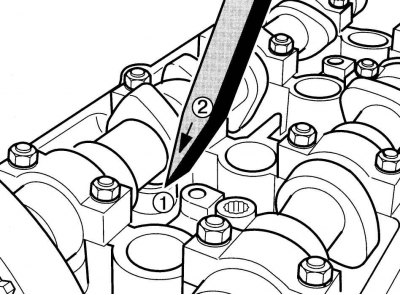
Fig. 4.19. Checking the hydraulic tappet: 1 – pusher; 2 – wedge

Fig. 4.19. Checking the hydraulic tappet: 1 – pusher; 2 – wedge


7. Use a wooden or plastic pin to press down on the plunger (Fig. 4.19).

8. If the push rod goes down quickly and without resistance, it should be replaced. This work should be done by specialists in a car repair shop.

Working at high speeds


Running at high speeds reduces the service life of the engine. If the engine runs at high speeds and knocks or noises are heard, this indicates wear of the crankshaft or valve mechanism. If the wear is severe, the tappet may break. As a rule, this leads to serious engine failure.

Some malfunctions of hydraulic tappets, their causes and methods of elimination are given in table.
This article is available at: russian, bulgarian, belarusian, ukrainian, serbian, croatian, romanian, polish, slovak, hungarian
The article has been verified: Polyakov Zakhar Grigorievich
Share with friends:
◀ Previous
E-Class W210 / Engine repair
Next ▶

Cranking the engine crankshaft
Six-cylinder diesel engines
Five-cylinder diesel engines
Four-cylinder diesel engines
Possible malfunctions of the hydraulic tappet, their causes and methods of elimination
Camshaft drive chain
Checking the compression in the cylinders
Checking the accessory drive belt
Replacement of auxiliary drive belt
More similar articles for repairing other models

☛ Parking brake — checking operation, running-in and adjustment Mercedes W168 (1997-2004)
☛ Hydraulic disc tappets Mercedes W202 (1993-2000)
☛ Checking and adjusting the hydraulic limiter Mercedes W463 (1999-2019)
☛ Seat adjustment Mercedes W163 (1997-2005)
☛ Checking the hydraulic pump Mercedes W140 (1991-1998)
☛ Checking the serviceability of hydraulic tappets Mercedes Sprinter (1995-2000, diesel)
Link in different formats to this article
Comments and feedback from visitors
No comments yet


How much will 27 + 38 ?


W210 (1996-2002) 
  • General information
  • Vehicle description
  • Working conditions and tools
  • Car care
  • Diesel engines
  • Engine repair
  • Lubrication system
  • Cooling system
  • Injection system
  • Supply system
  • Exhaust system
  • Gasoline engines
  • Engine repair
  • Lubrication system
  • Cooling system
  • Control system
  • Power and exhaust system
  • Transmission
  • Clutch
  • Mechanical gearbox
  • Automatic gearbox
  • Drive shafts
  • Chassis
  • Car suspension
  • Steering
  • Tires and wheels
  • Brake system
  • Body
  • Exterior (external elements)
  • Interior (internal elements)
  • Doors and windows
  • Heating and ventilation
  • Electrical equipment
  • Equipment and devices
  • Power devices
  • Lighting and signaling
  • Electrical circuits
W124 (1984-1995) 
  • General information
  • Governing bodies
  • Driving and operation
  • Weekly care
  • Maintenance (gasoline)
  • Maintenance (diesel)
  • Troubleshooting
  • Power unit
  • I4 petrol engine
  • V6 petrol engine (SOHC)
  • V6 petrol engine (DOHC)
  • Diesel engines
  • Engine overhaul
  • Cooling system
  • Heating and ventilation
  • Fuel system (carburetor)
  • Injection system «Bosch CIS-E»
  • Injection system «Bosch HFM»
  • Diesel fuel system
  • Supply system
  • Starting and charging system
  • Ignition system (I4)
  • Ignition system (V6)
  • Preheating
  • Transmission
  • Clutch
  • Mechanical gearbox
  • Automatic gearbox
  • Drive shafts
  • Chassis
  • Brake system
  • Car suspension
  • Steering
  • Body
  • Exterior (external elements)
  • Interior (internal elements)
  • Doors, locks and windows
  • Electrical equipment
  • Equipment and devices
  • Switches
  • Headlights and lighting
  • Electrical circuits
W123 (1976-1985) 
  • General information
  • Introduction to the guide
  • Power unit
  • Engine device
  • Repair M102 engines
  • Repair M110 and M123 engines
  • Cooling and lubrication (M102)
  • Cooling (M110 and M123)
  • Ignition system
  • Power system «Stromberg»
  • Power system «Solex 4A1»
  • Fuel injection «K-Jetronic»
  • Fuel injection «L-Jetronic»
  • Transmission
  • Clutch
  • Mechanical gearbox
  • Automatic gearbox
  • Cardan and rear axle
  • Chassis
  • Front suspension
  • Rear suspension
  • Steering
  • Brake system
  • Body
  • Exterior (external elements)
  • Interior (internal elements)
  • Doors, locks and windows
  • Electrical equipment
  • Equipment and devices
  • Power devices
  • Electrical circuits
 
MercedesMan.ru © 2017–2026 · Mobile version · Read about Mercedes · Sitemap: EN BG BY UA RS HR RO PL SK HU · Feedback · Site search · Bookmark A-Class (W168) · C-Class (W201) · C-Class (W202) · C-Class (W203) · E-Class (W123) · E-Class (W124) · E-Class (W210) · G-Class (W463) · M-Class (W163) · S-Class (W116, petrol) · S-Class (W126, petrol) · S-Class (W140) · S-Class (W220) · Sprinter · Vito 1 · Vito 2 · Vario 814D ·
 
We only use cookies without which some of the site's features may not be available.