



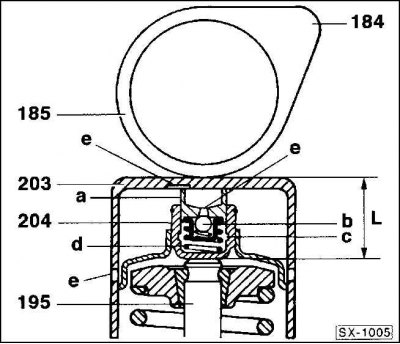
When the engine rotates, the plate tappet (203) is unloaded if the cam (184) of the camshaft is directed upwards. The spring (d) presses the compensating element (204), and it lies at the bottom against the valve stem (195), and at the top the pressure sleeve (a) presses on the plate tappet (203) in the direction of the camshaft. In this position, engine oil flows in or out of the working chamber (c) through a small opening (e). As soon as the plate tappet is unloaded again, the ball valve (b) is closed by the rotation of the cam of the rotating camshaft, and the enclosed oil acts as a solid body. The length (L) is thus adapted with each rotation of the camshaft to the corresponding changes in the size of the components in the valve drive. Repair of the plate tappet is not possible.
Important! Noise in the valve train when starting the engine is normal. When the engine is stopped, depending on the position of the cam, more or less oil is pushed out of the individual valve tappet. This causes noise until the hydraulic tappet is filled with oil again when the engine is rotating. Depending on the circumstances, this process can continue until the engine has warmed up to operating temperature. To ensure flawless operation of the hydraulic tappet, the cylinder head has an oil recirculation locking device that ensures that the oil passages in the cylinder head are completely emptied of oil when the engine is stopped.
Control
The hydraulic tappet should be checked if noise continues in the valve drive when the engine reaches operating temperature.
1. Drive with the engine warmed up. Once the coolant reaches operating temperature, continue driving for another 5 km to ensure that the engine oil is at a sufficient temperature.
2. If the hydraulic tappet is still noisy, stop the engine and remove the cylinder head cover.
3. Rotate the camshaft so that the cams of the cylinder to be checked point upwards. To do this, set the gearbox to idle, apply the parking brake and turn the crankshaft clockwise by the belt pulley mounting bolt with a suitable spanner.
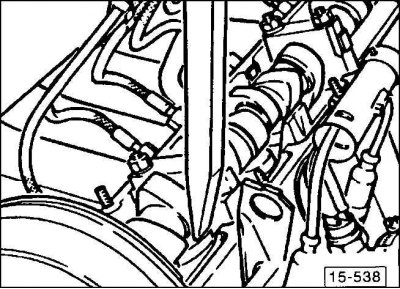
4. Press the plunger downwards with a wooden or plastic rod. If the plunger moves downwards more easily than the others, it should be replaced.