
Cars BMW Cars Volkswagen Cars Chevrolet Cars Land Rover Cars Lada Cars Honda Cars Peugeot
English Русский
Български
Беларускі
Український
Српски
Hrvatski
Română
Polski
Slovenský
Magyar
Bookmark News and articles Sitemap Feedback Site search
MercedesMan.ru


A-Class C-Class E-Class G-Class M-Class S-Class Others
190 (W201) (1982-1993) W202 (1993-2000) W203 (2000-2007)
  • Main
  • C-Class
  • W202 (1993-2000)
  • Power unit
  • Gasoline engines
  • Camshafts (6-cylinder engine)

Camshafts (6-cylinder engine) (Mercedes-Benz C-Class W202)

0
Contents: Removal ↡ Installation ↡
Caution! If the valve control parts are to be used again, they must be installed in the same places. To avoid mixing up the parts, we recommend making a panel for their storage. The camshafts are removed upwards with the cylinder head installed.


Removal


1. Disconnect the battery ground (–) cable.

Attention! This will erase the radio's anti-theft code.


2. Loosen the V-ribbed belt.

3. Remove the cylinder head cover.

4. Remove the front cover.

5. Set cylinder 1 to TDC.

6. Mark the position of the timing chain relative to each of the two camshaft sprockets by applying a paint stroke to the chain and sprocket.

7. Unscrew and remove the intake camshaft gear.

8. Remove the timing chain from the intake camshaft gear.
8. Remove the timing chain from the intake camshaft gear.


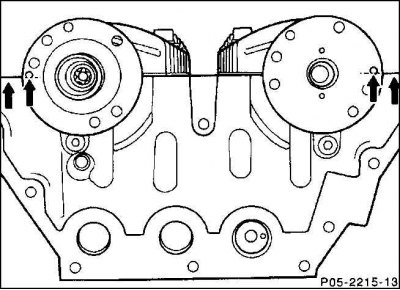
9. Check whether the camshafts are in the basic position. The adjustment holes with a diameter of 4 mm at the basic position of the camshafts are located respectively on the outside of the upper edge of the cylinder head (arrows). The camshaft adjuster is in the direction of "spat" (late).

Caution! Remove and install camshafts only in the basic position. They are very sensitive to breakage and therefore should be mounted, if possible, without tension.


Caution! Remove and install camshafts only in the basic position. They are very sensitive to…


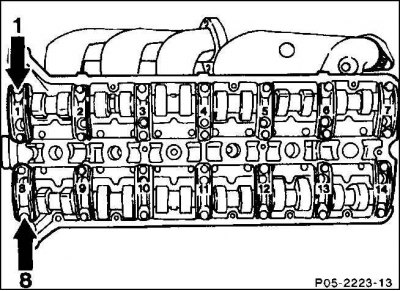
10. Unscrew the bearing caps of camshafts 1 and 8. Remove the bearing caps.

Attention! First loosen the bearing cap bolts crosswise by 1/2 turn, then loosen all the bolts by one turn and then unscrew.


11. To disassemble the intake camshaft, first remove bearing caps 9, 12 and 14.

12. Then remove bearing caps 10, 12 and 13. While doing this, loosen the bolts alternately and slowly until the resistance is removed.

13. To disassemble the exhaust camshaft, first remove bearing caps 4, 5 and 7.

14. Finally, remove bearing caps 2, 3 and 6. Loosen the bolts slowly and alternately until the resistance is removed.

15. Remove the camshafts.

Installation


1. Thoroughly clean all mounting parts with cleaning gasoline, clean the sealing surfaces.

2. Check the tappets.

3. Lubricate the camshafts and bearing areas with engine oil.

Attention! When replacing camshafts, ensure that they are identified correctly. The camshaft identifier is located at the installation locations of bearings 3 and 10 behind the bearing cap. The letters following the identifier are only a designation of the technological operation.


4. Install the intake camshaft so that the sharp ends of the cam lobes in the middle of the third cylinder are facing down.


5. First, mount bearing caps 10, 11 and 13. In doing so, tighten the bolts crosswise, alternately, by one turn, respectively.

6. Then mount bearing caps 9, 12 and 14.

7. Place the timing chain on the intake camshaft gear.

8. Insert the intake camshaft gear into the timing chain and secure it with a new flange bolt to a torque of 20 Nm. Then tighten the bolt further by 90° using an open-end wrench.

9. Check that the markings on the camshaft gears and the control chain applied during dismantling match.

10. Install the cylinder head cover.

11. Set the time on the clock.

12. Set the radio anti-theft code.
This article is available at: russian, bulgarian, belarusian, ukrainian, serbian, croatian, romanian, polish, slovak, hungarian
The article has been verified: Khromov Roman Mikhailovich
Share with friends:
◀ Previous
C-Class W202 / Gasoline engines
Next ▶

Camshafts — Main Position Adjustment (4 Cylinders)
Camshafts (4-cylinder engine)
Cylinder head (6-cylinder engine)
Cylinder head (2.2L engine)
Cylinder head (4-cylinder engine)
Hydraulic disc tappets
Valve stem seals — removal and installation
Valves — removal and installation
Directional valves
Valve seats in the cylinder head
More similar articles for repairing other models

☛ Checking the engine oil level using a dipstick Mercedes W168 (1997-2004)
☛ Diesel 6-cylinder engine E320CDI Mercedes W210 (1996-2002)
☛ Starting the engine from an auxiliary power source Mercedes W463 (1999-2019)
☛ Starting the engine from an auxiliary power source Mercedes W163 (1997-2005)
☛ Cylinder head cover of a six-cylinder engine Mercedes W126 (1979-1991, petrol)
☛ Checking the engine oil level Mercedes Sprinter (1995-2000, diesel)
Link in different formats to this article
Comments and feedback from visitors
No comments yet


How much will 21 + 32 ?


W203 (2000-2007) 
  • General information
  • Introduction to guide
  • User manual
  • Maintenance
  • Power unit
  • Gasoline engines
  • Diesel engines
  • Cooling system
  • Ventilation and heating
  • Supply system
  • Injection system (gasoline)
  • Injection system (diesel)
  • Exhaust system
  • Ignition and control system
  • Charge and launch systems
  • Transmission
  • Mechanical gearbox
  • Automatic gearbox
  • Clutch and drive shafts
  • Differential
  • Chassis
  • Brake system
  • Car suspension
  • Steering
  • Body
  • Exterior (external elements)
  • Interior (internal elements)
  • Electrical equipment
  • Equipment and devices
  • Lighting system
  • Electrical diagrams (2000)
  • Electrical diagrams (since 2001)
W202 (1993-2000) 
  • General information
  • User manual
  • Driving a car
  • Car care
  • Maintenance
  • Power unit
  • Gasoline engines
  • Diesel engines
  • Lubrication system
  • Cooling system
  • Heating and ventilation
  • Ignition system
  • Fuel system
  • Injection system (gasoline)
  • Injection system (diesel)
  • Exhaust system
  • Transmission
  • Clutch
  • Car gearbox
  • Chassis
  • Suspension, wheels and tires
  • Steering
  • Brake system
  • Body
  • Exterior (external elements)
  • Interior (internal elements)
  • Doors and windows
  • Electrical equipment
  • Equipment and devices
  • Power devices
  • Lighting system
  • Electrical circuits
190 (W201) (1982-1993) 
  • General information
  • Introduction to the guide
  • Operation and care
  • Maintenance (gasoline)
  • Maintenance (diesel)
  • Troubleshooting
  • Power unit
  • Petrol engine I4
  • Petrol engine V6
  • Diesel engines
  • Engine overhaul
  • Cooling and heating
  • Power system (carburetor)
  • Injection system (gasoline)
  • Injection system (diesel)
  • Exhaust system
  • Charge and start system
  • Ignition system (I4)
  • Ignition system (V6)
  • Diesel heating system
  • Transmission
  • Clutch
  • Mechanical gearbox
  • Automatic gearbox
  • Cardan shaft and axle shafts
  • Chassis
  • Brake system
  • Car suspension
  • Steering
  • Body
  • Exterior (external elements)
  • Interior (internal elements)
  • Doors, locks and windows
  • Electrical equipment
  • Equipment and devices
  • Electrical circuits
 
MercedesMan.ru © 2017–2026 · Mobile version · Read about Mercedes · Sitemap: EN BG BY UA RS HR RO PL SK HU · Feedback · Site search · Bookmark A-Class (W168) · C-Class (W201) · C-Class (W202) · C-Class (W203) · E-Class (W123) · E-Class (W124) · E-Class (W210) · G-Class (W463) · M-Class (W163) · S-Class (W116, petrol) · S-Class (W126, petrol) · S-Class (W140) · S-Class (W220) · Sprinter · Vito 1 · Vito 2 · Vario 814D ·
 
We only use cookies without which some of the site's features may not be available.