
Cars BMW Cars Volkswagen Cars Chevrolet Cars Land Rover Cars Lada Cars Honda Cars Peugeot
English Русский
Български
Беларускі
Український
Српски
Hrvatski
Română
Polski
Slovenský
Magyar
Bookmark News and articles Sitemap Feedback Site search
MercedesMan.ru


A-Class C-Class E-Class G-Class M-Class S-Class Others
W123 (1976-1985) W124 (1984-1995) W210 (1996-2002)
  • Main
  • E-Class
  • W210 (1996-2002)
  • Electrical equipment
  • Power devices
  • Measuring battery voltage

Measuring battery voltage (Mercedes-Benz E-Class W210)

0
1. If the last time the battery was charged was less than 6 hours ago, turn on the low beam for 30 seconds to allow the peak voltage to drop during charging.

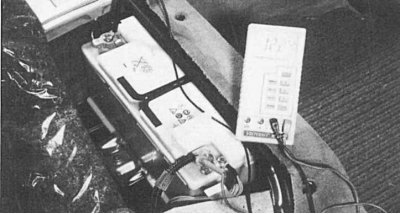
Fig. 9.6. Measuring the battery voltage with a multimeter. If the voltage is below 12.5 V, the…

Fig. 9.6. Measuring the battery voltage with a multimeter. If the voltage is below 12.5 V, the battery should be charged


2. After 4-5 minutes, measure the voltage between the battery terminals. Red wire with tester terminal (multimeter) connect to the positive terminal of the battery, black to the negative (Fig. 9.6). When measuring, all consumers must be switched off.
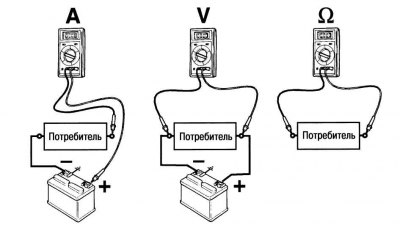
Fig. 9.7. The principle of connecting a multimeter when measuring current, voltage and resistance.…

Fig. 9.7. The principle of connecting a multimeter when measuring current, voltage and resistance. Consumers are, for example, lamps, a starter or a radio
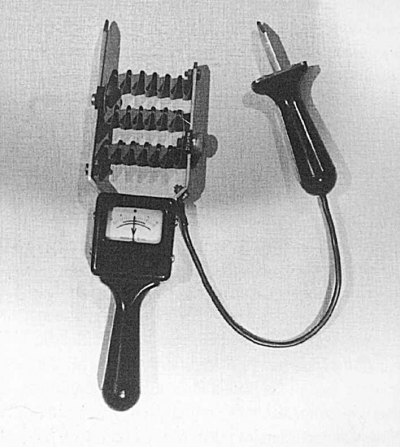

Fig. 9.8. Using a special tester, you can determine the battery condition by measuring its…

Fig. 9.8. Using a special tester, you can determine the battery condition by measuring its capacity. The measurement should not last longer than 10 seconds, since the battery is under a lot of load


Measuring voltage, current and resistance


If you want to check the health of your car's various electrical systems, you don't have to go to an electrician right away. There are many different devices on the market that you can use to check the condition of your electrical system yourself.

Tester with lamp (with needle contact). With its help you can check the presence of voltage in an electric circuit. The brighter the lamp burns, the higher the voltage.

The needle pierces the insulation of the wire being tested. The other terminal of the device on the wire is connected to the "ground" (car body).

Warning: The incandescent lamp tester consumes a lot of power, so it cannot be used to test electronic devices (for example, a controller). For this you need a voltage tester with an LED.


LED tester. Depending on the design, this device determines the presence of direct and alternating voltage within 6–700 V. Visually, the presence of voltage is determined by the lighting of the LED. Simple devices of this type are inexpensive.

Universal tester (multimeter)This device can measure voltage and current (constant and variable) and resistance. You can use inexpensive devices with a digital display. Such a device is usually powered by an autonomous battery.

Voltage measurement. In order to measure, for example, the voltage of the battery at idle, connect the negative terminal of the device to the negative terminal of the battery or attach it to the ground. Connect the positive terminal to the positive terminal of the battery or the wire being tested. If the device shows only 10.4 V, this indicates a short circuit in one of the battery cells. Also check the voltage of the battery when the starter is turned on; a value of less than 8 V indicates that there is something wrong with the battery.


Measuring current. To do this, you need to break the circuit and connect the device between the open contacts. When measuring, it will be enough to disconnect the contact connector and connect the wire between its two contacts.

Attention! Always remember the threshold values that your tester can measure. Very high currents flow on the contacts of such consumers as the starter, which can damage the device during measurement.


Measuring resistance. In this case, the tester checks whether the current passes through a particular wire or switch. If the current passes without obstruction, the resistance value will be zero. If there is a break somewhere, the resistance value will tend to infinity. In addition, you can find out what internal resistance a particular device has.

When measuring the resistance of a wire, its ends must be stripped and each connected to a different terminal of the device (Fig. 9.7). When setting measurement values, always start with the maximum value.

Measure the capacity of the battery (Fig. 9.8).

Battery condition according to hydrometer readings
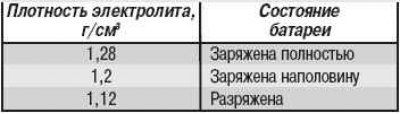


Battery condition according to hydrometer readings

Battery status according to multimeter readings
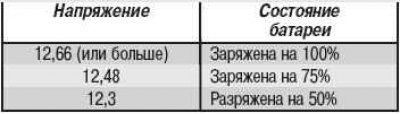


Battery status according to multimeter readings
This article is available at: russian, bulgarian, belarusian, ukrainian, serbian, croatian, romanian, polish, slovak, hungarian
The article has been verified: Polyakov Zakhar Grigorievich
Share with friends:
◀ Previous
E-Class W210 / Power devices
Next ▶

Checking the battery charge
Checking the electrolyte level in the battery, servicing the contacts
Generator — design description
Starter — design description
Battery — General Description
Starting the engine from an external power source
Charging the battery
Removal the battery
Detection of a faulty consumer
Checking the voltage regulator
More similar articles for repairing other models

☛ Starting the engine using an auxiliary battery Mercedes W168 (1997-2004)
☛ Starting the engine from an auxiliary battery Mercedes W202 (1993-2000)
☛ Checking and replacing spark plugs, checking the condition of… Mercedes W463 (1999-2019)
☛ Checking and replacing spark plugs, checking the condition of… Mercedes W163 (1997-2005)
☛ Checking battery condition, care and charging Mercedes W140 (1991-1998)
☛ Description of devices for measuring voltage, current and resistance Mercedes Sprinter (1995-2000, diesel)
Link in different formats to this article
Comments and feedback from visitors
No comments yet


How much will 29 + 11 ?


W210 (1996-2002) 
  • General information
  • Vehicle description
  • Working conditions and tools
  • Car care
  • Diesel engines
  • Engine repair
  • Lubrication system
  • Cooling system
  • Injection system
  • Supply system
  • Exhaust system
  • Gasoline engines
  • Engine repair
  • Lubrication system
  • Cooling system
  • Control system
  • Power and exhaust system
  • Transmission
  • Clutch
  • Mechanical gearbox
  • Automatic gearbox
  • Drive shafts
  • Chassis
  • Car suspension
  • Steering
  • Tires and wheels
  • Brake system
  • Body
  • Exterior (external elements)
  • Interior (internal elements)
  • Doors and windows
  • Heating and ventilation
  • Electrical equipment
  • Equipment and devices
  • Power devices
  • Lighting and signaling
  • Electrical circuits
W124 (1984-1995) 
  • General information
  • Governing bodies
  • Driving and operation
  • Weekly care
  • Maintenance (gasoline)
  • Maintenance (diesel)
  • Troubleshooting
  • Power unit
  • I4 petrol engine
  • V6 petrol engine (SOHC)
  • V6 petrol engine (DOHC)
  • Diesel engines
  • Engine overhaul
  • Cooling system
  • Heating and ventilation
  • Fuel system (carburetor)
  • Injection system «Bosch CIS-E»
  • Injection system «Bosch HFM»
  • Diesel fuel system
  • Supply system
  • Starting and charging system
  • Ignition system (I4)
  • Ignition system (V6)
  • Preheating
  • Transmission
  • Clutch
  • Mechanical gearbox
  • Automatic gearbox
  • Drive shafts
  • Chassis
  • Brake system
  • Car suspension
  • Steering
  • Body
  • Exterior (external elements)
  • Interior (internal elements)
  • Doors, locks and windows
  • Electrical equipment
  • Equipment and devices
  • Switches
  • Headlights and lighting
  • Electrical circuits
W123 (1976-1985) 
  • General information
  • Introduction to the guide
  • Power unit
  • Engine device
  • Repair M102 engines
  • Repair M110 and M123 engines
  • Cooling and lubrication (M102)
  • Cooling (M110 and M123)
  • Ignition system
  • Power system «Stromberg»
  • Power system «Solex 4A1»
  • Fuel injection «K-Jetronic»
  • Fuel injection «L-Jetronic»
  • Transmission
  • Clutch
  • Mechanical gearbox
  • Automatic gearbox
  • Cardan and rear axle
  • Chassis
  • Front suspension
  • Rear suspension
  • Steering
  • Brake system
  • Body
  • Exterior (external elements)
  • Interior (internal elements)
  • Doors, locks and windows
  • Electrical equipment
  • Equipment and devices
  • Power devices
  • Electrical circuits
 
MercedesMan.ru © 2017–2026 · Mobile version · Read about Mercedes · Sitemap: EN BG BY UA RS HR RO PL SK HU · Feedback · Site search · Bookmark A-Class (W168) · C-Class (W201) · C-Class (W202) · C-Class (W203) · E-Class (W123) · E-Class (W124) · E-Class (W210) · G-Class (W463) · M-Class (W163) · S-Class (W116, petrol) · S-Class (W126, petrol) · S-Class (W140) · S-Class (W220) · Sprinter · Vito 1 · Vito 2 · Vario 814D ·
 
We only use cookies without which some of the site's features may not be available.