
Cars BMW Cars Volkswagen Cars Chevrolet Cars Land Rover Cars Lada Cars Honda Cars Peugeot
English Русский
Български
Беларускі
Український
Српски
Hrvatski
Română
Polski
Slovenský
Magyar
Bookmark News and articles Sitemap Feedback Site search
MercedesMan.ru


A-Class C-Class E-Class G-Class M-Class S-Class Others
190 (W201) (1982-1993) W202 (1993-2000) W203 (2000-2007)
  • Main
  • C-Class
  • W202 (1993-2000)
  • General information
  • Driving a car
  • Starting the engine from an auxiliary battery

Starting the engine from an auxiliary battery (Mercedes-Benz C-Class W202)

0
Warning! If the prescribed connection recommendations are not strictly followed, there is a risk of burns due to spilled electrolyte, which is based on sulfuric acid. In addition, injuries or bruises may occur due to battery explosion, or malfunctions in electrical equipment may occur.


The cross-section of the wire for connecting the starter to the auxiliary battery must be at least 16 sq. mm (diameter about 5 mm) for internal combustion engines with forced spark ignition of the working mixture up to a cylinder volume of 2.5 liters. For engines with a cylinder volume of over 2.5 liters and for diesel engines, the cross-section of this cable must be at least 25 sq. mm. In this case, the determining factor is, of course, a vehicle with a discharged battery. As a rule, the cross-section of the cable is indicated on its packaging. It is recommended to purchase this cable with insulated clamping collets and a cross-section of 25 sq. mm, since it is also suitable for engines with a comparatively lower cylinder displacement.

Both batteries must have a voltage of 12 volts.

A discharged battery can freeze at temperatures as low as -10°C. Before connecting the starter cable to the auxiliary (outside the car) if the battery is frozen, be sure to defrost it.

The discharged battery must be properly connected to the vehicle's electrical system.

Check the fluid level in the discharged battery. If necessary, add distilled water.

Place the cars at such a distance from each other that there is no metal contact between them. Otherwise, current may flow already when the positive pole is connected.


On each of the two vehicles, tighten the handbrake lever. Set the manual transmission to neutral, or the automatic transmission to the park position "P".

Turn off all power consumers.

The auxiliary vehicle engine must be running at idle speed during the starting process of the main vehicle. This eliminates the possibility of damage to the generator due to voltage peaks that occur during starting.

When starting, avoid open flames and burning cigarettes near the battery, as it may emit flammable gases.

Be careful that the starter cables connecting the booster battery cannot be damaged by rotating parts such as the engine cooling fan.
Be careful that the starter cables connecting the booster battery cannot be damaged by rotating…


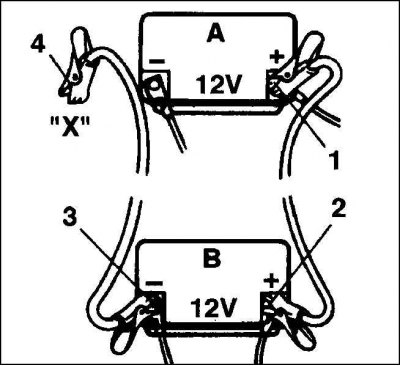
Connect the starter wires to the auxiliary battery as follows:

1. Connect the red wire to the positive terminal of the discharged battery (A).

2. Connect the other end of the red wire to the positive terminal of the battery that supplies current (B).

3. Connect the black wire to the negative terminal of the battery that supplies current.

4. Connect the other end of the black wire to a good point on the chassis (X) of the receiving vehicle. A metal part screwed to the engine block is best suited for this. In unfavorable circumstances: when connecting the wire to the negative pole of a discharged battery, the latter may explode due to sparking and the release of detonating gas.


Caution! The terminals of the wires for connecting the starter to the auxiliary battery must not contact each other when the wires are connected, or the positive terminals must not touch the body (body or frame).


Start and let the engine of the receiving vehicle run (the battery is discharged). When starting, do not press the starter continuously for more than 10 seconds, since the high current consumption heats up the clamping collets of the poles and the wires. Therefore, sometimes maintain a "cooling pause" of at least 1/2 minute.

Original source of information: mercedesman.ru

Do not lean over batteries - there is a risk of injury!

After starting the engine, disconnect the clamps from the terminals in the reverse order: first disconnect the black wire (-) from the terminal on the receiving vehicle, then on the current-supplying vehicle; first disconnect the red wire from the terminal on the current-supplying vehicle, then on the receiving vehicle.
This article is available at: russian, bulgarian, belarusian, ukrainian, serbian, croatian, romanian, polish, slovak, hungarian
The article has been verified: Khromov Roman Mikhailovich
Share with friends:
◀ Previous
C-Class W202 / Driving a car
Next ▶

Oil and fuel consumption
Cruise control
Vehicle motion control
Driving mode selection switch
Installing the gear selector lever
Towing a car
Jacking and lifting the car
More similar articles for repairing other models

☛ Starting the engine using an auxiliary battery Mercedes W168 (1997-2004)
☛ Electrical diagram of the model «280TE» with engine 123.093, starting… Mercedes W123 (1976-1985)
☛ Starting the engine from an auxiliary power source Mercedes W463 (1999-2019)
☛ Starting the engine from an auxiliary power source Mercedes W163 (1997-2005)
☛ Starting the engine from an auxiliary power source Mercedes W140 (1991-1998)
☛ Starting the engine of a car with an automatic transmission by towing Mercedes Sprinter (1995-2000, diesel)
Link in different formats to this article
Comments and feedback from visitors
No comments yet


How much will 37 + 45 ?


W203 (2000-2007) 
  • General information
  • Introduction to guide
  • User manual
  • Maintenance
  • Power unit
  • Gasoline engines
  • Diesel engines
  • Cooling system
  • Ventilation and heating
  • Supply system
  • Injection system (gasoline)
  • Injection system (diesel)
  • Exhaust system
  • Ignition and control system
  • Charge and launch systems
  • Transmission
  • Mechanical gearbox
  • Automatic gearbox
  • Clutch and drive shafts
  • Differential
  • Chassis
  • Brake system
  • Car suspension
  • Steering
  • Body
  • Exterior (external elements)
  • Interior (internal elements)
  • Electrical equipment
  • Equipment and devices
  • Lighting system
  • Electrical diagrams (2000)
  • Electrical diagrams (since 2001)
W202 (1993-2000) 
  • General information
  • User manual
  • Driving a car
  • Car care
  • Maintenance
  • Power unit
  • Gasoline engines
  • Diesel engines
  • Lubrication system
  • Cooling system
  • Heating and ventilation
  • Ignition system
  • Fuel system
  • Injection system (gasoline)
  • Injection system (diesel)
  • Exhaust system
  • Transmission
  • Clutch
  • Car gearbox
  • Chassis
  • Suspension, wheels and tires
  • Steering
  • Brake system
  • Body
  • Exterior (external elements)
  • Interior (internal elements)
  • Doors and windows
  • Electrical equipment
  • Equipment and devices
  • Power devices
  • Lighting system
  • Electrical circuits
190 (W201) (1982-1993) 
  • General information
  • Introduction to the guide
  • Operation and care
  • Maintenance (gasoline)
  • Maintenance (diesel)
  • Troubleshooting
  • Power unit
  • Petrol engine I4
  • Petrol engine V6
  • Diesel engines
  • Engine overhaul
  • Cooling and heating
  • Power system (carburetor)
  • Injection system (gasoline)
  • Injection system (diesel)
  • Exhaust system
  • Charge and start system
  • Ignition system (I4)
  • Ignition system (V6)
  • Diesel heating system
  • Transmission
  • Clutch
  • Mechanical gearbox
  • Automatic gearbox
  • Cardan shaft and axle shafts
  • Chassis
  • Brake system
  • Car suspension
  • Steering
  • Body
  • Exterior (external elements)
  • Interior (internal elements)
  • Doors, locks and windows
  • Electrical equipment
  • Equipment and devices
  • Electrical circuits
 
MercedesMan.ru © 2017–2026 · Mobile version · Read about Mercedes · Sitemap: EN BG BY UA RS HR RO PL SK HU · Feedback · Site search · Bookmark A-Class (W168) · C-Class (W201) · C-Class (W202) · C-Class (W203) · E-Class (W123) · E-Class (W124) · E-Class (W210) · G-Class (W463) · M-Class (W163) · S-Class (W116, petrol) · S-Class (W126, petrol) · S-Class (W140) · S-Class (W220) · Sprinter · Vito 1 · Vito 2 · Vario 814D ·
 
We only use cookies without which some of the site's features may not be available.