Cars BMW Cars Volkswagen Cars Chevrolet Cars Land Rover Cars Lada Cars Honda Cars Peugeot
English Русский
Български
Беларускі
Український
Српски
Hrvatski
Română
Polski
Slovenský
Magyar
Bookmark News and articles Sitemap Feedback Site search
MercedesMan.ru


A-Class C-Class E-Class G-Class M-Class S-Class Others
190 (W201) (1982-1993) W202 (1993-2000) W203 (2000-2007)
  • Main
  • C-Class
  • W202 (1993-2000)
  • General information
  • Driving a car
  • Jacking and lifting the car

Jacking and lifting the car (Mercedes-Benz C-Class W202)

0
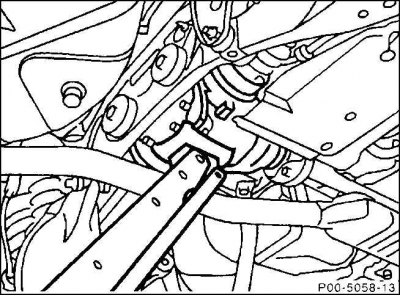
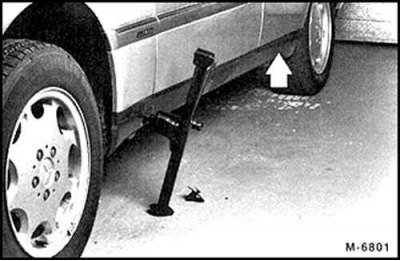
Lifting and support points: flatbed car jack.

Lifting and support points: flatbed car jack.


Car lift in the workshop
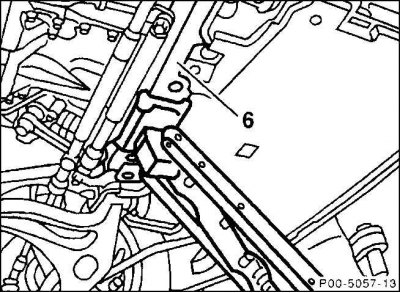


Car lift in the workshop

Car lift with platform, jack stands and car lift in workshop
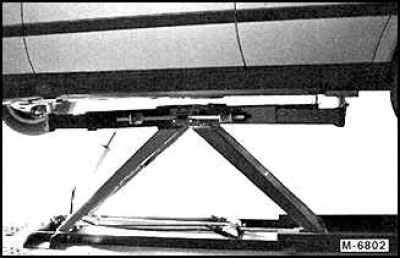


Car lift with platform, jack stands and car lift in workshop


Warning! When working under a vehicle, if there is no vehicle lift with a platform, install it on two or four stable trestles. Never work under a vehicle if it is not sufficiently secured or if it is supported only by a vehicle jack. Danger to life!


Caution! Only lift the vehicle when it is unloaded.


Warning! Using a rubber or wooden pad can help prevent damage to the base of the car body when lifting it. Never lift or support the car under the engine or gearbox.


Caution! Secure the wheels standing on the supporting surface with wedges to prevent them from rolling forward or backward. Do not rely on the parking brake system, as it must be released for some repair work.


Caution! Raise the vehicle only on a level, hard surface.


Attention! Place the car on jack stands so that one of its legs sticks out on the side.


Using a screwdriver as a lever, remove the protective cover on the jack mounting hole.

Carefully insert the vehicle jack mounting pin into the side member insert tube.

Keep the car jack vertical even on a slope.

Raise the front axle at the front by placing a jack on the frame crossmember (6) (see Fig. Car lift in the workshop).

Raise the vehicle from the rear by placing a jack on the rear axle crosspiece (see Fig. Car lift in the workshop).

The front and rear support points are located below the insertion tubes for the on-board car jack and are equipped with ebonite shock absorbers (see Fig. Car lift with platform, support trestles and car lift in workshop).

Note! The support points on the side members can also be used for side lifting using a car lift in the workshop. In this case, place the car jack under the ebonite shock absorbers.


[Publication taken from an online resource: MercedesMan.ru]
This article is available at: russian, bulgarian, belarusian, ukrainian, serbian, croatian, romanian, polish, slovak, hungarian
The article has been verified: Khromov Roman Mikhailovich
Share with friends:
◀ Previous
C-Class W202 / Driving a car
Next ▶

Towing a car
Starting the engine from an auxiliary battery
Oil and fuel consumption
Cruise control
Vehicle motion control
 
More similar articles for repairing other models

☛ Jacking up a car Mercedes W168 (1997-2004)
☛ Lifting and towing a car Mercedes W123 (1976-1985)
☛ Jacking up with a standard jack when changing wheels Mercedes W463 (1999-2019)
☛ Jacking and towing a car Mercedes W163 (1997-2005)
☛ Jacking and towing a car Mercedes W140 (1991-1998)
Link in different formats to this article
Comments and feedback from visitors
No comments yet


How much will 36 + 34 ?


W203 (2000-2007) 
  • General information
  • Introduction to guide
  • User manual
  • Maintenance
  • Power unit
  • Gasoline engines
  • Diesel engines
  • Cooling system
  • Ventilation and heating
  • Supply system
  • Injection system (gasoline)
  • Injection system (diesel)
  • Exhaust system
  • Ignition and control system
  • Charge and launch systems
  • Transmission
  • Mechanical gearbox
  • Automatic gearbox
  • Clutch and drive shafts
  • Differential
  • Chassis
  • Brake system
  • Car suspension
  • Steering
  • Body
  • Exterior (external elements)
  • Interior (internal elements)
  • Electrical equipment
  • Equipment and devices
  • Lighting system
  • Electrical diagrams (2000)
  • Electrical diagrams (since 2001)
W202 (1993-2000) 
  • General information
  • User manual
  • Driving a car
  • Car care
  • Maintenance
  • Power unit
  • Gasoline engines
  • Diesel engines
  • Lubrication system
  • Cooling system
  • Heating and ventilation
  • Ignition system
  • Fuel system
  • Injection system (gasoline)
  • Injection system (diesel)
  • Exhaust system
  • Transmission
  • Clutch
  • Car gearbox
  • Chassis
  • Suspension, wheels and tires
  • Steering
  • Brake system
  • Body
  • Exterior (external elements)
  • Interior (internal elements)
  • Doors and windows
  • Electrical equipment
  • Equipment and devices
  • Power devices
  • Lighting system
  • Electrical circuits
190 (W201) (1982-1993) 
  • General information
  • Introduction to the guide
  • Operation and care
  • Maintenance (gasoline)
  • Maintenance (diesel)
  • Troubleshooting
  • Power unit
  • Petrol engine I4
  • Petrol engine V6
  • Diesel engines
  • Engine overhaul
  • Cooling and heating
  • Power system (carburetor)
  • Injection system (gasoline)
  • Injection system (diesel)
  • Exhaust system
  • Charge and start system
  • Ignition system (I4)
  • Ignition system (V6)
  • Diesel heating system
  • Transmission
  • Clutch
  • Mechanical gearbox
  • Automatic gearbox
  • Cardan shaft and axle shafts
  • Chassis
  • Brake system
  • Car suspension
  • Steering
  • Body
  • Exterior (external elements)
  • Interior (internal elements)
  • Doors, locks and windows
  • Electrical equipment
  • Equipment and devices
  • Electrical circuits
 
MercedesMan.ru © 2017–2026 · Mobile version · Read about Mercedes · Sitemap: EN BG BY UA RS HR RO PL SK HU · Feedback · Site search · Bookmark A-Class (W168) · C-Class (W201) · C-Class (W202) · C-Class (W203) · E-Class (W123) · E-Class (W124) · E-Class (W210) · G-Class (W463) · M-Class (W163) · S-Class (W116, petrol) · S-Class (W126, petrol) · S-Class (W140) · S-Class (W220) · Sprinter · Vito 1 · Vito 2 · Vario 814D ·
 
We only use cookies without which some of the site's features may not be available.