
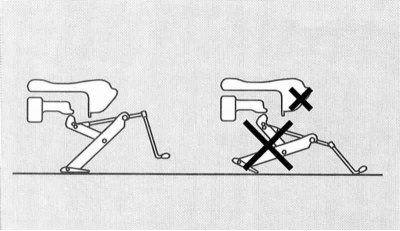
Attention! The standard jack is intended only for short-term lifting of the car when changing a wheel; before performing any work under the car, it must be installed on special supports!
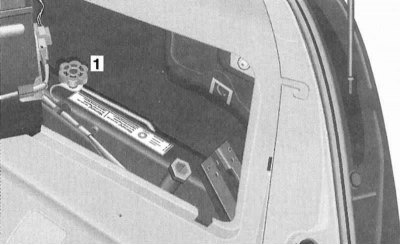
1 - Jack
1. The vehicle jack, complete with wheel wrench, is located in a pocket under the cover of the right side panel of the luggage compartment trim.
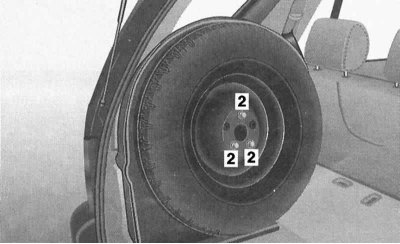
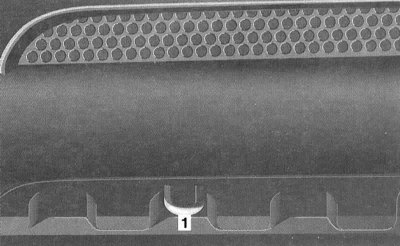
2. Regular spare wheel of a compact design is attached from below under the car, - grasping with TWO hands, remove the center cover from the rear bumper.
Attention! Attempting to remove the cover by pulling on the middle part risks damaging it!
2 - Mounting bolt
3 - Lever
3. Using the wrench provided in the vehicle tool kit, completely unscrew the bolt (2), - the bolt must remain in the holder, lift the wheel assembly and press the lever with a screwdriver (3). Turn the wheel support bracket down and pull it towards you, then turning it counterclockwise as far as it will go, remove the bayonet lock, then remove the protector and remove the spare wheel.
Note. A failed wheel cannot be installed in place of a compact spare tire - place it in a canvas cover and secure it in the luggage compartment (a description of the rules for securing cargo in the luggage compartment is given in Chapter Controls and techniques for safe operation).
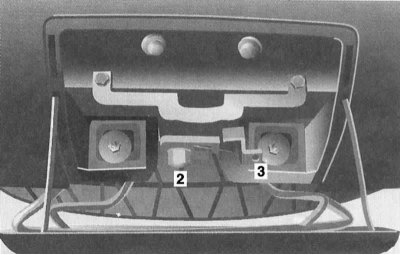
4. On ML 55 AMG models, the uninflated compact spare wheel fits into the casing (3), secured to the left in the luggage compartment (the arrows show the lid fasteners)
5. On ML 55 AMG models, the uninflated spare wheel of the compact design is stored in a special casing fixed to the left in the luggage compartment - release the latches and remove the casing cover. The wheel is fixed in the casing with three screws. The regular mounting point for the tire inflation compressor is located under the cover of the left side panel of the luggage compartment trim and is equipped with a mounting strap - you must first dismantle the spare tire casing.
6. If equipped, spare wheel (any design) can be mounted on a special bracket behind the tailgate of the car - release the lock by turning the locking lever in the appropriate direction. Turn out fixing bolts and remove a wheel from an arm where the failed wheel then can be established. When transferring the bracket to the transport position, make sure that it is securely fixed.
Warning! The deployed bracket can cover the combination rear light assembly - don't forget to put up the warning sign!
Attention! Driving with a loose outer spare wheel carrier is not permitted!
Note. Cars equipped with an external wheel holder should not be washed in automatic lines.
7. Inside the casing, the spare tire is fixed with three bolts (2), - ML 55 AMG models
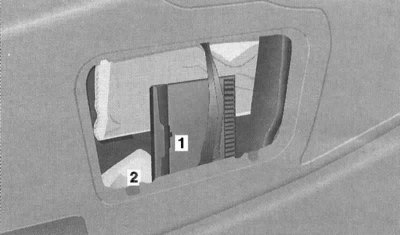
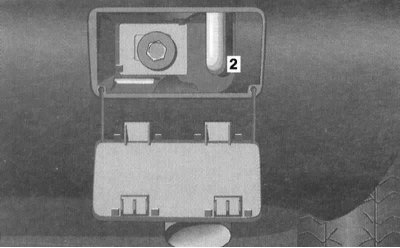
1 - Compressor
2 - Repair putty TIREFIT-KIT
8. Pocket for mounting an electric tire inflation compressor
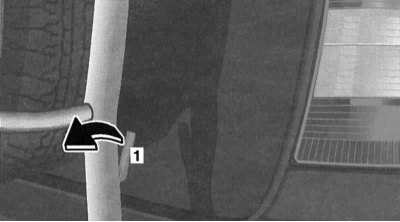
9. Spare wheel outer bracket lock lever (1), - to release turn in the direction of the arrow
10. Park the vehicle on a level, level surface, if possible paved.
11. Apply the parking brake.
12. With the appropriate configuration, move the AT selector lever to the position «R».
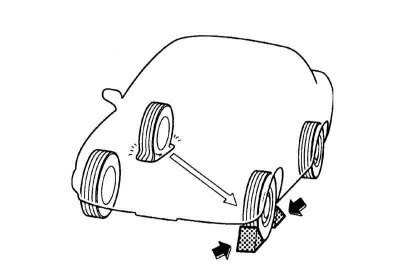
13. Chock the wheel diagonally opposite the wheel to be replaced.
Note. When performing the procedure on a slope, place shoes under both wheels of a working axle on the side of the descent.
14. Prepare the necessary tool (jack, wheel wrench) and spare wheel (see above).
15. If equipped, remove the protective cap of the disc, then loosen the bolts of the failed wheel.
16. Get the head of the jack under the special body bracket behind (front wheels) or ahead (rear wheels) wheel arch. Make sure that the heel of the jack rests on the ground with its entire surface - in case of loose soil, place a special lining under the heel (in winter it is useful to have a piece of a wide board in the car).
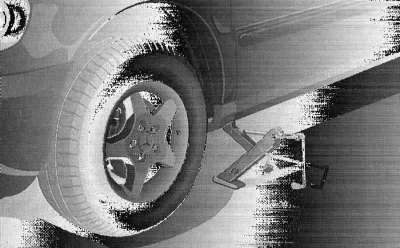
17. Remember that regardless of the presence of a slope, the jack must always occupy a strictly vertical position.
18. Rotate the drive knob until the wheel to be replaced is completely off the ground.
19. Turn out wheel bolts and make replacement of a wheel, evenly tightening bolts in a diagonal order (star) with the required force (150 Nm).
Attention! Only branded bolts with the Mercedes-Benz logo must be used to fasten the wheels!
20. Check the inflation pressure of the installed spare tire, if necessary, make the appropriate adjustment (4.3 kgf / cm 2).
Note. The maximum allowable continuous operation of the electric tire inflator is 8 minutes.
21. Put the removed wheel and tool back into place.
Towing
Emergency vehicle towing
Attention! When towing with the front axle raised, as well as when checking the parking brake on the brake test stand, the engine must be switched off, otherwise due to the active braking action of the electronic anti-skid (ESP) damage to the rear axle brake system can occur!
1. Strictly speaking, an emergency vehicle should be transported on a tow truck.
2. If towing cannot be avoided, it is best to do it on a rigid hitch (the emergency vehicle's ignition key must be turned to position 2).
Attention! It should be remembered that when disconnecting or in the event of a complete discharge of the battery, disabling the steering lock is not possible, as well as removing the AT selector lever (with appropriate equipment) out of position «R»!
3. If the transfer case is damaged, before towing the car, disconnect the cardan shafts from the drive axles.
4. Towing a car with a damaged front axle must be carried out with the latter off the ground and with the rear propeller shaft disconnected.
5. In case of damage to the rear axle, towing is carried out with the latter off the ground with the front wheels mounted on a special trolley.
6. When towing an emergency vehicle, use only a tow rope specially designed for this purpose. The use of modern synthetic materials made it possible to establish the production of towing cables of an elastic design, minimizing the risk of breaks as a result of the sling falling under the wheels of a towed vehicle. towing element (rope/rod) must only be hooked to the special towing eye, and never to the bumper or suspension elements.
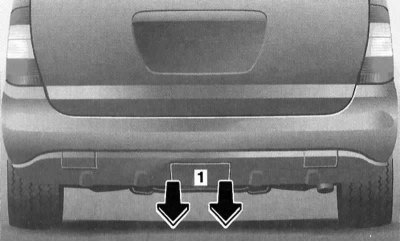
7. The front towing eye is located on the right under the bumper, the rear is on the right under a decorative cover that opens by prying with a screwdriver.
8. Front towing eye location (1).
9. Location of the rear towing eye (2), - models of a standard complete set.
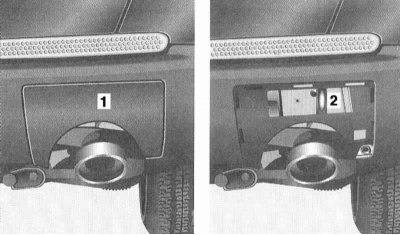
1 - Cover
2 - Towing eye
10. Location of the rear towing eye (ML 55 AMG models and all models of the AMG Styling Packet).
11. The driver of the towing vehicle should try to move as evenly as possible, releasing the clutch smoothly when changing gears and especially when starting off.
Do not forget to turn the key in the ignition of the towed vehicle to position 2, otherwise the steering column will inevitably lock. In addition, when the ignition is switched on, the direction indicators and brake lights are also activated.
Note. Activation of direction indicators when the alarm is on leads to a temporary shutdown of the latter.
12. When driving a towed vehicle, make sure that during the movement the cable remains constantly taut - when manipulating the foot brake, try to avoid sharp jerks and collisions with a loose cable.
13. Remember that when the engine is off, the braking efficiency of the car is noticeably reduced due to the fact that the vacuum brake booster ceases to function. In this case, the foot brake pedal should be depressed with a noticeably greater force than usual; when maneuvering, more force will also have to be applied to the steering wheel; the steering pump will also not function.
14. Before driving, the drivers of both vehicles (towing and towed) the itinerary must be agreed upon.
15. Movement should be carried out only at moderate speeds, along the shortest route and in compliance with traffic rules. Avoid sudden braking, acceleration and maneuvering. Be aware that when towing your vehicle on the edge of a dirt road, there is always a risk of drifting to the side of the road.
Features of towing emergency vehicles equipped with AT
Attention! When disconnected or in the event of a complete discharge of the battery, removing the AT selector lever from the position «R» does not seem possible!
1. Cars equipped with AT can be towed forward on all four wheels at a speed not exceeding 50 km/h and for a distance of not more than 50 km.
Attention! Failure to comply with the maximum speed or towing distance may result in damage to the transmission.
2. Before towing, check the transmission fluid level (see Section Replacing and checking the ATF level, replacing the AT filter), - if the ATF level is insufficient, the necessary adjustment should be made, or the car should be towed only with the driving wheels off the ground.
Attention! Towing a car equipped with AT over long distances, as well as with a failed transmission, should be carried out only with the drive wheels off the ground, or with the driveshafts disconnected, ideally on a tow truck platform.
3. Perform the following preparatory procedures:
- Release the parking brake;
- Start the engine;
- Move the selector lever to position «D», then to neutral («N»);
- Stop the engine;
- Turn the ignition key to position 2 (never leave it in position 0);
- Function «Automatic door locking while driving» can be turned off.
Towing to start the engine
Before attempting to start the engine by towing the vehicle, try to use an auxiliary power source if possible (see below).
Models with manual transmission
1. Towing in order to start the engine must be carried out with the battery connected and the ignition key turned in position 2 in the lock.
2. Starting the engine by pushing or towing should only be done with a cold engine and catalytic converter. Avoid repeated lengthy startup attempts.
Models with AT
It is not possible to start the engine equipped with AT by towing or pushing - if necessary, use an auxiliary power source.