
Note. Refer also to the materials of the corresponding Section of the Chapter Engine Electrical Systems.
Attention! Replace spark plugs only when the engine is cold or slightly warm. Removing spark plugs when the engine is hot risks damaging the threads in the alloy head (Oh) cylinders.
The spark plugs, depending on the type, should be replaced every 96,000 km or 160,000 km. Before starting work, prepare all the necessary tools (some spark plug manufacturers supply special tools to measure the spark plug gap):
- Candle wrench 16 mm, e.g. HAZET 900AKF. Mercedes-Benz service stations use a 3122V spark plug wrench for this;
- Additionally, it is recommended to purchase special pliers, for example, HAZET 1849, which make it easier to unscrew the candles. Mercedes-Benz uses the 3277A installation key for this;
- Replacement spark plugs (by number of cylinders), - cm. Specifications.
Details of installing spark plugs on gasoline engines
1. Adjustment of the interelectrode gaps on the candles should be made immediately before they are screwed in.
Attention! Make sure that the purchased candles correspond to the type of car engine!
2. Wait for the engine to cool completely - use your free time to check the condition of the candles and measure their interelectrode gaps.
Note. On new spark plugs, the electrode gaps are usually already set correctly at the factory.
3. Checking the spark plug gaps is carried out by introducing into the space between the electrodes of the spark plug a special wire gauge corresponding to the thickness of the probe - the probe should only lightly touch each of the electrodes. If necessary, bend the bent part of the electrode accordingly using the knurled adjuster.
Note. When adjusting the spark plug gap, bend only the ground electrode base without touching its end. If the ground electrode is offset from the center electrode, correct its position using the same knob.
Attention! Never try to correct the position of the central electrode!
4. Remove the upper section of the air cleaner (see chapter Power supply and exhaust systems).
5. Disconnect the electrical wiring from the BB spark plugs.
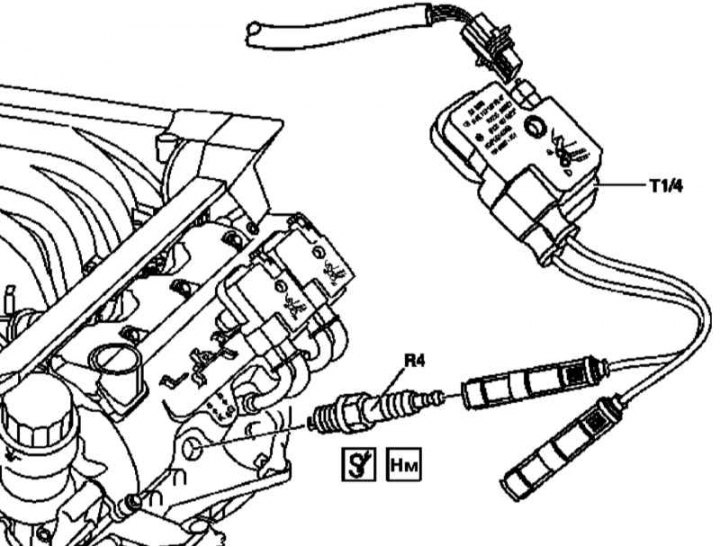
6. Remove ignition coils (Т1/4) (see chapter Engine Electrical Systems) and remove the spark plugs (R4).
7. Evaluate the candles turned out of the engine according to the state map (see photographic insert in Chapter Engine Electrical Systems). By analyzing the appearance of spent candles, you can assess the general condition of the engine.
8. Evaluate the condition of the porcelain insulators of the candles - if cracks are found, the candle must be replaced.
9. If there are signs of damage to the thread, the candle must also be replaced.
Note. A special tool is available to check the condition of the threaded part of the spark plugs, usually included in the repair kit (e.g. BERU).
10. Using a special drill, a damaged threaded hole in the cylinder head can be passed, which does not need to be dismantled for this). After that, a special one is installed in the head.
11. Before screwing in the spark plug, lightly lubricate its threaded part with a copper-containing anti-seize compound. Use your fingers to feed the spark plug into the socket in the niche, then tighten with a spark plug wrench, if possible equipped with a torque gauge (see Specifications).
Note. To prevent the spark plug from being twisted when screwing in, pull a small piece of the fuel hose onto its shank, which will act as a universal joint, and in case of misalignment, it will easily scroll on the spark plug, thereby preventing the possibility of damage to the thread.
13. Install the ignition coils (Т1/4) (see chapter Engine Electrical Systems).
14. Before connecting a high voltage spark plug (BB) wires (models with separate coils) carefully check the latter for damage, signs of corrosion of the internal contact. Measure the resistive resistance of the wire, - if the measurement result exceeds the value of 30 kΩ / meter, replace the entire wire as a set.
15. With rotational-translational movements, firmly seat the tip of the wire on the spark plug screwed into the cylinder head.
16. Proceeding in a similar manner, connect the electrical wiring to the remaining candles - try not to mix up the ignition order.