
Note. See also Section Spark plug Chapters Engine electrical equipment.
Attention! Replace spark plugs only when the engine is cold or slightly warm. If the spark plugs are turned out on a hot engine, the threads of the light metal cylinder head may be damaged.
Spark plugs, depending on the type, are replaced every 96,000 km or 160,000 km. Before starting work, prepare all the necessary tools (some spark plug manufacturers supply special tools to measure the spark plug gap):
- Candle wrench 16 mm, e.g. HAZET 900AKF. Mercedes-Benz service stations use a 3122V spark plug wrench for this.
- Additionally, it is recommended to purchase special pliers, for example, HAZET 1849, which make it easier to unscrew the candles. Mercedes-Benz uses the 3277A installation key for this.
- Depending on the number of engine cylinders, the required number of spark plugs. Applicable spark plugs are listed in Specifications. There are 2 spark plugs for each cylinder.
The best way to replace spark plugs is to buy new spark plugs in advance, adjust their gap, and replace each spark plug in turn. When buying candles, it is very important to choose exactly those candles that are designed for the engine of your car. Information about them is given in Specifications.
With new spark plugs on hand, let the engine cool completely before removing the old ones. During this time, you can inspect new spark plugs for defects and check spark plug gaps.
The spark plug gap is checked by inserting a gauge of the desired thickness between the electrodes at the end of the spark plug. The clearance must be as specified in Specifications. The wire should only touch each of the electrodes. If the gap is not correct, slightly bend the bent part of the electrode using a knurled adjuster until the desired gap is reached.
Note. When adjusting the gap of a new spark plug, bend only the ground electrode base without touching its end. If the ground electrode is offset from the center electrode, use the knurled adjuster to align them. Check the porcelain insulator for cracks, indicating that the spark plug needs to be replaced.
M104 / 120 series engines from 01.10.93, issue.
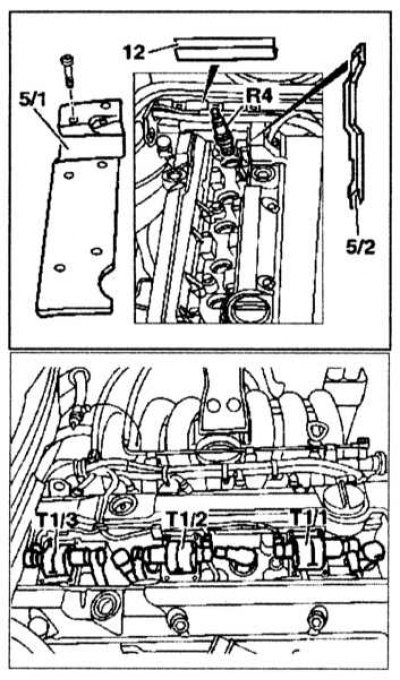
Replacing spark plugs on 104 series engines from 10/01/93, issue.
5/1 - Spark plug cover
5/2 - Guide
12 - Cable conduit
R4 - spark plug
T1-T3 - Ignition coils
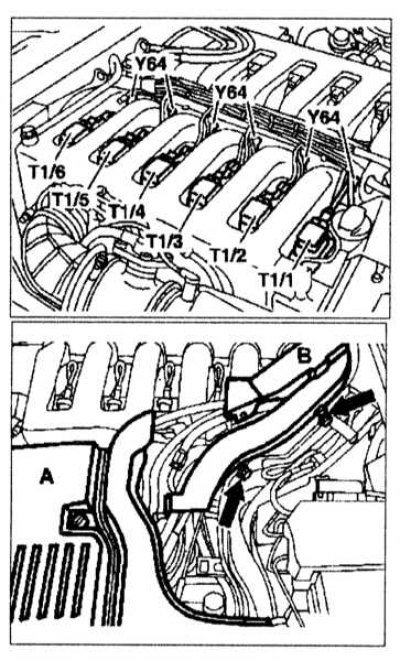
Replacing spark plugs on engines 120 from 01.10.93, issue.
T1 / 1-T1 / 6 - Ignition coil connectors
A - Lid
B - High-voltage wires
1. Turn off the ignition.
2. Disconnect the cable conduit (12). On engines 120.980, the cable line must be disconnected when changing the spark plugs.
3. Remove cover rubber seals (A) and wiring connectors (IN) (see resist. illustration).
4. Remove ignition coils. On engines 104, remove ignition coils T1/1, T1/2, T1/3 with control drives and high-voltage ignition wires.
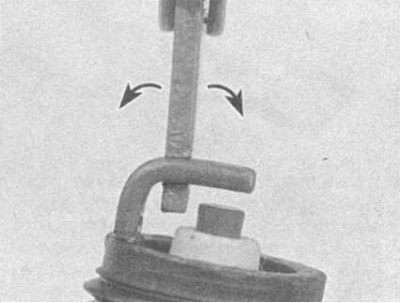
5. Disconnect the spark plug tips by turning gently. Check inside of BB wire lugs for side spark (color changes) and check the seals for damage.
6. Wipe tips and blow with compressed air.
7. Replace spark plugs. Use a rubber tube to prevent damage to the threads when screwing in the spark plug (inner diameter 5/16 inch), put on its insulator. When you try to wrap the candle not on the thread, the rubber tube will begin to rotate on the insulator, preventing damage to the thread.
8. Install the tips and make sure they are installed correctly.
M119.97/98 series engines
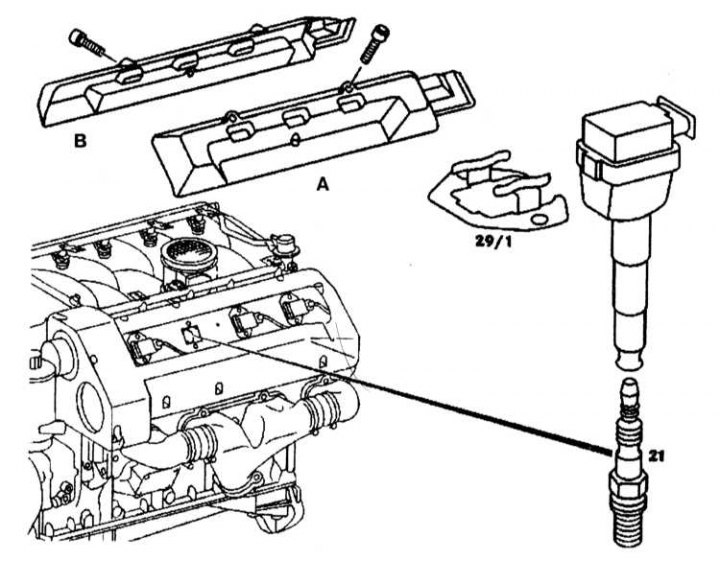
Replacement of spark plugs on engines 119.97/98
A, B - Covers
21 - spark plug
29/1 - Mounting element
1. Remove covers (A) And (IN).
2. Remove spark plugs (21).
3. Use spark plugs recommended by the manufacturer. Check the gap between the electrodes 0.8 mm.
Examination
1. Compare the removed candle with those shown in the Chapter Engine electrical equipment.
2. Check the electrode spacing with a probe. The required gap value is given in Specifications.
Note. With new spark plugs, the electrode spacing is usually set correctly.
3. If the spark plug thread is damaged, it must be replaced. To do this, there is a suitable tool and repair kit, in particular BERU. Using a special drill, the old threaded hole can be pierced. The cylinder head does not need to be removed to do this. After that, a new thread can be cut into the cylinder head and a candle is screwed in using a special threaded insert. Threaded inserts sit securely and tightly. 4. To set the distance between the contacts, bend the appropriate ground electrode. To do this, knock on the side of the mass electrode. When bending, rest a small screwdriver on the edge of the thread. Never lean on the center electrode as this can be damaged.
5. Apply a small amount of copper anti-seize compound to the threads of the new spark plug. Install the spark plug in the cylinder head and screw it in with your fingers until it stops, then tighten it with the head of the spark plug wrench. If possible, use a torque wrench to tighten the spark plug to make sure it is installed correctly. The tightening force of the candles is included in Specifications.
Note. Place a small piece of rubber hose or plastic tube over the spark plug shank to avoid the possibility of the spark plug being screwed in out of thread. The flexible tube will work as a universal joint, ensuring that the spark plug is aligned with the spark plug socket, and if the spark plug starts to warp, the hose will slip on it, making it impossible to strip the threads.
6. Before connecting to a high-voltage spark plug (BB) wire, carefully inspect it for damage, corrosion of the internal contact and measure the resistance. If it significantly exceeds 30 kOhm / m - replace the entire set of wires.
7. Connect the wire to the installed new spark plug, again using a twisting motion and holding the connector until it is fully seated on the spark plug.
8. Repeat the above procedure for the remaining spark plugs in sequence to avoid incorrectly connecting the spark plug wires.