



Contents: Crankshaft speed sensor ↡ Camshaft Position Sensor ↡ Knock sensors ↡ Electronic control device ↡ Coolant temperature sensor ↡ Throttle position switch ↡ Engine Air Intake Temperature Sensor ↡ Top Dead Center Sensor ↡
Warning! Disconnecting and removing ignition system sensors may cause damage that will be recorded in the memory of the electronic control unit. Some damage recorded in the memory may cause the system to switch to a special operating mode, which may affect the operation of the ignition system. It is advisable to contact a service station after any repair of the ignition system in order to erase the recorded damage from the memory of the electronic control unit.
Crankshaft speed sensor
Removal
1. Remove the ground cable from the battery.
2. Disconnect the electrical connector from the crankshaft speed sensor, located in the engine compartment behind the battery.
3. On models with HFM engine management, remove the starter from the clutch housing to improve access to the sensor.
4. Unscrew the bolt and remove the sensor from the clutch housing. Remove the gasket.
Installation
1. The crankshaft speed sensor is installed in the reverse order of removal.
Camshaft Position Sensor
Removal
Location of the camshaft position sensor
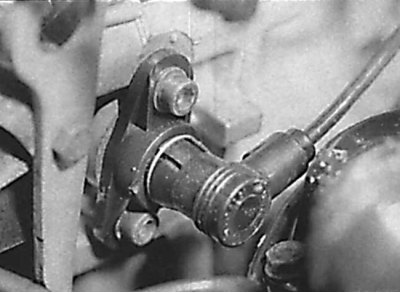
1. The camshaft position sensor is mounted in the front of the cylinder head to the left of the timing chain sprocket cover (see fig. Location of the camshaft position sensor). Check that the ignition is off and disconnect the electrical connector from the camshaft position sensor.
2. Remove the screws and camshaft position sensor.
3. Remove the sealing ring and adjusting shims.
Installation
1. Installation is performed in the reverse order of removal. If necessary, install a new sealing ring and adjusting linings of the required thickness.
Caution! The adjusting shims determine the distance from the sensor to the protrusion on the camshaft sprocket that controls the intake valves. If the adjusting shims are thinner than the specified thickness, the protrusion on the camshaft sprocket may hit the camshaft position sensor. To check the clearance, remove the cylinder head cover, then turn the engine until the protrusion on the camshaft sprocket aligns with the camshaft position sensor. Using a feeler gauge, check that the clearance between the protrusion on the camshaft sprocket and the camshaft position sensor is 0.4 - 0.6 mm. If necessary, adjust the clearance by changing the thickness of the shims under the camshaft position sensor.
Knock sensors
Removal
1. The knock sensors are mounted on the left side of the engine block. Since the sensors share a common wiring harness, they can only be removed as an assembly.
2. Make sure the ignition is off and disconnect the knock sensor wiring harness electrical connector from the control unit.
3. Remove the knock sensor harness from its mounting brackets. On HFM models, remove the starter for better access.
4. Unscrew the mounting bolts and remove the knock sensors from the cylinder block.
Installation
1. Installation is performed in the reverse order of removal. Tighten the knock sensor mounting bolts to the required torque.
Full article available on the resource: mercedesman.ru
Electronic control device
EZL Ignition System
Removal
Location of the electronic control unit ECU of the ignition system EZL
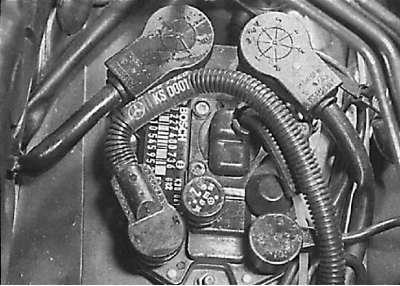
1. The electronic control unit for the ignition control system is mounted on the left side of the engine compartment on the upper part of the wheel arch (see fig. Location of the electronic control unit ECU of the ignition system EZL).
2. Remove the ground cable from the battery.
3. Disconnect the electrical connectors from the crankshaft position sensor and the knock sensor. Label and disconnect the two multi-pin connectors from the electronic control unit.
4. Disconnect the intake manifold vacuum hose from the ECU and plug the hole.
5. Remove the nuts and remove the electronic control unit from the engine compartment.
Attention! To improve heat dissipation from the electronic control device, its lower surface is covered with a special heat-conducting paste.
Installation
1. Installation is carried out in the reverse order of removal. If the heat-conducting paste layer is dirty or hardened, purchase fresh paste from your Mercedes-Benz dealer and replace it.
HFM Engine Management System
See related information at subsection 11.12.
Coolant temperature sensor
Coolant Temperature Sensor Location
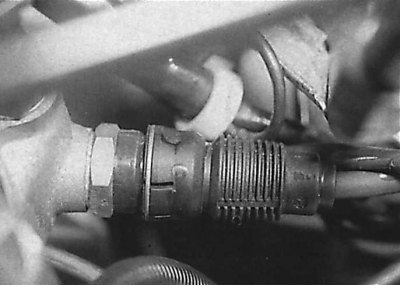
Typically, the ignition system and fuel injection system share one common coolant temperature sensor.
Throttle position switch
The ignition system and fuel injection system are controlled by one common switch for extreme throttle positions. The throttle position switch can only be removed when the throttle body is removed. The switch must be installed at a service station only.
Engine Air Intake Temperature Sensor
Removal
1. The temperature sensor for the air entering the engine is installed on the side of the air filter housing.
2. Make sure the ignition is off, then disconnect the electrical connector from the sensor.
3. Turn the sensor a quarter turn and remove it from the air cleaner housing. Remove the gasket.
Installation
1. Installation is carried out in the reverse order of removal.
Top Dead Center Sensor
The TDC sensor is mounted on a bracket above the vibration damper on the front side of the engine. The position of the TDC sensor is very important for setting the ignition timing, so the TDC sensor must be replaced at a service station.