
Cars BMW Cars Volkswagen Cars Chevrolet Cars Land Rover Cars Lada Cars Honda Cars Peugeot
English Русский
Български
Беларускі
Український
Српски
Hrvatski
Română
Polski
Slovenský
Magyar
Bookmark News and articles Sitemap Feedback Site search
MercedesMan.ru


A-Class C-Class E-Class G-Class M-Class S-Class Others
W123 (1976-1985) W124 (1984-1995) W210 (1996-2002)
  • Main
  • E-Class
  • W124 (1984-1995)
  • Chassis
  • Car suspension
  • Front Hub Bearing — Checking and Adjusting

Front Hub Bearing — Checking and Adjusting (Mercedes-Benz E-Class W124)

0
Contents: Examination ↡ Adjustment ↡

Examination


Using a dial indicator to measure front wheel bearing end play
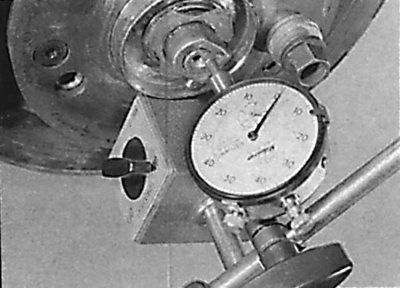


Using a dial indicator to measure front wheel bearing end play


1. Apply the parking brake, then raise the front of the vehicle and secure it on stands. Remove the affected front wheel.

2. Screw two wheel mounting bolts with thick washers into the holes on two diametrically opposite sides of the brake disc.

3. Using a punch or screwdriver, remove the protective cap from the center of the hub. If the cap is damaged when removed, it must be replaced. If present, remove the spring located on the hub axle.

4. Using a large flat-blade screwdriver, carefully pry the brake pads away from the brake disc so that they do not interfere with the rotation of the hub.

5. Attach the dial indicator bracket to the front side of the brake disc and install the dial indicator tip into the end of the hub journal (see picture). Set the dial indicator scale to 0. Grasp the brake disc on both sides and move it along the axis. Using the dial indicator readings, determine the axial play of the front hub bearing. If the axial play of the bearing exceeds the permissible value, adjustment is required.


6. If the front wheel bearing axial play is within the acceptable limits, remove the dial indicator from the brake disc, then reinstall the spring and protective cap. Install the wheel, then lower the vehicle to the ground and tighten the wheel mounting bolts to the specified torque. Press the brake pedal several times to ensure that the brake pads come into contact with the brake disc.

Adjustment


1. Apply the parking brake, then raise the front of the vehicle and secure it on stands. Remove the affected front wheel.

2. Screw two wheel mounting bolts with thick washers into the holes on two diametrically opposite sides of the brake disc.

3. Using a punch or screwdriver, remove the protective cap from the center of the hub. If the cap is damaged when removed, it must be replaced. If present, remove the spring located on the hub axle.

4. Using a large flat-blade screwdriver, carefully pry the brake pads away from the brake disc so that they do not interfere with the rotation of the hub.

5. Loosen the clamp bolt holding the hub mounting nut from unscrewing.

6. While rotating the brake disc, tighten the hub mounting nut little by little until the brake disc rotates with little effort. From this point, unscrew the hub mounting nut by about a third of a turn, then hit the hub axle with a mallet to reduce the bearing tension.

7. Using a dial indicator, measure the axial play of the hub bearing. If necessary, adjust the axial play of the hub bearing by turning the hub mounting nut. After adjustment, tighten the clamp bolt that secures the hub mounting nut from loosening to the required tightening torque.


8. If the front wheel bearing axial play is within the acceptable limits, remove the dial indicator from the brake disc, then reinstall the spring and protective cap. Install the wheel, then lower the vehicle to the ground and tighten the wheel mounting bolts to the specified torque. Press the brake pedal several times to ensure that the brake pads come into contact with the brake disc.

9. Re-measure the front wheel hub bearing end play.
This article is available at: russian, bulgarian, belarusian, ukrainian, serbian, croatian, romanian, polish, slovak, hungarian
The article has been verified: Levin Kirill Glebovich
Share with friends:
◀ Previous
E-Class W124 / Car suspension
Next ▶

General information about suspension and steering
Technical characteristics of suspension and steering
Front Wheel Hub — Removal and Installation
Steering knuckle — removal and installation
Front suspension shock absorber — removal and installation
Front suspension spring — removal and installation
Lower control arm front suspension — removal and installation
More similar articles for repairing other models

☛ Windscreen wiper arm angle — checking and adjusting Mercedes W168 (1997-2004)
☛ Front Hub Bearing — Checking and Adjusting Mercedes 190 (W201) (1982-1993)
☛ Checking and adjusting the play of the front axle wheel bearing Mercedes W463 (1999-2019)
☛ Checking and adjusting idle speed / ignition timing / CO concentration Mercedes W163 (1997-2005)
☛ Adjusting the clearance in the front wheel bearing Mercedes W220 (1998-2005)
☛ Checking and adjusting the front wheel alignment Mercedes Vito 2 (2003-2014, diesel)
Link in different formats to this article
Comments and feedback from visitors
No comments yet


How much will 48 + 14 ?


W210 (1996-2002) 
  • General information
  • Vehicle description
  • Working conditions and tools
  • Car care
  • Diesel engines
  • Engine repair
  • Lubrication system
  • Cooling system
  • Injection system
  • Supply system
  • Exhaust system
  • Gasoline engines
  • Engine repair
  • Lubrication system
  • Cooling system
  • Control system
  • Power and exhaust system
  • Transmission
  • Clutch
  • Mechanical gearbox
  • Automatic gearbox
  • Drive shafts
  • Chassis
  • Car suspension
  • Steering
  • Tires and wheels
  • Brake system
  • Body
  • Exterior (external elements)
  • Interior (internal elements)
  • Doors and windows
  • Heating and ventilation
  • Electrical equipment
  • Equipment and devices
  • Power devices
  • Lighting and signaling
  • Electrical circuits
W124 (1984-1995) 
  • General information
  • Governing bodies
  • Driving and operation
  • Weekly care
  • Maintenance (gasoline)
  • Maintenance (diesel)
  • Troubleshooting
  • Power unit
  • I4 petrol engine
  • V6 petrol engine (SOHC)
  • V6 petrol engine (DOHC)
  • Diesel engines
  • Engine overhaul
  • Cooling system
  • Heating and ventilation
  • Fuel system (carburetor)
  • Injection system «Bosch CIS-E»
  • Injection system «Bosch HFM»
  • Diesel fuel system
  • Supply system
  • Starting and charging system
  • Ignition system (I4)
  • Ignition system (V6)
  • Preheating
  • Transmission
  • Clutch
  • Mechanical gearbox
  • Automatic gearbox
  • Drive shafts
  • Chassis
  • Brake system
  • Car suspension
  • Steering
  • Body
  • Exterior (external elements)
  • Interior (internal elements)
  • Doors, locks and windows
  • Electrical equipment
  • Equipment and devices
  • Switches
  • Headlights and lighting
  • Electrical circuits
W123 (1976-1985) 
  • General information
  • Introduction to the guide
  • Power unit
  • Engine device
  • Repair M102 engines
  • Repair M110 and M123 engines
  • Cooling and lubrication (M102)
  • Cooling (M110 and M123)
  • Ignition system
  • Power system «Stromberg»
  • Power system «Solex 4A1»
  • Fuel injection «K-Jetronic»
  • Fuel injection «L-Jetronic»
  • Transmission
  • Clutch
  • Mechanical gearbox
  • Automatic gearbox
  • Cardan and rear axle
  • Chassis
  • Front suspension
  • Rear suspension
  • Steering
  • Brake system
  • Body
  • Exterior (external elements)
  • Interior (internal elements)
  • Doors, locks and windows
  • Electrical equipment
  • Equipment and devices
  • Power devices
  • Electrical circuits
 
MercedesMan.ru © 2017–2026 · Mobile version · Read about Mercedes · Sitemap: EN BG BY UA RS HR RO PL SK HU · Feedback · Site search · Bookmark A-Class (W168) · C-Class (W201) · C-Class (W202) · C-Class (W203) · E-Class (W123) · E-Class (W124) · E-Class (W210) · G-Class (W463) · M-Class (W163) · S-Class (W116, petrol) · S-Class (W126, petrol) · S-Class (W140) · S-Class (W220) · Sprinter · Vito 1 · Vito 2 · Vario 814D ·
 
We only use cookies without which some of the site's features may not be available.