
Cars BMW Cars Volkswagen Cars Chevrolet Cars Land Rover Cars Lada Cars Honda Cars Peugeot
English Русский
Български
Беларускі
Український
Српски
Hrvatski
Română
Polski
Slovenský
Magyar
Bookmark News and articles Sitemap Feedback Site search
MercedesMan.ru


A-Class C-Class E-Class G-Class M-Class S-Class Others
W123 (1976-1985) W124 (1984-1995) W210 (1996-2002)
  • Main
  • E-Class
  • W124 (1984-1995)
  • Chassis
  • Car suspension
  • Front Wheel Hub — Removal and Installation

Front Wheel Hub — Removal and Installation (Mercedes-Benz E-Class W124)

0
Contents: Removal ↡ Repair ↡ Installation ↡
Attention! The front wheel hub bearing is pressed into the steering knuckle, so when removing it there is a high probability of damage and it may need to be replaced.


Front wheel hub
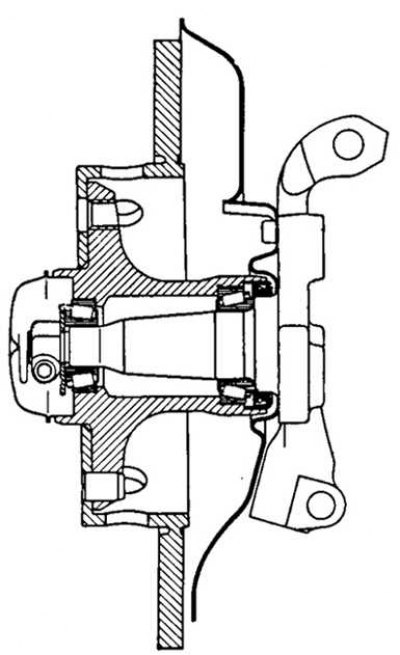


Front wheel hub


Removal


Using a screwdriver to remove the protective cap from the front wheel hub
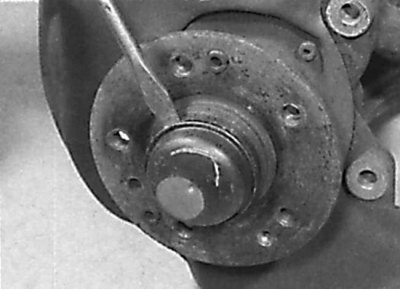


Using a screwdriver to remove the protective cap from the front wheel hub


Removal the spring from the hub axle
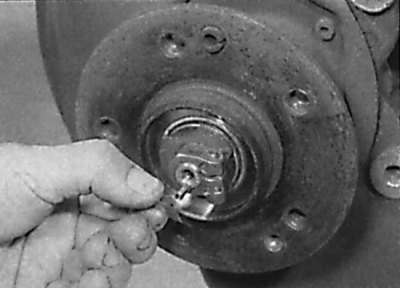


Removal the spring from the hub axle


Loosening the clamp bolt securing the front wheel hub nut
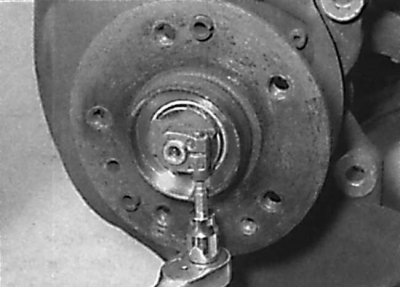


Loosening the clamp bolt securing the front wheel hub nut


Unscrewing the front wheel hub mounting nut
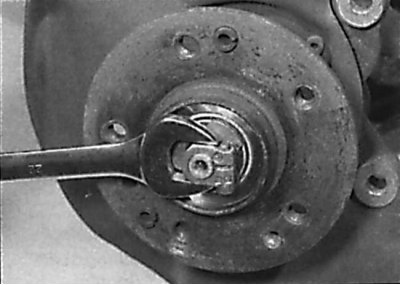


Unscrewing the front wheel hub mounting nut


1. Remove the front brake disc. On models with anti-lock braking system, remove the ABS sensor from the front wheel.


2. Using a screwdriver or punch, remove the protective cap located in the center of the front wheel hub. If the protective cap is damaged during removal, it must be replaced (see Fig. Using a screwdriver to remove the protective cap from the front wheel hub).

3. If present, remove the spring from the hub axle (see fig. Removing the spring from the hub axle).

4. Loosen the clamp bolt securing the hub mounting nut from unscrewing, then unscrew the nut and remove it from the hub axle. Remove the thrust washer if present (see fig. Loosening the clamp bolt securing the front wheel hub nut, Unscrewing the front wheel hub nut).

5. Remove the front wheel hub from the steering knuckle. If the hub does not come off, you will need to use a puller.

6. If the inner bearing race remains on the steering knuckle, use a puller to remove it from the hub axle, then remove the hub seal ring.

7. Check the condition of the steering knuckle and replace if necessary.

Repair


1. Remove the inner race of the outer bearing from the hub.

2. From the rear of the hubs, remove the sealing ring and then remove the inner race of the inner bearing. 3. Place the hub on a suitable mandrel and, using a hammer and drift, knock out the inner race of the outer bearing. Do not tilt the race to avoid damaging the bearing seat in the hub.

4. Turn the hub over and knock out the outer race of the inner bearing in the same way.

5. Clean the hub from dirt and grease and, using sandpaper, grind down the burrs on the hub. Check the condition of the hub for cracks, wear and mechanical damage and replace if necessary. On models with an anti-lock system, check the condition of the sensor toothed rotor.


6. Before assembly, apply a thin film of grease to the outer bearing race and the mating surface of the hub. Also lubricate the raceways of the inner race.

7. Mount the hub on the mandrel and install the outer race of the inner bearing into the hub. Using a tubular mandrel resting on the outer race of the bearing and a press, press the bearing race into the hub until it stops. Do not tilt the bearing race when pressing it in.

8. Turn the hub over and press the outer bearing outer race into the hub in the same manner.

9. Install the inner race of the inner bearing. Install the sealing ring on the rear of the hub with the working lips facing the bearing. Fill the bearings with grease to two-thirds of the full volume of grease, then install the inner race of the outer bearing.

Installation


1. Apply a thin coat of grease to the back of the hub seal and install the hub onto the steering knuckle.

2. Install the thrust washer and screw on the hub mounting nut.

3. By tightening the hub mounting nut, press the inner bearing races of the hub onto the steering knuckle journal. After installing the hub, adjust the axial play of the hub bearing. After making the adjustment, tighten the clamp bolt that secures the hub mounting nut from unscrewing.

4. Install the spring onto the steering knuckle pin.

5. Install the protective cap with grease on the hub.

6. Install the brake disc and, if equipped, the front ABS sensor.
This article is available at: russian, bulgarian, belarusian, ukrainian, serbian, croatian, romanian, polish, slovak, hungarian
The article has been verified: Levin Kirill Glebovich
Share with friends:
◀ Previous
E-Class W124 / Car suspension
Next ▶

Front Hub Bearing — Checking and Adjusting
General information about suspension and steering
Technical characteristics of suspension and steering
Steering knuckle — removal and installation
Front suspension shock absorber — removal and installation
Front suspension spring — removal and installation
Lower control arm front suspension — removal and installation
Front anti-roll bar
More similar articles for repairing other models

☛ Front wheel fender liner — removal and installation Mercedes W168 (1997-2004)
☛ Design and description of front wheel suspension Mercedes W203 (2000-2007)
☛ Checking and adjusting the play of the front axle wheel bearing Mercedes W463 (1999-2019)
☛ Checking the amount of front wheel divergence when turning Mercedes W163 (1997-2005)
☛ Front fenders and wheel arch protection liners — installation details Mercedes W140 (1991-1998)
☛ Front wheel alignment angles Mercedes Sprinter (1995-2000, diesel)
Link in different formats to this article
Comments and feedback from visitors
No comments yet


How much will 34 + 20 ?


W210 (1996-2002) 
  • General information
  • Vehicle description
  • Working conditions and tools
  • Car care
  • Diesel engines
  • Engine repair
  • Lubrication system
  • Cooling system
  • Injection system
  • Supply system
  • Exhaust system
  • Gasoline engines
  • Engine repair
  • Lubrication system
  • Cooling system
  • Control system
  • Power and exhaust system
  • Transmission
  • Clutch
  • Mechanical gearbox
  • Automatic gearbox
  • Drive shafts
  • Chassis
  • Car suspension
  • Steering
  • Tires and wheels
  • Brake system
  • Body
  • Exterior (external elements)
  • Interior (internal elements)
  • Doors and windows
  • Heating and ventilation
  • Electrical equipment
  • Equipment and devices
  • Power devices
  • Lighting and signaling
  • Electrical circuits
W124 (1984-1995) 
  • General information
  • Governing bodies
  • Driving and operation
  • Weekly care
  • Maintenance (gasoline)
  • Maintenance (diesel)
  • Troubleshooting
  • Power unit
  • I4 petrol engine
  • V6 petrol engine (SOHC)
  • V6 petrol engine (DOHC)
  • Diesel engines
  • Engine overhaul
  • Cooling system
  • Heating and ventilation
  • Fuel system (carburetor)
  • Injection system «Bosch CIS-E»
  • Injection system «Bosch HFM»
  • Diesel fuel system
  • Supply system
  • Starting and charging system
  • Ignition system (I4)
  • Ignition system (V6)
  • Preheating
  • Transmission
  • Clutch
  • Mechanical gearbox
  • Automatic gearbox
  • Drive shafts
  • Chassis
  • Brake system
  • Car suspension
  • Steering
  • Body
  • Exterior (external elements)
  • Interior (internal elements)
  • Doors, locks and windows
  • Electrical equipment
  • Equipment and devices
  • Switches
  • Headlights and lighting
  • Electrical circuits
W123 (1976-1985) 
  • General information
  • Introduction to the guide
  • Power unit
  • Engine device
  • Repair M102 engines
  • Repair M110 and M123 engines
  • Cooling and lubrication (M102)
  • Cooling (M110 and M123)
  • Ignition system
  • Power system «Stromberg»
  • Power system «Solex 4A1»
  • Fuel injection «K-Jetronic»
  • Fuel injection «L-Jetronic»
  • Transmission
  • Clutch
  • Mechanical gearbox
  • Automatic gearbox
  • Cardan and rear axle
  • Chassis
  • Front suspension
  • Rear suspension
  • Steering
  • Brake system
  • Body
  • Exterior (external elements)
  • Interior (internal elements)
  • Doors, locks and windows
  • Electrical equipment
  • Equipment and devices
  • Power devices
  • Electrical circuits
 
MercedesMan.ru © 2017–2026 · Mobile version · Read about Mercedes · Sitemap: EN BG BY UA RS HR RO PL SK HU · Feedback · Site search · Bookmark A-Class (W168) · C-Class (W201) · C-Class (W202) · C-Class (W203) · E-Class (W123) · E-Class (W124) · E-Class (W210) · G-Class (W463) · M-Class (W163) · S-Class (W116, petrol) · S-Class (W126, petrol) · S-Class (W140) · S-Class (W220) · Sprinter · Vito 1 · Vito 2 · Vario 814D ·
 
We only use cookies without which some of the site's features may not be available.