
Cross section of the central bearing of the input shaft
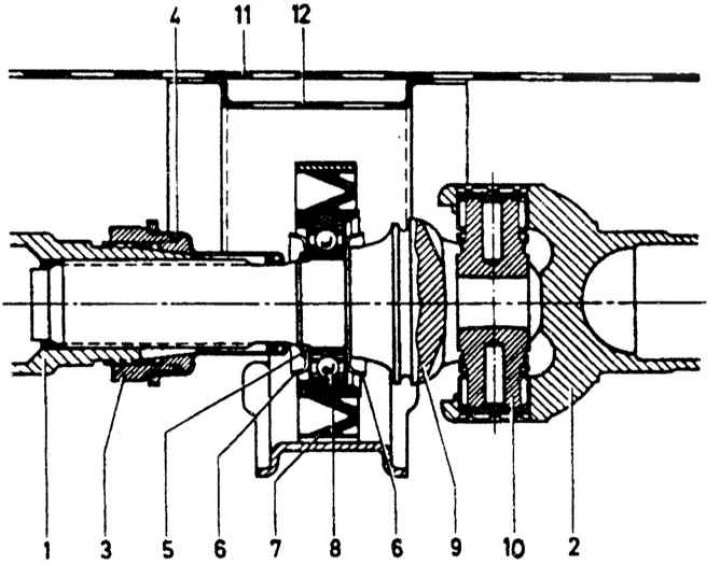
1 - front section of the shaft; 2 - rear section of the shaft; 3 - clamping nut; 4 - rubber bushing; 5 - locking ring; 6 - protective cover; 7 - outboard bearing clutch; 8 - ball bearing; 9 - fork; 10 - cross with a needle bearing and bushing; 11 - bottom of the body; 12 - the corridor of the drive shaft
Removing
1. Raise the vehicle.
2. Remove the final pipeline.
3. Turn away bolts of fastening and remove a guard from the bottom of a body.
4. Disconnect the parking brake cables and remove the linkage from the underbody.
5. Using two wrenches, loosen the coupling nut at the front end of the propeller shaft by two turns. This will allow the shaft to move slightly.
6. Mark the position of the cardan shaft and flexible couplings (chalk, paint).
7. Turn away bolts of fastening of an intermediate support, forward and back flexible couplings from a transmission and the main transfer. Lower the intermediate support onto the stand (jack).
8. Fix the relative position of the splines (paint), to further balance the cardan shaft.
9. Slide the rear driveshaft forward and disconnect it from the final drive flange.
10. Disconnect the front driveshaft from the gearbox flange and remove the driveline assembly from under the vehicle and place it on a stand (tarpaulin), without separating the cardan shafts from each other.
Installation
Install in reverse order.
1. Put 6 g of refractory grease into the central recess of each of the centering bushes.
2. Insert the connecting bolts with their heads towards the middle support and screw on new self-locking nuts.
3. Rotate the drive shaft several times to relieve tension. Check that the front and back (sections) do not jam, then tighten the coupling nut to a torque of 10.0 kgf·m.
4. Finally tighten the center bearing bolts.
5. Install the wheels and lower the vehicle.