
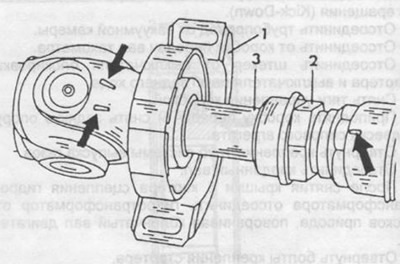
Pic. 205. Marks on cardan shafts. The mark on the front propeller shaft must be located between the marks on the rear propeller shaft during assembly (shown by arrows).
1 - intermediate support bearing,
2 - locknut,
3 - rubber cuff.
Removal and installation of cardan transmission
Raise the car or roll it onto a viewing ditch.
Remove the exhaust system assembly, remove the muffler protective mudguard by unscrewing the four mounting bolts.
Remove the parking brake equalizer lever (see fig. 206).
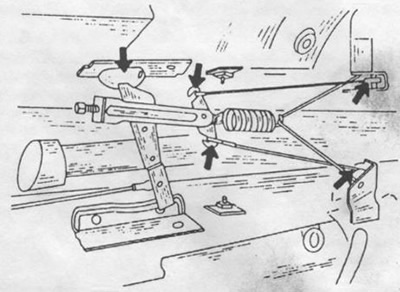
Pic. 206. Removing the equalizing lever of the parking brake cables, remove the parts shown by the arrows.
Place a jack with a wooden lining under the gearbox and slightly raise the gearbox.
Loosen the bolts securing the crossmember to the floor of the body.
Loosen the central nut of the rear suspension support of the power unit and remove the cross member with the support assembly.
Loosen the driveline front flange mounting bolts using a ratchet socket wrench.
Loosen the propshaft clamping nut two turns and slide the rubber seal back.
Disconnect driveline from final drive flange.
Loosen the bolts securing the intermediate support to the floor of the body.
Separate the flanges of the final drive and cardan drive, lower the driveshaft down. When removing the cardan transmission, it is not required to disconnect the shafts from each other. After disassembly, during assembly, align the marks on the shafts, as shown in fig. 205.
Check the condition of all parts if the driveline is to be reused.
When installing the cardan transmission, perform the following work:
Put 2 g of long-life grease into the cavity of the centering holes.
Install the driveline assembly on the centering pins of the gearbox and final drive.
Fasten the intermediate support to the floor of the body without fully tightening the mounting bolts.
Install the bolts securing the driveline to the gearbox and final drive. Bolts should always be replaced with new ones. Tighten the mounting bolts to the required torque. The tightening torque depends on the motor type and is shown in the tables.
Install the rear cross member and protective mudguard. Tighten the bolts to 45 Nm.
Install the rear suspension support, lower the jack and secure the support. Tightening torque 25 Nm.
Roll the car several times in forward and reverse directions and tighten the clamping nut to a torque of 30...40 Nm.
Torque to 25 Nm Tighten the propeller shaft mounting bolts.
Install the protective mudguard on the muffler of the exhaust system.