
Cars BMW Cars Volkswagen Cars Chevrolet Cars Land Rover Cars Lada Cars Honda Cars Peugeot
English Русский
Български
Беларускі
Український
Српски
Hrvatski
Română
Polski
Slovenský
Magyar
Bookmark News and articles Sitemap Feedback Site search
MercedesMan.ru


A-Class C-Class E-Class G-Class M-Class S-Class Others
W116 (1972-1980, petrol) W126 (1979-1991, petrol) W140 (1991-1998) W220 (1998-2005)
  • Main
  • S-Class
  • W116 (1972-1980)
  • Transmission
  • Clutch and cardan
  • Disassembly and assembly of synchronizer of manual transmission

Disassembly and assembly of synchronizer of manual transmission (Mercedes-Benz S-Class W116)

0
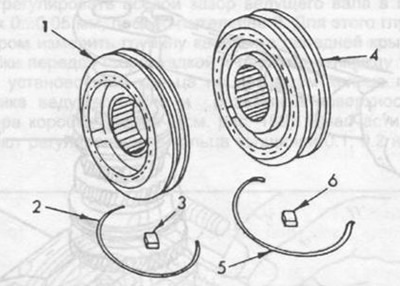
Wrap the synchronizer coupling with a rag and squeeze it out of the hub together with the driver. Check the wear of all parts. Remove the locking rings and drivers from the synchronizer coupling. Check their condition. The locking rings are different in diameter and must match the diameter of the synchronizer coupling. Fig. 199 shows the parts of both synchronizer couplings.

Fig. 199. Synchronizer clutch parts.

Fig. 199. Synchronizer clutch parts.
1 - 3/4 gear synchronizer clutch,
2 - locking ring,
3 - leash,
4 - 1/2 gear synchronizer clutch,
5 - locking ring,
6 - leash.


When assembling the synchronizer of the first and second gears, make sure that the flange on the synchronizer sleeve and the narrow part of the synchronizer hub are directed towards the first gear (indicated by arrows in Fig. 200). Install the third and fourth gear synchronizer sleeve on the hub so that the groove on the sleeve and the wide part of the hub are located on the same side (arrow in Fig. 200). The enclosing side of one locking ring is adjacent to seven leashes. The leashes are placed one after another on the locking rings and the synchronizer hub is pushed into the synchronizer clutch.
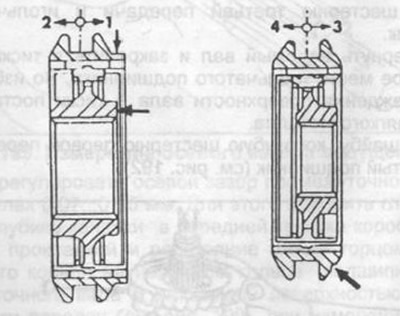


Fig. 200. Sectional view of synchronizers with locking rings for first and second gears (left) and…

Fig. 200. Sectional view of synchronizers with locking rings for first and second gears (left) and third and fourth gears (right). Gears are indicated by arrows.


Article borrowed from the web portal (www.mercedesman.ru)
This article is available at: russian, bulgarian, belarusian, ukrainian, serbian, croatian, romanian, polish, slovak, hungarian
The article has been verified: Panova Maya Vladimirovna
Share with friends:
◀ Previous
S-Class W116 / Clutch and cardan
Next ▶

Bleeding the hydraulic drive
Checking the free play of the clutch and suspension pedal
Removal and installation the slave cylinder
Removal and installation the master cylinder
Checking the wear of the clutch driven disc linings (in assembled condition)
Removal and installation the cardan transmission
Removal and installation the intermediate support bearing of the cardan transmission
Adjusting the front wheel alignment
Clutch specifications
Tightening torques for threaded connections
More similar articles for repairing other models

☛ Manual transmission Mercedes W168 (1997-2004)
☛ Adjusting the manual transmission control drive Mercedes W203 (2000-2007)
☛ Manual transmission Mercedes W210 (1996-2002)
☛ Starting the movement and switching the automatic transmission Mercedes W463 (1999-2019)
☛ Manual Transmission Specifications Mercedes W163 (1997-2005)
☛ Manual transmission — general description Mercedes Sprinter (1995-2000, diesel)
Link in different formats to this article
Comments and feedback from visitors
No comments yet


How much will 45 + 21 ?


W220 (1998-2005) 
  • General information
  • Introduction to guide
  • User manual
  • Maintenance
  • Power unit
  • Engine repair
  • Cooling and heating systems
  • Power and exhaust systems
  • Ignition and control system
  • Charge and launch systems
  • Transmission
  • Automatic gearbox
  • Drive shafts
  • Chassis
  • Brake system
  • Front suspension
  • Rear suspension
  • Steering
  • Body
  • Body elements
  • Electrical equipment
  • Equipment and devices
  • Electrical circuits
W140 (1991-1998) 
  • User manual
  • Controls and instruments
  • Driving and operation
  • Maintenance
  • Power unit
  • Petrol engine V6
  • Petrol engine V8
  • Petrol engine V12
  • Diesel engine OM603
  • Diesel engine OM606
  • Cooling system
  • Power supply and injection system
  • Control system HFM-SFI
  • Control system LH-SFI
  • Control systems ME-SFI
  • Diesel control system
  • Ignition system
  • Charge and launch system
  • Transmission
  • Mechanical gearbox 717.438
  • Mechanical gearbox 717.454
  • Automatic gearbox 722.5
  • Automatic gearbox 722.6
  • Clutch and drive shafts
  • Differential
  • Chassis
  • Brake system
  • Steering
  • Front suspension
  • Rear suspension
  • Body
  • Exterior (external elements)
  • Interior (internal elements)
  • Electrical equipment
  • Equipment and devices
  • Electrical circuits
W126 (1979-1991, petrol) 
  • Power unit
  • Engine repair
  • Ignition system
  • Lubrication system
  • Cooling system
  • Fuel system
  • Fuel injection system
  • Transmission
  • Clutch and cardan
  • Mechanical gearbox
  • Automatic gearbox
  • Chassis
  • Front suspension
  • Rear suspension
  • Steering
  • Brake system
  • Electrical equipment
  • Power devices
  • Electrical circuits
W116 (1972-1980, petrol) 
  • General information
  • Introduction to guide
  • Power unit
  • 8-cylinder V8 engine
  • 6-cylinder I6 engine
  • Cooling and lubrication system
  • Power system (carburetor)
  • Fuel injection system
  • Ignition system
  • Transmission
  • Clutch and cardan
  • Car gearbox
  • Chassis
  • Front suspension
  • Rear suspension
  • Steering
  • Brake system
  • Electrical equipment
  • Power devices
  • Electrical circuits
 
MercedesMan.ru © 2017–2026 · Mobile version · Read about Mercedes · Sitemap: EN BG BY UA RS HR RO PL SK HU · Feedback · Site search · Bookmark A-Class (W168) · C-Class (W201) · C-Class (W202) · C-Class (W203) · E-Class (W123) · E-Class (W124) · E-Class (W210) · G-Class (W463) · M-Class (W163) · S-Class (W116, petrol) · S-Class (W126, petrol) · S-Class (W140) · S-Class (W220) · Sprinter · Vito 1 · Vito 2 · Vario 814D ·
 
We only use cookies without which some of the site's features may not be available.