



Remove the cover under the instrument panel.
Remove the floor covering and rug.
Drain the brake fluid by placing a hose on the bleed nipple, open the nipple and press the clutch pedal several times, lower the hose into the container.
Disconnect the pipe from the combination tank.
Disconnect the line from the working cylinder.
Loosen the adjusting bolt (3) in Fig. 167.
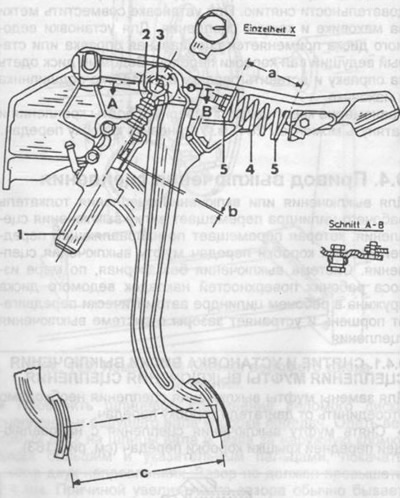
Fig. 167. Sectional view of the clutch master cylinder.
a - the adjustment size of the spring to overcome the pedal dead point,
b - clearance between the master cylinder piston and the pedal pusher,
c - clutch pedal travel,
1 - master cylinder,
2 - pusher,
3 - adjusting bolt,
4 - spring for overcoming the pedal dead point,
5 - spring plate.
Loosen the bolts securing the master cylinder to the pedal bracket. Pay attention to the position of the limit stop on the master cylinder. Leave the pusher on the clutch pedal.
The installation of the master cylinder is performed in the reverse order. Before fixing the master cylinder, install the pusher in it. Put a hose on the rubber tip of the master cylinder and connect it to the combination tank. Check and, if necessary, adjust the clearance between the clutch pedal pusher and the master cylinder piston. Bleed the clutch drive hydraulic system. A description of this work is given below.
Check the operation of the clutch release drive. To do this, press the clutch pedal and engage reverse gear. A scraping sound when engaging gears indicates that the clutch is not fully disengaged. It is necessary to check the operation of the entire mechanism.
If the clutch pedal does not reach the stop when pressed, this may result in the clutch not being fully disengaged.