
Cars BMW Cars Volkswagen Cars Chevrolet Cars Land Rover Cars Lada Cars Honda Cars Peugeot
English Русский
Български
Беларускі
Український
Српски
Hrvatski
Română
Polski
Slovenský
Magyar
Bookmark News and articles Sitemap Feedback Site search
MercedesMan.ru


A-Class C-Class E-Class G-Class M-Class S-Class Others
190 (W201) (1982-1993) W202 (1993-2000) W203 (2000-2007)
  • Main
  • C-Class
  • W201 (1982-1993)
  • Power unit
  • Injection system (diesel)
  • Fuel injection timing of the high pressure fuel pump — checking and adjustment

Fuel injection timing of the high pressure fuel pump — checking and adjustment (Mercedes-Benz C-Class W201)

0
Contents: General information ↡ Examination ↡ Adjustment ↡

General information


1. To ensure that the high-pressure fuel pump delivers fuel to each cylinder at the correct time during the engine's operating cycle, the fuel injection timing should be checked and, if necessary, adjusted. This check should always be performed after the fuel pump or any associated components have been disassembled.

2. There is an inspection hole on the fuel injection pump body, which is closed with a metal threaded plug in the working condition. Fuel injection into cylinder No.1 begins when the protrusion on the regulator rotor inside the fuel pump is located opposite the inspection hole.

3. When the projection is precisely aligned with the center of the hole, the position of the crankshaft can be determined using the pointer on the camshaft timing chain case and the scale on the crankshaft damper. The crankshaft rotation angle determined in this position provides an indirect determination of the fuel injection timing.

4. The best way to measure is electronically, using a sensor screwed into the fuel pump inspection hole. However, since such equipment is only available to Mercedes-Benz dealers and Bosch diesel fuel injection specialists, we describe an alternative method. It should be noted that this method only provides an approximate setting to start the engine - the car should be tested by specialists at the first opportunity to obtain accurate data.

Examination


5. Disconnect the negative battery terminal.


6. In accordance with chapter 3 remove the radiator fan and its shroud.

7. Unscrew the plug on the side of the fuel pump housing. Be prepared for possible fuel leakage and place a piece of rag that absorbs fuel well near the plug hole.

8. Using a small mirror, inspect the edge of the fuel pump rotor through the inspection hole.

9. Using a thorium wrench, turn the crankshaft in the direction of normal rotation by the pulley/damper mounting bolt to the hub until the protrusion on the governor rotor is precisely aligned with the center of the inspection hole (see fig. 7.24).

10. Without allowing the engine to turn further, determine the crankshaft rotation angle using the pointer on the camshaft timing chain cover and the scale on the crankshaft damper (see fig. 7.8).

11. Compare the obtained value with the one indicated in the paragraph "Technical data" and adjust if necessary. Replace the inspection hole plug and tighten to the specified torque.

Adjustment


12. In accordance with the previous subsection, manually turn the crankshaft until it reaches the position specified in paragraph "Technical data" nominal value of fuel injection moment.

13. Loosen the three bolts securing the fuel pump to the support flange. Similarly, loosen the bolt securing the rear of the pump to the support bracket (refer to paragraph 7).

14. Unscrew the plug on the side of the fuel pump housing. Be prepared for possible fuel leakage and place a piece of rag that absorbs fuel well near the plug hole.

15. Using a small mirror, inspect the edge of the fuel pump rotor through the inspection hole. Using a thorium wrench, turn the crankshaft in the direction of normal rotation by the pulley/damper mounting bolt to the hub. Turn the fuel timing adjustment screw until the protrusion on the regulator rotor aligns exactly with the center of the inspection hole (see fig. 9.15).
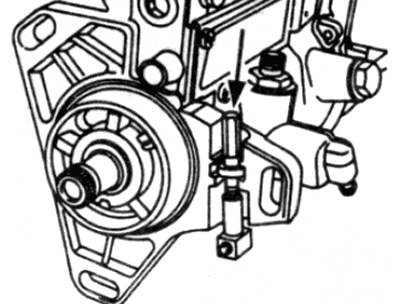


Fig. 9.15. Fuel injection timing adjustment screw (shown with an asterisk) on the fuel injection…

Fig. 9.15. Fuel injection timing adjustment screw (shown with an asterisk) on the fuel injection pump


Note: Turn the adjusting screw to the right if the fuel supply switching moment is delayed; turn the screw to the left if the fuel supply switching moment is ahead of the nominal value.


18. Once alignment is achieved, tighten the front and rear fuel pump mounting bolts to the recommended torque values.

17. Replace the inspection hole plug and tighten to the specified torque.

18. Please note that this method only provides the preliminary adjustment necessary to start the engine - the engine should be tested and adjusted by Mercedes-Benz dealers or Bosch specialists at the earliest opportunity.
This article is available at: russian, bulgarian, belarusian, ukrainian, serbian, croatian, romanian, polish, slovak, hungarian
The article has been verified: Lukyanov Nikita Ilyich
Share with friends:
◀ Previous
C-Class 190 (W201) / Injection system (diesel)
Next ▶

Injection timing control device and high pressure fuel pump sprocket
High pressure fuel pump — removal and installation
Throttle Control Cable — Removal, Installation and Adjustment
Fuel tank — removal and installation
Fuel Level Gauge Sensor Unit — Removal and Installation
Injectors and high pressure fuel lines — removal and installation
Fuel thermostat — removal and installation
Electronic Idle Speed Control (ELR) — Parts Removal and Installation
Electronic Anti-Rapidity Control (ARA) — Component Removal and Installation
Electronic Diesel System (EDS) — Removal and Installation
More similar articles for repairing other models

☛ Fuel injection pump — removal and installation Mercedes W168 (1997-2004)
☛ High pressure fuel pump injection timing Mercedes W124 (1984-1995)
☛ Removal and installation of high pressure fuel pump (HPFP) Mercedes W463 (1999-2019)
☛ Removal and installation of high pressure fuel pump (HPFP) Mercedes W163 (1997-2005)
☛ Removal and installation the high pressure fuel pump (OM603) Mercedes W140 (1991-1998)
☛ High pressure fuel pump (HPFP) Mercedes Vito 1 (1996-2003)
Link in different formats to this article
Comments and feedback from visitors
No comments yet


How much will 50 + 18 ?


W203 (2000-2007) 
  • General information
  • Introduction to guide
  • User manual
  • Maintenance
  • Power unit
  • Gasoline engines
  • Diesel engines
  • Cooling system
  • Ventilation and heating
  • Supply system
  • Injection system (gasoline)
  • Injection system (diesel)
  • Exhaust system
  • Ignition and control system
  • Charge and launch systems
  • Transmission
  • Mechanical gearbox
  • Automatic gearbox
  • Clutch and drive shafts
  • Differential
  • Chassis
  • Brake system
  • Car suspension
  • Steering
  • Body
  • Exterior (external elements)
  • Interior (internal elements)
  • Electrical equipment
  • Equipment and devices
  • Lighting system
  • Electrical diagrams (2000)
  • Electrical diagrams (since 2001)
W202 (1993-2000) 
  • General information
  • User manual
  • Driving a car
  • Car care
  • Maintenance
  • Power unit
  • Gasoline engines
  • Diesel engines
  • Lubrication system
  • Cooling system
  • Heating and ventilation
  • Ignition system
  • Fuel system
  • Injection system (gasoline)
  • Injection system (diesel)
  • Exhaust system
  • Transmission
  • Clutch
  • Car gearbox
  • Chassis
  • Suspension, wheels and tires
  • Steering
  • Brake system
  • Body
  • Exterior (external elements)
  • Interior (internal elements)
  • Doors and windows
  • Electrical equipment
  • Equipment and devices
  • Power devices
  • Lighting system
  • Electrical circuits
190 (W201) (1982-1993) 
  • General information
  • Introduction to the guide
  • Operation and care
  • Maintenance (gasoline)
  • Maintenance (diesel)
  • Troubleshooting
  • Power unit
  • Petrol engine I4
  • Petrol engine V6
  • Diesel engines
  • Engine overhaul
  • Cooling and heating
  • Power system (carburetor)
  • Injection system (gasoline)
  • Injection system (diesel)
  • Exhaust system
  • Charge and start system
  • Ignition system (I4)
  • Ignition system (V6)
  • Diesel heating system
  • Transmission
  • Clutch
  • Mechanical gearbox
  • Automatic gearbox
  • Cardan shaft and axle shafts
  • Chassis
  • Brake system
  • Car suspension
  • Steering
  • Body
  • Exterior (external elements)
  • Interior (internal elements)
  • Doors, locks and windows
  • Electrical equipment
  • Equipment and devices
  • Electrical circuits
 
MercedesMan.ru © 2017–2026 · Mobile version · Read about Mercedes · Sitemap: EN BG BY UA RS HR RO PL SK HU · Feedback · Site search · Bookmark A-Class (W168) · C-Class (W201) · C-Class (W202) · C-Class (W203) · E-Class (W123) · E-Class (W124) · E-Class (W210) · G-Class (W463) · M-Class (W163) · S-Class (W116, petrol) · S-Class (W126, petrol) · S-Class (W140) · S-Class (W220) · Sprinter · Vito 1 · Vito 2 · Vario 814D ·
 
We only use cookies without which some of the site's features may not be available.