
Cars BMW Cars Volkswagen Cars Chevrolet Cars Land Rover Cars Lada Cars Honda Cars Peugeot
English Русский
Български
Беларускі
Український
Српски
Hrvatski
Română
Polski
Slovenský
Magyar
Bookmark News and articles Sitemap Feedback Site search
MercedesMan.ru


A-Class C-Class E-Class G-Class M-Class S-Class Others
190 (W201) (1982-1993) W202 (1993-2000) W203 (2000-2007)
  • Main
  • C-Class
  • W201 (1982-1993)
  • Power unit
  • Injection system (diesel)
  • Throttle Control Cable — Removal, Installation and Adjustment

Throttle Control Cable — Removal, Installation and Adjustment (Mercedes-Benz C-Class W201)

0
Contents: Removal and installation ↡ Adjustment ↡

Removal and installation


1. Refer to the information provided in chapter 4B. In addition to this, the cable adjustment is described in the next subsection.

Adjustment


2. Before you begin adjusting, make sure that there are no sharp bends or areas where the cable can get pinched. Press the throttle pedal all the way down and check that this force is transmitted without resistance.

3. With the throttle rod in the idle position, check that the spring plate at the end of the cable rests slightly against the compression spring without tension (see fig. 6.3).
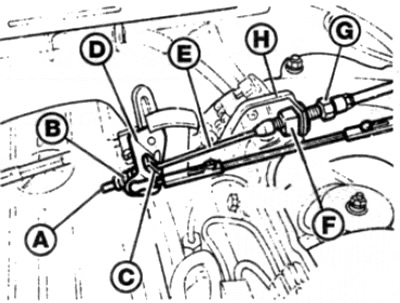
Fig. 6.3. Damper control cable rod

Fig. 6.3. Damper control cable rod
A The end of the rope
In Compression spring
With Mounting Block
About Leading Lever
E Throttle control cable
F Plastic lock nut
G Adjusting nut
H Bracket


4. If not, remove the trim panel above the driver's footwell to gain access to the hole in the engine compartment bulkhead where the throttle cable enters the engine compartment (see fig. 6.4). Turn the regulator on the partition to meet the conditions of point 3.
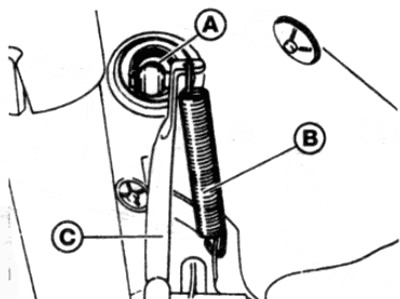
Fig. 6.4. Adjustment knob next to the throttle pedal

Fig. 6.4. Adjustment knob next to the throttle pedal
A Regulator handle
In Return Spring
With accelerator pedal


5. With the intermediate lever in the idle position, the hinge roller should rest against the end of the hinge lever slot. Adjust the length of the connecting rod if necessary (see Fig. 6.5, a, b).
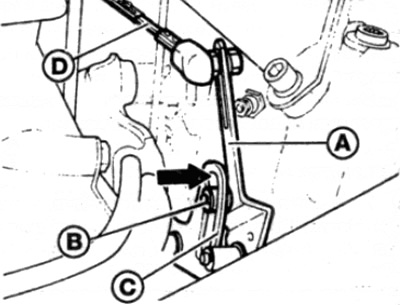


Fig. 6.5, a. At idle speed, the hinge roller should rest against the horse (shown by arrow) cut on…

Fig. 6.5, a. At idle speed, the hinge roller should rest against the horse (shown by arrow) cut on the hinge lever
A Intermediate lever
In the Roller swivel
With Hinge Lever
D Connecting rod
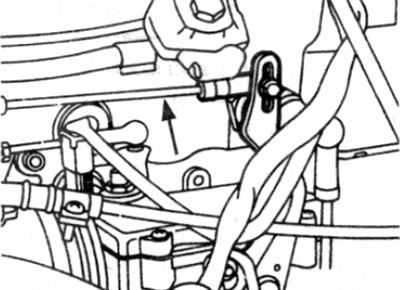

Fig. 6.5, b. Adjust the length of the rod (shown by arrow), if required

Fig. 6.5, b. Adjust the length of the rod (shown by arrow), if required


6. Pull the throttle control lever all the way out. Make sure that the fuel injection pump control lever rests against the full load limiter. In this position, also check that the intermediate lever hinge stops approximately 1 mm closer to the end of the slot on the hinge lever (see fig. 6.6).
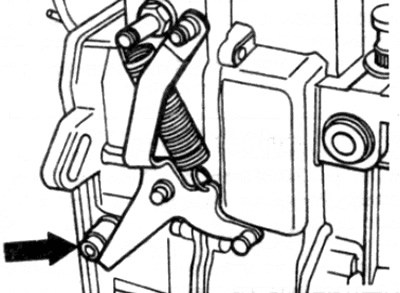
Fig. 6.6. Check that the fuel injection pump control lever rests against the full load limiter…

Fig. 6.6. Check that the fuel injection pump control lever rests against the full load limiter (shown by arrow)


7. If not, loosen the lock nut on the ball socket at the end of the tie rod and move the socket within the slot on the intermediate lever to achieve the required travel (see fig. 6.7). When finished, tighten the lock nut.
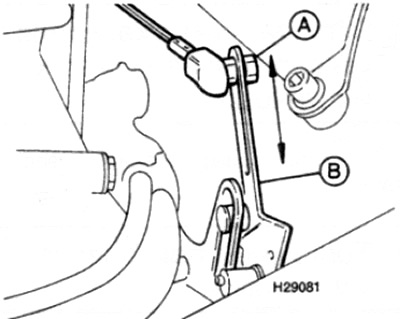


Fig. 6.7. Loosen the lock nut on the ball socket at the end of the rod and move it

Fig. 6.7. Loosen the lock nut on the ball socket at the end of the rod and move it
A Locknut
In Intermediate lever


8. On models with automatic transmission, refer to Chapter 7B and adjust the action of the pressure control cable.

9. Have an assistant press the accelerator pedal all the way down. Check that the fuel injection pump control lever rests against the full load limiter. If necessary, turn the adjustment nut on the throttle cable bracket to achieve the appropriate travel (see fig. 6.3).

10. When finished, repeat the steps described in points 3 and 4.
This article is available at: russian, bulgarian, belarusian, ukrainian, serbian, croatian, romanian, polish, slovak, hungarian
The article has been verified: Lukyanov Nikita Ilyich
Share with friends:
◀ Previous
C-Class 190 (W201) / Injection system (diesel)
Next ▶

Fuel tank — removal and installation
Fuel Level Gauge Sensor Unit — Removal and Installation
Low pressure fuel pump — removal and installation
Air cleaner — removal and installation
General information and precautions
High pressure fuel pump — removal and installation
Injection timing control device and high pressure fuel pump sprocket
Fuel injection timing of the high pressure fuel pump — checking and adjustment
Injectors and high pressure fuel lines — removal and installation
Fuel thermostat — removal and installation
More similar articles for repairing other models

☛ Gear Selector Cable — Adjustment Mercedes W168 (1997-2004)
☛ Diagram 7. Electronic Throttle Positioning (EFP)/ Cruise Control… Mercedes W210 (1996-2002)
☛ Instrument cluster, gauges, control lamps and indicator lights Mercedes W463 (1999-2019)
☛ Seat adjustment Mercedes W163 (1997-2005)
☛ Remote control and special functions Mercedes W140 (1991-1998)
☛ Idle speed adjustment Mercedes Sprinter (1995-2000, diesel)
Link in different formats to this article
Comments and feedback from visitors
No comments yet


How much will 44 + 36 ?


W203 (2000-2007) 
  • General information
  • Introduction to guide
  • User manual
  • Maintenance
  • Power unit
  • Gasoline engines
  • Diesel engines
  • Cooling system
  • Ventilation and heating
  • Supply system
  • Injection system (gasoline)
  • Injection system (diesel)
  • Exhaust system
  • Ignition and control system
  • Charge and launch systems
  • Transmission
  • Mechanical gearbox
  • Automatic gearbox
  • Clutch and drive shafts
  • Differential
  • Chassis
  • Brake system
  • Car suspension
  • Steering
  • Body
  • Exterior (external elements)
  • Interior (internal elements)
  • Electrical equipment
  • Equipment and devices
  • Lighting system
  • Electrical diagrams (2000)
  • Electrical diagrams (since 2001)
W202 (1993-2000) 
  • General information
  • User manual
  • Driving a car
  • Car care
  • Maintenance
  • Power unit
  • Gasoline engines
  • Diesel engines
  • Lubrication system
  • Cooling system
  • Heating and ventilation
  • Ignition system
  • Fuel system
  • Injection system (gasoline)
  • Injection system (diesel)
  • Exhaust system
  • Transmission
  • Clutch
  • Car gearbox
  • Chassis
  • Suspension, wheels and tires
  • Steering
  • Brake system
  • Body
  • Exterior (external elements)
  • Interior (internal elements)
  • Doors and windows
  • Electrical equipment
  • Equipment and devices
  • Power devices
  • Lighting system
  • Electrical circuits
190 (W201) (1982-1993) 
  • General information
  • Introduction to the guide
  • Operation and care
  • Maintenance (gasoline)
  • Maintenance (diesel)
  • Troubleshooting
  • Power unit
  • Petrol engine I4
  • Petrol engine V6
  • Diesel engines
  • Engine overhaul
  • Cooling and heating
  • Power system (carburetor)
  • Injection system (gasoline)
  • Injection system (diesel)
  • Exhaust system
  • Charge and start system
  • Ignition system (I4)
  • Ignition system (V6)
  • Diesel heating system
  • Transmission
  • Clutch
  • Mechanical gearbox
  • Automatic gearbox
  • Cardan shaft and axle shafts
  • Chassis
  • Brake system
  • Car suspension
  • Steering
  • Body
  • Exterior (external elements)
  • Interior (internal elements)
  • Doors, locks and windows
  • Electrical equipment
  • Equipment and devices
  • Electrical circuits
 
MercedesMan.ru © 2017–2026 · Mobile version · Read about Mercedes · Sitemap: EN BG BY UA RS HR RO PL SK HU · Feedback · Site search · Bookmark A-Class (W168) · C-Class (W201) · C-Class (W202) · C-Class (W203) · E-Class (W123) · E-Class (W124) · E-Class (W210) · G-Class (W463) · M-Class (W163) · S-Class (W116, petrol) · S-Class (W126, petrol) · S-Class (W140) · S-Class (W220) · Sprinter · Vito 1 · Vito 2 · Vario 814D ·
 
We only use cookies without which some of the site's features may not be available.