



Warning: Use extreme caution when working with injectors. Never place your hand or any other part of your body under the injector nozzles. since due to the high working pressure, fuel can enter under the skin with all sorts of unpleasant consequences. You must strictly adhere to the rule that work. involving pressure testing of injectors should be carried out by dealers or diesel engine specialists. Before starting work, read the preliminary notes in paragraph 1 this chapter.
General information
1. Injectors are designed for a long service life and it makes sense to check them with a restoration or replacement chain after 100,000 km. Accurate testing, repair and calibration of injectors should be performed by specialists. Faulty injectors that cause detonation and increased smoke formation can be identified without dismantling as follows.
2. Start the engine at idle speed. Loosen the fuel supply line connector of each injector one by one, placing a rag around it to collect any spilled fuel and avoiding the jet getting on your skin. When the faulty injector is disconnected, detonation and smoke formation will stop.
Removal
Caution: Take care to avoid contamination of the injectors and fuel lines. The injectors are manufactured with high precision and you must handle them with care.
3. Disconnect the negative battery terminal.
4. To improve accessibility, please contact paragraph 16 and remove the intake manifold.
5. Thoroughly wipe the injector and fuel line connection nuts (see fig. 10.5). Loosen the clamps and disconnect the air release hose from the injector.
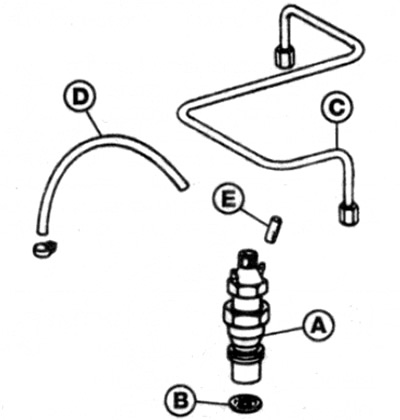
Fig. 10.5. Injector device
A Nozzle body
In Puck
With High Pressure Fuel Line
D Air release hose
E Cap
6. Place a highly absorbent material around the injector. Wipe the fuel line fittings, then unscrew the nut securing the corresponding high-pressure fuel line to the top of the injector.
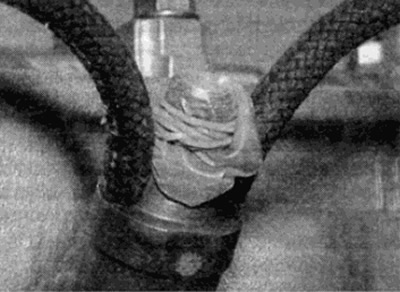
7. Loosen the appropriate nut on each high-pressure fuel line union on top of the fuel pump. Once all union nuts are loosened, hold the adapter on the pump with an open-end wrench to prevent it from being unscrewed from the pump. Once the union nuts are loosened, remove the fuel lines from the engine. Cap the injectors and fuel line unions to prevent dirt from entering the system (see Homemade device).
Cut a separate finger from an old rubber glove and secure it with elastic tape on top of the open fuel line fitting to prevent dirt from getting in.
8. Using a deep thorium wrench, unscrew the injector from the cylinder head.
Caution: Unscrew the injector by the lower hexagonal part adjacent to the cylinder head. Do not unscrew it by the upper hexagonal section, otherwise the injector will be broken.
9. Remove the washer, remembering how it should be installed.
Installation
10. Install a new washer onto the cylinder head, then screw the injector into place and tighten to the specified torque.
11. Connect the fuel lines and tighten the union nuts. Put the clamps on the pipes from which they were removed.
12. Attach the air bleed hose to the nozzle and tighten the hose clamps (where provided).
13. Install the intake manifold in accordance with paragraph 16.
14. Connect the negative battery terminal and check the engine operation.