
Cars BMW Cars Volkswagen Cars Chevrolet Cars Land Rover Cars Lada Cars Honda Cars Peugeot
English Русский
Български
Беларускі
Український
Српски
Hrvatski
Română
Polski
Slovenský
Magyar
Bookmark News and articles Sitemap Feedback Site search
MercedesMan.ru


A-Class C-Class E-Class G-Class M-Class S-Class Others
Sprinter (1995-2000, diesel) Vito 1 (1996-2003) Vito 2 (2003-2014, diesel) Vario 814D (1996-2003, diesel)
  • Main
  • Mercedes-Benz
  • Vario 814D (1996-2003)
  • General information
  • Maintenance
  • Checking the brake shoe linings

Checking the brake shoe linings (Mercedes-Benz Vario 814)

0
Contents: Cars with 602 engines ↡ Cars with engines 602, 904 ↡

Cars with 602 engines


Single tires


1. Check the thickness of the brake pads through the hole in the wheel disk (figure 1.23). Insert the feeler gauge into the hole until it stops and measure the thickness of the pad. The maximum permissible wear is 2 mm.
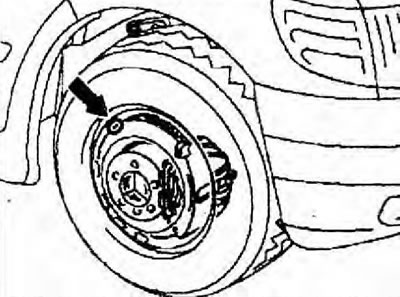
Figure 1.23. Checking the thickness of the brake linings(single tires).

Figure 1.23. Checking the thickness of the brake linings(single tires).


Twin tires


2. Check the position of marks A and B on the brake caliper when rotating relative to edge C (figure 1.24). A - new gasket, B - remaining gasket about 5 mm. This test is only a rough check. If mark B approaches mark C, it is necessary to check by removing the wheel.
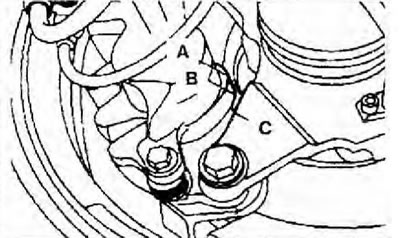
Figure 1.24. Checking the thickness of the brake linings (dual tires).

Figure 1.24. Checking the thickness of the brake linings (dual tires).


Cars with engines 602, 904


3. Check the thickness of the outer lining of the front wheel brake shoe through the hole (arrow) (figure 1.25).
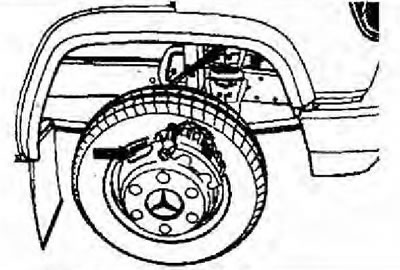
Figure 1.25. Check the thickness of the outer lining of the front wheel brake shoe through the hole…

Figure 1.25. Check the thickness of the outer lining of the front wheel brake shoe through the hole (arrow).


4. Check the thickness of the inner lining of the rear wheel disc brake pad through the hole (arrow) (figure 1.26).
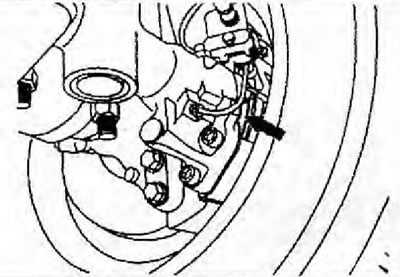
Figure 1.26. Check the thickness of the inner lining of the rear wheel disc brake pad through the…

Figure 1.26. Check the thickness of the inner lining of the rear wheel disc brake pad through the hole (arrow).


5. Check the thickness of the inner lining of the rear wheel drum brake shoe through the hole in the protective casing, after removing plugs 1 (figure 1.27).

Permissible wear of the brake shoe lining


Models 667, 668,670 with disc brakes: 2 mm.


Models 670.4 with drum brakes: 3.5 mm.
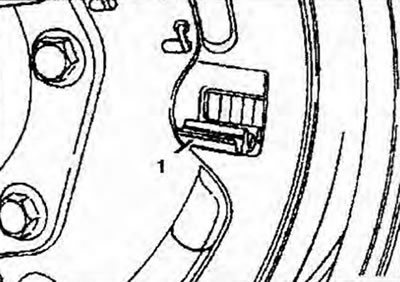
Figure 1.27. Check the thickness of the inner lining of the rear wheel drum brake shoe through the…

Figure 1.27. Check the thickness of the inner lining of the rear wheel drum brake shoe through the hole in the protective casing, after removing plugs 1.


Brake fluid instructions


  • Make sure that the brake fluid does not come into contact with the paintwork, as it contains components that act as a solvent on the vehicle's paintwork. If, despite all caution, contact between brake fluid and paintwork occurs, immediately wash off the wet surface with plenty of water (do not wipe off brake fluid).
  • Brake fluid is highly hygroscopic, meaning it absorbs moisture from the air, which reduces its boiling point. Therefore, store brake fluid only in closed, well-sealed containers (branded containers).
  • Do not reuse used brake fluid.
  • Brake fluid can be colorless to yellow and can therefore easily be confused with petroleum products. Therefore, it is imperative that brake fluid be poured only from branded containers and stored separately from petroleum products and other liquids.
This article is available at: russian, bulgarian, belarusian, ukrainian, serbian, croatian, romanian, polish, slovak, hungarian
The article has been verified: Rodionov Artyom Semyonovich
Share with friends:
◀ Previous
Mercedes Vario 814D / Maintenance
Next ▶

Changing the oil in the rear axle gearbox
Changing the oil in the front axle gearbox
Transfer case oil change 750.553/581
Automatic transmission (AT)
Manual transmission (MT)
Checking the steering
More similar articles for repairing other models

☛ Brake fluid — checking the level Mercedes W168 (1997-2004)
☛ Checking the thickness of the brake pad friction linings Mercedes W202 (1993-2000)
☛ Checking and replacing disc brake pads Mercedes W123 (1976-1985)
☛ Checking the brake system Mercedes W463 (1999-2019)
☛ Checking the brake system Mercedes W163 (1997-2005)
☛ Checking the brake system Mercedes W140 (1991-1998)
Link in different formats to this article
Comments and feedback from visitors
No comments yet


How much will 25 + 36 ?


Vario 814D (1996-2003, diesel) 
  • General information
  • Maintenance
  • Power unit
  • Engines 602.984/985
  • Engines 904.908/914/923/936
  • Transmission
  • Clutch
  • Manual gearbox 711.613
  • Manual gearbox 710.64/66
  • Manual gearbox 715.051
  • Automatic gearbox 723.345
  • Power take-off box
  • Chassis
  • Front suspension
  • Rear suspension
  • Steering
  • Brake system
  • Body and electrical equipment
  • Interior (internal elements)
  • Exterior (external elements)
  • Heater and air conditioner
  • Electrical diagrams
Vito 2 (2003-2014, diesel) 
  • General information
  • User manual
  • Maintenance
  • Diesel engine OM646
  • Engine repair
  • Cooling and lubrication system
  • Power and exhaust system
  • Transmission
  • Clutch
  • Car gearbox
  • Chassis
  • Front suspension
  • Rear suspension
  • Steering
  • Brake system
  • Body
  • Body elements
  • Electrical equipment
  • Equipment and devices
  • Security systems
  • Electrical circuits
Vito 1 (1996-2003) 
  • General information
  • User manual
  • Maintenance
  • Petrol engines 2.0 l
  • Engine repair
  • Lubrication system
  • Cooling system
  • Power and control system
  • Petrol engines 2.8 l
  • Engine repair
  • Lubrication system
  • Cooling system
  • Power and control system
  • Diesel engines 2.3 l
  • Engine repair
  • Cooling system
  • Lubrication system
  • Turbocharging and recycling
  • Power and control system
  • Diesel engines 2.2 l
  • Engine repair
  • Cooling system
  • Lubrication system
  • Turbocharging and recycling
  • Power and control system
  • Transmission
  • Clutch
  • Mechanical gearbox
  • Automatic gearbox
  • Chassis
  • Front suspension and wheels
  • Rear suspension
  • Steering
  • Brake system
  • Body
  • Exterior (external elements)
  • Interior (internal elements)
  • Electrical equipment
  • Equipment and devices
  • Heater and air conditioner
  • Electrical circuits
Sprinter (1995-2000, diesel) 
  • General information
  • Introduction to the guide
  • Maintenance
  • Power unit
  • Engine repair
  • Lubrication system
  • Cooling system
  • Power and exhaust system
  • Transmission
  • Clutch
  • Mechanical gearbox
  • Automatic gearbox
  • Front axle
  • Rear axle and cardan
  • Chassis
  • Car suspension
  • Steering
  • Brake system
  • Tires and wheels
  • Electrical equipment
  • Equipment and devices
  • Headlights and lighting
  • Power devices
  • Electrical circuits
 
MercedesMan.ru © 2017–2026 · Mobile version · Read about Mercedes · Sitemap: EN BG BY UA RS HR RO PL SK HU · Feedback · Site search · Bookmark A-Class (W168) · C-Class (W201) · C-Class (W202) · C-Class (W203) · E-Class (W123) · E-Class (W124) · E-Class (W210) · G-Class (W463) · M-Class (W163) · S-Class (W116, petrol) · S-Class (W126, petrol) · S-Class (W140) · S-Class (W220) · Sprinter · Vito 1 · Vito 2 · Vario 814D ·
 
We only use cookies without which some of the site's features may not be available.