
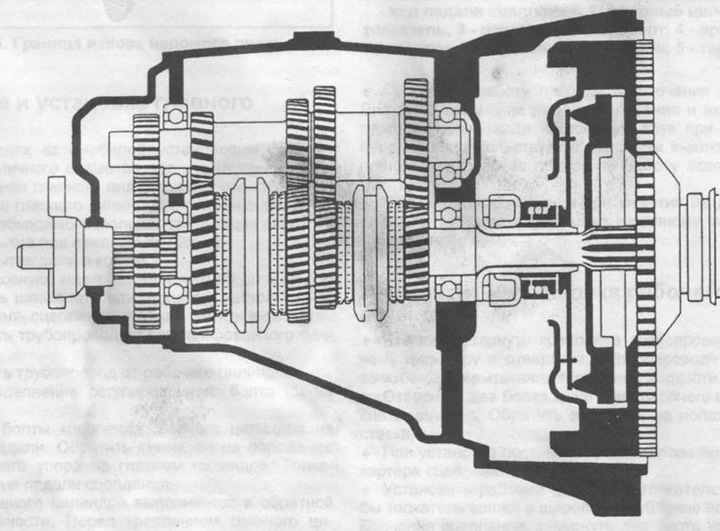
Pic. 169. Section of a four-speed gearbox.
If it is necessary to remove the engine, the gearbox is removed with it, as described in section 2.1. To remove one gearbox, you must perform the following work:
Disconnect ground wire from battery.
Disconnect the clutch hydraulic hose and plug it to prevent leakage of brake fluid.
Place the front of the car on stands.
Place a jack under the gearbox, placing a wooden spacer between the jack and the gearbox, and lift the gearbox.
Loosen the two propshaft intermediate support mounting bolts without completely unscrewing them.
Loosen the propshaft clamping nut.
On 280S and 280SE models, remove the exhaust system mounting nuts on the transmission rear cover. Loosen the clamp nut and turn the pipe down.
Unscrew the fasteners of the cross member and support on the gearbox, in models 350 SE, unscrew the lower protective mudguard and remove all parts.
Disconnect the control rods of the gearbox from the levers on the gearbox.
On 350 SE models remove the connection between the two; remove the exhaust pipes and the rear pipe together with the main and additional mufflers.
Loosen the tachometer mounting bolt in the rear cover of the gearbox and remove the shaft.
Detach the cardan shaft from the gearbox so that the flexible coupling remains on the gearbox flange.
Move the cardan shaft back as far as the fastening of the intermediate support and the clamping nut allow.
Under the front end of the cardan shaft, place a wooden lining, shifting the shaft up.
Disconnect the wires from the starter, unscrew the starter mounting bolts and remove the starter.
Loosen the bolts securing the clutch housing to the intermediate flange. Do not remove the two upper mounting bolts. Mark which bolt the ground wire is attached to.
Move the gearbox horizontally back until it is removed from the dowel pins and the drive shaft comes out of the hub of the clutch disc. Rotate the gearbox 45°so that the two bosses for mounting the starter in the clutch housing do not rest against the body floor tunnels, and lower the gearbox down.
When installing, do the following:
Lubricate the front end and splines of the gearbox input shaft with long-life grease and position the gearbox horizontally against the engine. Install the slave cylinder and the clutch release hydraulic system pipe to the clutch housing.
Engage the gear in the gearbox and, rotating the flange of the driven disk of the gearbox shaft in two directions, engage the splines on the drive shaft with the splines in the hub of the clutch driven disk. Then push the box all the way to the engine.
Attach the clutch housing to the intermediate flange of the engine. Install the ground wire under the head of the mounting bolt.
Install and secure the starter.
Install and tighten clutch slave cylinder bolts. Pay attention to the position of the spacer of the slave cylinder. Tighten the fastening of the drive line and secure it with a clamp.
Install and secure the tachometer drive.
Slide the cardan shaft back and install its flange on the flexible coupling. Raise the engine and gearbox with a jack to facilitate the connection of the driveshaft flange and the flexible coupling.
Attach the pipes of the exhaust system to the rear cover of the gearbox.
Install the powertrain mount to the transmission and secure the rear cross member to the body.
Install and secure the clamps on the pipes of the exhaust system.
Tighten the propshaft clamping nut to 30-40 Nm.
Install a protective mudguard under the propshaft intermediate support.
Carry out the rest of the work in reverse order.
Pour oil into the gearbox.