
Cars BMW Cars Volkswagen Cars Chevrolet Cars Land Rover Cars Lada Cars Honda Cars Peugeot
English Русский
Български
Беларускі
Український
Српски
Hrvatski
Română
Polski
Slovenský
Magyar
Bookmark News and articles Sitemap Feedback Site search
MercedesMan.ru


A-Class C-Class E-Class G-Class M-Class S-Class Others
W123 (1976-1985) W124 (1984-1995) W210 (1996-2002)
  • Main
  • E-Class
  • W210 (1996-2002)
  • Transmission
  • Mechanical gearbox
  • Adjusting the gear shift mechanism

Adjusting the gear shift mechanism (Mercedes-Benz E-Class W210)

0
Contents: How a manual gearbox works ↡ Gears and shafts ↡ Forward and reverse gears ↡
If gear shifting is difficult, its mechanism can be adjusted with an assistant. Before starting work, check whether the mechanism parts are deformed and whether the bearing bushings are worn. At the service station, a special device is used for adjustment, which is installed on the gear shift control shaft.

How a manual gearbox works


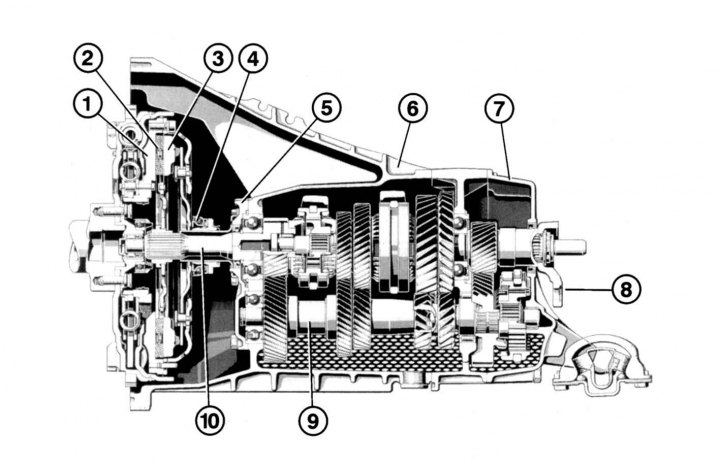
Fig. 6.4. Five-speed manual gearbox in section: 1 – dual mass flywheel; 2 – driven disk; 3 – clutch…

Fig. 6.4. Five-speed manual gearbox in section: 1 – dual mass flywheel; 2 – driven disk; 3 – clutch pressure plate; 4 – clutch release bearing; 5 – Front cover of the manual gearbox; 6 – manual gearbox housing; 7 – rear cover of the manual gearbox; 8 – output shaft flange; 9 – secondary shaft; 10 – primary shaft


The torque from the engine is transmitted via the driven disk 2 (Fig. 6.4) to the primary shaft 10 of the gearbox. The forward gear pinions and the reverse gear pinion are located on it. These pinions are engaged with the pinions located on the secondary shaft 9. The reverse gear pinion engages via the intermediate pinion, which changes the direction of rotation to the opposite.


Gears and shafts


If the gear is not engaged at all, the gears of the primary shaft rotate without transmitting torque. When a gear is engaged, one of the gears of the primary shaft connects with the gear of the secondary shaft, and the torque with the corresponding gear ratio is transmitted to the secondary shaft of the gearbox. The ratio of the number of teeth of a pair of gears forms the gear ratio. All gears are synchronized. Thanks to the synchronizers, the speeds of the shaft and the gear located on this shaft are equalized, after which the synchronizer clutch connects with the gear without impact. As a result, the gears are engaged easily and silently. Rubbing elements, braking faster rotating parts, ensure the alignment of the parts coming into contact. Synchronization occurs within fractions of a second, so when changing gears, it is important to move the lever smoothly, with some delay.

Re-throttle is usually not required when operating a fully synchronized gearbox. Only at low temperatures and with thick transmission oil can it help when downshifting.

Forward and reverse gears
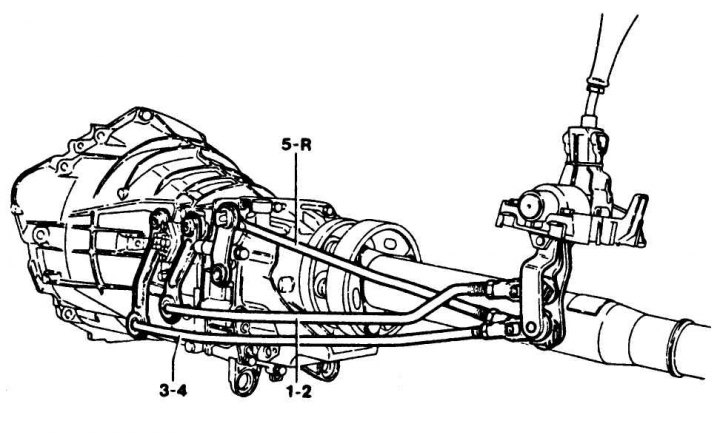


Fig. 6.5. Location of gear shift rods in a five-speed manual transmission

Fig. 6.5. Location of gear shift rods in a five-speed manual transmission


The first three forward gears increase torque. The 4th, so-called direct gear, transmits torque in a ratio of approximately 1:1. In 5th gear, the frequency of revolutions of the driven shaft is higher than the frequency of revolutions of the engine. In order for the car to move in reverse, there is an additional gear that changes the direction of rotation of the wheels to the opposite. When you select the desired gear with the shift lever, the movement of the lever through the rods (Fig. 6.5) is transmitted to the shift mechanism in the gearbox.

Sequence of works


1. Move the gear shift lever to neutral position.

2. Place the vehicle on stands and remove the lower engine guard.
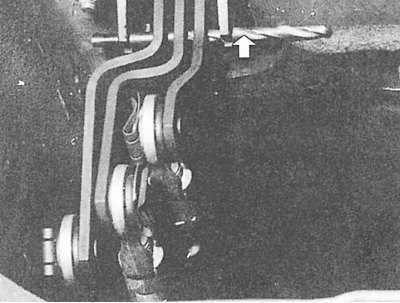
Fig. 6.6. Fixing the intermediate levers of a manual gearbox using a drill (arrow) with a diameter…

Fig. 6.6. Fixing the intermediate levers of a manual gearbox using a drill (arrow) with a diameter of 5.9 mm


3. Fix the intermediate levers (under the shift lever support), inserting a 5.9 mm diameter drill into the holes of the shift mechanism support and intermediate levers (Fig. 6.6). At service stations, a special 5.9 mm diameter locking pin is used for this purpose.
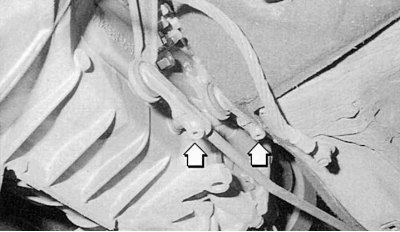
Fig. 6.7. To adjust the rods, loosen the bolts shown by the arrows and move the rods to the set…

Fig. 6.7. To adjust the rods, loosen the bolts shown by the arrows and move the rods to the set position


4. If the length of each rod is as required, the rods should fit into the intermediate levers of the shift mechanism without additional offset. Otherwise, loosen the bolts (fig. 6.7, arrows) mount the rods to the gearbox and move the rods to the installed position.

5. Move the gearshift lever to neutral position and tighten the bolts in this position.

6. Remove the drill and check the gear shifting with the engine running.
This article is available at: russian, bulgarian, belarusian, ukrainian, serbian, croatian, romanian, polish, slovak, hungarian
The article has been verified: Polyakov Zakhar Grigorievich
Share with friends:
◀ Previous
E-Class W210 / Mechanical gearbox
Next ▶

Manual transmission — general description
Checking the gearbox oil level
Checking the tightness of a manual gearbox
More similar articles for repairing other models

☛ Gear shift mechanism — removal and installation Mercedes W168 (1997-2004)
☛ Gear shift rod Mercedes W202 (1993-2000)
☛ Adjusting the AT shift drive Mercedes W463 (1999-2019)
☛ Adjustment of the gear shift drive RCPP 717.461 Mercedes W163 (1997-2005)
☛ Adjusting the gear shift mechanism Mercedes W140 (1991-1998)
☛ Adjusting the gear shift lever Mercedes Vito 1 (1996-2003)
Link in different formats to this article
Comments and feedback from visitors
No comments yet


How much will 40 + 37 ?


W210 (1996-2002) 
  • General information
  • Vehicle description
  • Working conditions and tools
  • Car care
  • Diesel engines
  • Engine repair
  • Lubrication system
  • Cooling system
  • Injection system
  • Supply system
  • Exhaust system
  • Gasoline engines
  • Engine repair
  • Lubrication system
  • Cooling system
  • Control system
  • Power and exhaust system
  • Transmission
  • Clutch
  • Mechanical gearbox
  • Automatic gearbox
  • Drive shafts
  • Chassis
  • Car suspension
  • Steering
  • Tires and wheels
  • Brake system
  • Body
  • Exterior (external elements)
  • Interior (internal elements)
  • Doors and windows
  • Heating and ventilation
  • Electrical equipment
  • Equipment and devices
  • Power devices
  • Lighting and signaling
  • Electrical circuits
W124 (1984-1995) 
  • General information
  • Governing bodies
  • Driving and operation
  • Weekly care
  • Maintenance (gasoline)
  • Maintenance (diesel)
  • Troubleshooting
  • Power unit
  • I4 petrol engine
  • V6 petrol engine (SOHC)
  • V6 petrol engine (DOHC)
  • Diesel engines
  • Engine overhaul
  • Cooling system
  • Heating and ventilation
  • Fuel system (carburetor)
  • Injection system «Bosch CIS-E»
  • Injection system «Bosch HFM»
  • Diesel fuel system
  • Supply system
  • Starting and charging system
  • Ignition system (I4)
  • Ignition system (V6)
  • Preheating
  • Transmission
  • Clutch
  • Mechanical gearbox
  • Automatic gearbox
  • Drive shafts
  • Chassis
  • Brake system
  • Car suspension
  • Steering
  • Body
  • Exterior (external elements)
  • Interior (internal elements)
  • Doors, locks and windows
  • Electrical equipment
  • Equipment and devices
  • Switches
  • Headlights and lighting
  • Electrical circuits
W123 (1976-1985) 
  • General information
  • Introduction to the guide
  • Power unit
  • Engine device
  • Repair M102 engines
  • Repair M110 and M123 engines
  • Cooling and lubrication (M102)
  • Cooling (M110 and M123)
  • Ignition system
  • Power system «Stromberg»
  • Power system «Solex 4A1»
  • Fuel injection «K-Jetronic»
  • Fuel injection «L-Jetronic»
  • Transmission
  • Clutch
  • Mechanical gearbox
  • Automatic gearbox
  • Cardan and rear axle
  • Chassis
  • Front suspension
  • Rear suspension
  • Steering
  • Brake system
  • Body
  • Exterior (external elements)
  • Interior (internal elements)
  • Doors, locks and windows
  • Electrical equipment
  • Equipment and devices
  • Power devices
  • Electrical circuits
 
MercedesMan.ru © 2017–2026 · Mobile version · Read about Mercedes · Sitemap: EN BG BY UA RS HR RO PL SK HU · Feedback · Site search · Bookmark A-Class (W168) · C-Class (W201) · C-Class (W202) · C-Class (W203) · E-Class (W123) · E-Class (W124) · E-Class (W210) · G-Class (W463) · M-Class (W163) · S-Class (W116, petrol) · S-Class (W126, petrol) · S-Class (W140) · S-Class (W220) · Sprinter · Vito 1 · Vito 2 · Vario 814D ·
 
We only use cookies without which some of the site's features may not be available.