
Cars BMW Cars Volkswagen Cars Chevrolet Cars Land Rover Cars Lada Cars Honda Cars Peugeot
English Русский
Български
Беларускі
Український
Српски
Hrvatski
Română
Polski
Slovenský
Magyar
Bookmark News and articles Sitemap Feedback Site search
MercedesMan.ru


A-Class C-Class E-Class G-Class M-Class S-Class Others
W123 (1976-1985) W124 (1984-1995) W210 (1996-2002)
  • Main
  • E-Class
  • W210 (1996-2002)
  • Diesel engines
  • Cooling system
  • Thermostat — Removal and Checking

Thermostat — Removal and Checking (Mercedes-Benz E-Class W210)

0
The thermostat controls the direction of the coolant flow. A temperature-sensitive element with a spring controls two flaps as the engine heats up, which, depending on the temperature conditions, direct the coolant flow completely or partially along the appropriate circuit.

1. Circulation in a small circuit (temperature up to +87°C) – the thermostat is closed. The bypass valve directs the coolant to the pump. From there, the liquid is fed back to the engine. This mode is used to quickly warm up the engine.

2. Mixed mode (temperature +87...+102°C) – the thermostat opens. The liquid, circulating along the small circuit, partially passes through the radiator.

3. Circulation along a large circuit (temperature over +102°C) – the thermostat is fully open. All liquid passes through the radiator.

Removal and checking the thermostat


If the thermostat gets stuck, it can cause major damage to the engine. The fluid will boil and evaporate quickly. In this case, you cannot continue driving. Tow the car to a repair shop. Removing and installing the thermostat is not a difficult job. When buying a new thermostat, do not forget new gaskets, including the housing gasket. You will also need a container to drain the fluid. Remove the thermostat only on a cold engine. Different models have slightly different thermostat housings in location.

Sequence of works


1. Disconnect the cable from the negative terminal of the battery.


2. Drain the coolant as described previously.

3. Remove the front upper engine cover.

4. Loosen the clamp and disconnect the radiator hose from the thermostat housing.

5. Disconnect the small hose from the expansion tank (having previously loosened the clamp).
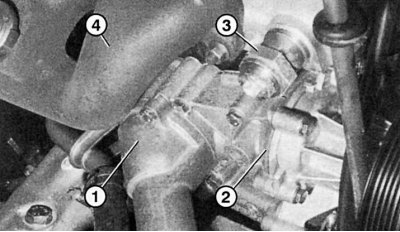
Fig. 4.47. Thermostat location: 1 – thermostat housing; 2 – coolant pump; 3 – chain tensioner; 4 –…

Fig. 4.47. Thermostat location: 1 – thermostat housing; 2 – coolant pump; 3 – chain tensioner; 4 – exhaust manifold


(Original published on the website: mercedesman.ru)
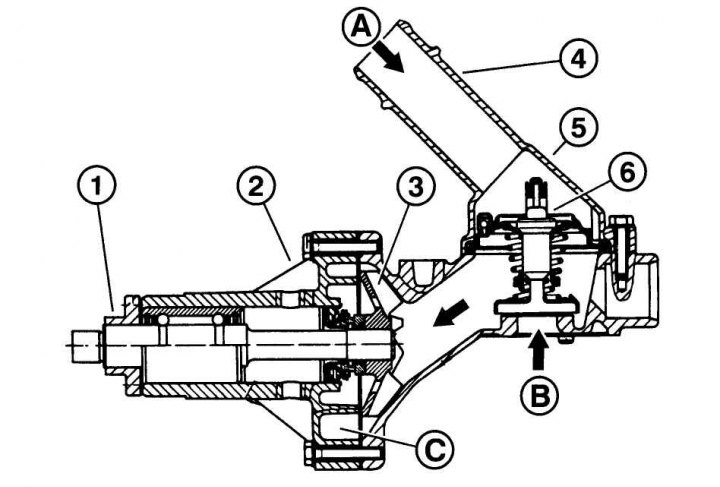
Fig. 4.48. Coolant pump in the block with thermostat: 1 – V-belt pulley flange; 2 – pump body; 3 –…

Fig. 4.48. Coolant pump in the block with thermostat: 1 – V-belt pulley flange; 2 – pump body; 3 – pump impeller; 4 – radiator hose nipple; 5 – thermostat housing; 6 – thermostat; A - from the radiator; B - from the engine; C - to the engine


6. Unscrew the thermostat housing and remove it together (Fig. 4.47). The thermostat is assembled with the water pump (Fig. 4.48).
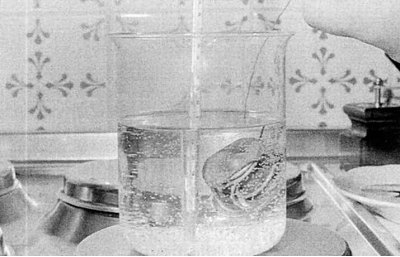


Fig. 4.49. Checking the thermostat

Fig. 4.49. Checking the thermostat


7. Place the thermostat in a container with water (Fig. 4.49) and check the operating temperature by slowly heating the water. For a thermostat that has already been in operation, a difference in operating temperature of ±3°C is permissible.

8. Check that the valve is completely closed when cooling.

9. If it is not working properly, replace the thermostat. On 4- and 6-cylinder engines, the thermostat is a one-piece design.

10. Before installing the thermostat, clean the connection points with the gasket on the housing and engine.

11. Install the housing with the thermostat and a new gasket and tighten to a torque of 10 Nm.

12. Connect the radiator hose, making sure it is seated correctly and the clamp is securely tightened.

13. Fill with coolant.

14. Connect the cable to the negative terminal of the battery.

15. Warm up the engine and make sure that the radiator is hot at the bottom.

16. Check the tightness of the thermostat installation.
This article is available at: russian, bulgarian, belarusian, ukrainian, serbian, croatian, romanian, polish, slovak, hungarian
The article has been verified: Polyakov Zakhar Grigorievich
Share with friends:
◀ Previous
E-Class W210 / Cooling system
Next ▶

Possible malfunctions of the cooling system, their causes and methods of elimination
Possible malfunctions of the hydraulic tappet thermostat and their causes
Cooling system filling volumes
Replacing the coolant
Checking the level and topping up the coolant
Fan — Checking the serviceability
Replacing cooling system hoses
Radiator — removal and installation
Air filter — removal and installation
More similar articles for repairing other models

☛ Checking the engine oil level using a dipstick Mercedes W168 (1997-2004)
☛ Checking the Thermostat Mercedes W203 (2000-2007)
☛ Checking the Thermostat Mercedes W463 (1999-2019)
☛ Checking the proper functioning of the thermostat Mercedes W163 (1997-2005)
☛ Checking the proper functioning of the thermostat Mercedes W140 (1991-1998)
☛ Checking the Thermostat Mercedes Sprinter (1995-2000, diesel)
Link in different formats to this article
Comments and feedback from visitors
No comments yet


How much will 15 + 48 ?


W210 (1996-2002) 
  • General information
  • Vehicle description
  • Working conditions and tools
  • Car care
  • Diesel engines
  • Engine repair
  • Lubrication system
  • Cooling system
  • Injection system
  • Supply system
  • Exhaust system
  • Gasoline engines
  • Engine repair
  • Lubrication system
  • Cooling system
  • Control system
  • Power and exhaust system
  • Transmission
  • Clutch
  • Mechanical gearbox
  • Automatic gearbox
  • Drive shafts
  • Chassis
  • Car suspension
  • Steering
  • Tires and wheels
  • Brake system
  • Body
  • Exterior (external elements)
  • Interior (internal elements)
  • Doors and windows
  • Heating and ventilation
  • Electrical equipment
  • Equipment and devices
  • Power devices
  • Lighting and signaling
  • Electrical circuits
W124 (1984-1995) 
  • General information
  • Governing bodies
  • Driving and operation
  • Weekly care
  • Maintenance (gasoline)
  • Maintenance (diesel)
  • Troubleshooting
  • Power unit
  • I4 petrol engine
  • V6 petrol engine (SOHC)
  • V6 petrol engine (DOHC)
  • Diesel engines
  • Engine overhaul
  • Cooling system
  • Heating and ventilation
  • Fuel system (carburetor)
  • Injection system «Bosch CIS-E»
  • Injection system «Bosch HFM»
  • Diesel fuel system
  • Supply system
  • Starting and charging system
  • Ignition system (I4)
  • Ignition system (V6)
  • Preheating
  • Transmission
  • Clutch
  • Mechanical gearbox
  • Automatic gearbox
  • Drive shafts
  • Chassis
  • Brake system
  • Car suspension
  • Steering
  • Body
  • Exterior (external elements)
  • Interior (internal elements)
  • Doors, locks and windows
  • Electrical equipment
  • Equipment and devices
  • Switches
  • Headlights and lighting
  • Electrical circuits
W123 (1976-1985) 
  • General information
  • Introduction to the guide
  • Power unit
  • Engine device
  • Repair M102 engines
  • Repair M110 and M123 engines
  • Cooling and lubrication (M102)
  • Cooling (M110 and M123)
  • Ignition system
  • Power system «Stromberg»
  • Power system «Solex 4A1»
  • Fuel injection «K-Jetronic»
  • Fuel injection «L-Jetronic»
  • Transmission
  • Clutch
  • Mechanical gearbox
  • Automatic gearbox
  • Cardan and rear axle
  • Chassis
  • Front suspension
  • Rear suspension
  • Steering
  • Brake system
  • Body
  • Exterior (external elements)
  • Interior (internal elements)
  • Doors, locks and windows
  • Electrical equipment
  • Equipment and devices
  • Power devices
  • Electrical circuits
 
MercedesMan.ru © 2017–2026 · Mobile version · Read about Mercedes · Sitemap: EN BG BY UA RS HR RO PL SK HU · Feedback · Site search · Bookmark A-Class (W168) · C-Class (W201) · C-Class (W202) · C-Class (W203) · E-Class (W123) · E-Class (W124) · E-Class (W210) · G-Class (W463) · M-Class (W163) · S-Class (W116, petrol) · S-Class (W126, petrol) · S-Class (W140) · S-Class (W220) · Sprinter · Vito 1 · Vito 2 · Vario 814D ·
 
We only use cookies without which some of the site's features may not be available.