
Cars BMW Cars Volkswagen Cars Chevrolet Cars Land Rover Cars Lada Cars Honda Cars Peugeot
English Русский
Български
Беларускі
Український
Српски
Hrvatski
Română
Polski
Slovenský
Magyar
Bookmark News and articles Sitemap Feedback Site search
MercedesMan.ru


A-Class C-Class E-Class G-Class M-Class S-Class Others
W123 (1976-1985) W124 (1984-1995) W210 (1996-2002)
  • Main
  • E-Class
  • W210 (1996-2002)
  • Diesel engines
  • Cooling system
  • Air filter — removal and installation

Air filter — removal and installation (Mercedes-Benz E-Class W210)

0
Contents: Cleaning and replacing the filter ↡ Removal the air boost damper ↡
The intake air passes through the air filter, which consists of a housing, also called a discharge gas damper, and the actual filter made of pleated material.

The rubber seal allows the filter to fit tightly to the housing. When passing through the filter, small particles of dirt are deposited in its folds of fine-pored material, while larger particles are deposited in the housing.

The filter only performs its function well if it is regularly maintained. A clogged filter does not allow enough air to enter the engine. The mixture becomes greasy, power drops and fuel consumption increases.

Cleaning and replacing the filter


The filter itself must be cleaned at least once a year and replaced after two years. The filter type for your Mercedes E-class is described in the documentation, you can also find it out in specialized stores selling spare parts for foreign cars. It is not necessary to purchase an original spare filter, filters from other manufacturers are also suitable for use.

Sequence of works


"60,000 km 2 years"
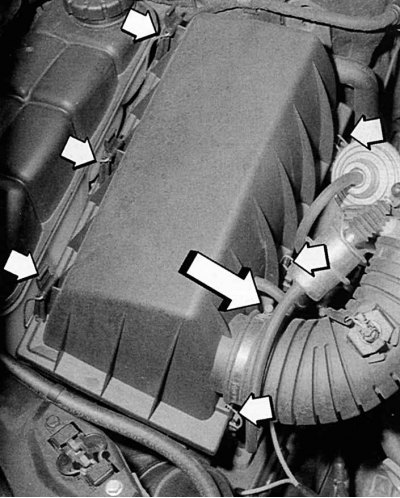


Fig. 4.55. Air filter cover fastening locks

Fig. 4.55. Air filter cover fastening locks


1. Remove the upper part of the air injection damper. Open the six latches on the air injection pipe of the meter (Fig. 4.55) and remove the clamp.
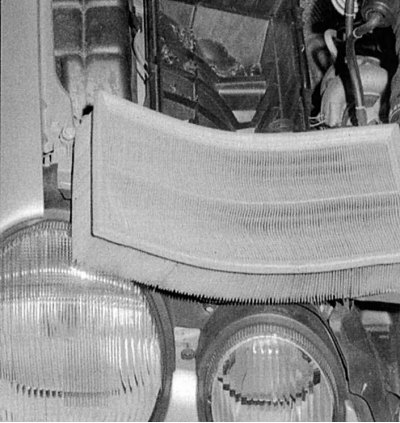
Fig. 4.56. Evaluation of the degree of filter contamination

Fig. 4.56. Evaluation of the degree of filter contamination


2. Remove the filter (Fig. 4.56).
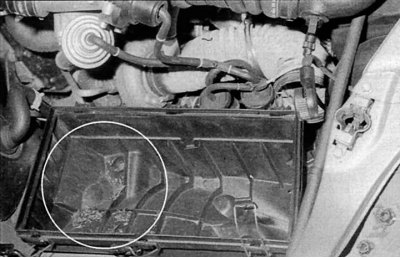
Fig. 4.57. Place of accumulation of dirt in the filter housing

Fig. 4.57. Place of accumulation of dirt in the filter housing


3. Clean the filter housing (Fig. 4.57). Oil accumulation in dirt indicates engine wear or an excess of oil in the system.

4. Knock the paper filter on a hard surface. Remove large particles of dirt.
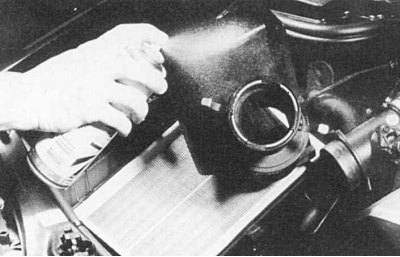
Fig. 4.58. Cleaning the filter

Fig. 4.58. Cleaning the filter


5. Remove finer dirt using compressed air (Fig. 4.58). Direct the air flow from the side along the filter folds.

Do not blow the filter from the outside in. Do not clean the paper filter with liquid.

6. When changing the filter, make sure that the seal fits tightly against the bottom of the filter housing.

7. Insert the new filter into the bottom of the damper, making sure the rubber seal fits tightly.

8. Check the seal on the top of the damper. Replace if necessary.
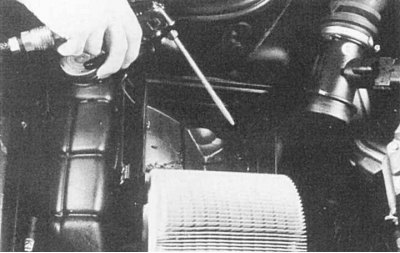
Fig. 4.59. Installing the sealing ring on the air flow meter discharge pipe

Fig. 4.59. Installing the sealing ring on the air flow meter discharge pipe


9. Place the upper part of the housing on the discharge pipe, place the lower part, place the discharge pipe on the fitting and tighten with a clamp (Fig. 4.59).

Removal the air boost damper


1. Remove the suction tube from the damper. To do this, unscrew the clamp.

2. Lift the damper off the rubber pad and remove it from the engine compartment.

3. When installing the damper, pay attention to the correct fit of the housing journals on the rubber pad.
This article is available at: russian, bulgarian, belarusian, ukrainian, serbian, croatian, romanian, polish, slovak, hungarian
The article has been verified: Polyakov Zakhar Grigorievich
Share with friends:
◀ Previous
E-Class W210 / Cooling system
Next ▶

Radiator — removal and installation
Replacing cooling system hoses
Fan — Checking the serviceability
Thermostat — Removal and Checking
Possible malfunctions of the cooling system, their causes and methods of elimination
 
More similar articles for repairing other models

☛ Engine Oil and Oil Filter — Replacement Mercedes W168 (1997-2004)
☛ Replacing the fuel filter / coarse filter Mercedes W202 (1993-2000)
☛ Changing engine oil and oil filter Mercedes W463 (1999-2019)
☛ Changing engine oil and oil filter Mercedes W163 (1997-2005)
☛ Changing engine oil and oil filter Mercedes W140 (1991-1998)
☛ Air filter element Mercedes Sprinter (1995-2000, diesel)
Link in different formats to this article
Comments and feedback from visitors
No comments yet


How much will 38 + 46 ?


W210 (1996-2002) 
  • General information
  • Vehicle description
  • Working conditions and tools
  • Car care
  • Diesel engines
  • Engine repair
  • Lubrication system
  • Cooling system
  • Injection system
  • Supply system
  • Exhaust system
  • Gasoline engines
  • Engine repair
  • Lubrication system
  • Cooling system
  • Control system
  • Power and exhaust system
  • Transmission
  • Clutch
  • Mechanical gearbox
  • Automatic gearbox
  • Drive shafts
  • Chassis
  • Car suspension
  • Steering
  • Tires and wheels
  • Brake system
  • Body
  • Exterior (external elements)
  • Interior (internal elements)
  • Doors and windows
  • Heating and ventilation
  • Electrical equipment
  • Equipment and devices
  • Power devices
  • Lighting and signaling
  • Electrical circuits
W124 (1984-1995) 
  • General information
  • Governing bodies
  • Driving and operation
  • Weekly care
  • Maintenance (gasoline)
  • Maintenance (diesel)
  • Troubleshooting
  • Power unit
  • I4 petrol engine
  • V6 petrol engine (SOHC)
  • V6 petrol engine (DOHC)
  • Diesel engines
  • Engine overhaul
  • Cooling system
  • Heating and ventilation
  • Fuel system (carburetor)
  • Injection system «Bosch CIS-E»
  • Injection system «Bosch HFM»
  • Diesel fuel system
  • Supply system
  • Starting and charging system
  • Ignition system (I4)
  • Ignition system (V6)
  • Preheating
  • Transmission
  • Clutch
  • Mechanical gearbox
  • Automatic gearbox
  • Drive shafts
  • Chassis
  • Brake system
  • Car suspension
  • Steering
  • Body
  • Exterior (external elements)
  • Interior (internal elements)
  • Doors, locks and windows
  • Electrical equipment
  • Equipment and devices
  • Switches
  • Headlights and lighting
  • Electrical circuits
W123 (1976-1985) 
  • General information
  • Introduction to the guide
  • Power unit
  • Engine device
  • Repair M102 engines
  • Repair M110 and M123 engines
  • Cooling and lubrication (M102)
  • Cooling (M110 and M123)
  • Ignition system
  • Power system «Stromberg»
  • Power system «Solex 4A1»
  • Fuel injection «K-Jetronic»
  • Fuel injection «L-Jetronic»
  • Transmission
  • Clutch
  • Mechanical gearbox
  • Automatic gearbox
  • Cardan and rear axle
  • Chassis
  • Front suspension
  • Rear suspension
  • Steering
  • Brake system
  • Body
  • Exterior (external elements)
  • Interior (internal elements)
  • Doors, locks and windows
  • Electrical equipment
  • Equipment and devices
  • Power devices
  • Electrical circuits
 
MercedesMan.ru © 2017–2026 · Mobile version · Read about Mercedes · Sitemap: EN BG BY UA RS HR RO PL SK HU · Feedback · Site search · Bookmark A-Class (W168) · C-Class (W201) · C-Class (W202) · C-Class (W203) · E-Class (W123) · E-Class (W124) · E-Class (W210) · G-Class (W463) · M-Class (W163) · S-Class (W116, petrol) · S-Class (W126, petrol) · S-Class (W140) · S-Class (W220) · Sprinter · Vito 1 · Vito 2 · Vario 814D ·
 
We only use cookies without which some of the site's features may not be available.