
Cars BMW Cars Volkswagen Cars Chevrolet Cars Land Rover Cars Lada Cars Honda Cars Peugeot
English Русский
Български
Беларускі
Український
Српски
Hrvatski
Română
Polski
Slovenský
Magyar
Bookmark News and articles Sitemap Feedback Site search
MercedesMan.ru


A-Class C-Class E-Class G-Class M-Class S-Class Others
W123 (1976-1985) W124 (1984-1995) W210 (1996-2002)
  • Main
  • E-Class
  • W210 (1996-2002)
  • Electrical equipment
  • Power devices
  • Removal and installation the starter

Removal and installation the starter (Mercedes-Benz E-Class W210)

0
Contents: Diesel engines ↡ Petrol engines ↡ Installation ↡
Starter failure can be caused by several reasons, such as jamming or wear of the traction relay or brushes, wear of bearings. It is better to refuse to repair a faulty starter. As a rule, it must be replaced.

Diesel engines


Removal


1. Remove the cable from the negative terminal of the battery.

Warning! When the battery is disconnected, the memory is erased (for example radio code) all electronic storage devices.


2. It is better to remove from underneath the car, for which you need to lift and secure the car.

3. Remove the lower engine compartment protection.

4. Unscrew the connected wires from the starter.

5. Disconnect the wire holders and clamps.

6. Loosen the starter mounting bolts (tightening torque during assembly 42 Nm).
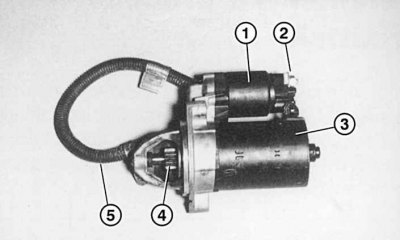
Fig. 9.13. Starter: 1 – traction relay; 2 – electrical contacts from the battery (contact «30») and…

Fig. 9.13. Starter: 1 – traction relay; 2 – electrical contacts from the battery (contact "30") and the ignition switch (contact "50"); 3 – starter housing with winding and anchor; 4 – gear; 5 – connection wire


7. Remove the starter (Fig. 9.13) downwards.

8. When assembling, pay attention to the correct placement and fastening of the wires connected to the starter.

Petrol engines


Removal


1. Remove the cable from the negative terminal of the battery.

Warning! When the battery is disconnected, the memory is erased (for example radio code) all electronic storage devices.


2. It is better to remove from underneath the car, for which you need to lift and secure the car.

3. Remove the lower engine compartment protection.

V6 Engine


4. Unscrew the fastening of the protective shield of the cardan shaft in the starter area.

V8 engine manufactured before 08.1997.


5. Unscrew the two bolts and remove the screen near the starter.

6. Remove the exhaust pipe together with the catalytic converter.

V6 Engine


7. Remove only the first front pipe together with the catalytic converter.

V8 engine manufactured before 08.1997.


8. Unscrew the mounting bolts from below and remove the right engine support.

All engines
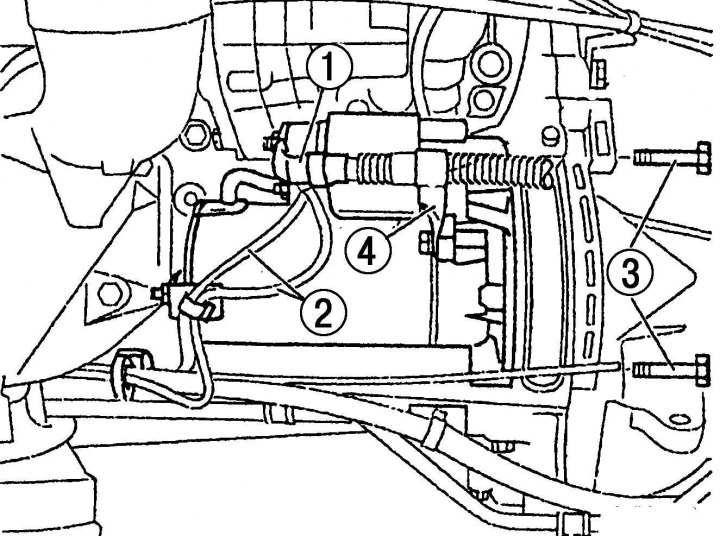


Fig. 9.14. Removing the starter (gasoline in-line engine): 1 – contact wire «30»; 2 – contact wire…

Fig. 9.14. Removing the starter (gasoline in-line engine): 1 – contact wire "30"; 2 – contact wire "50"; 3 – bolts; 4 – bracket


9. Disconnect wire 1 (Fig. 9.14) of contact "30" and wire 2 of contact "50".

10. Loosen the mounting bolts and remove the 4 wire bracket.

11. Unscrew bolts 3 securing the starter flange.

Caution! On V6 and V8 engines, there is one or more washers between the starter and the cylinder block. The mudguard is also located in this area. To facilitate subsequent assembly, record the number of washers and their location.


12. Remove the starter by pulling it downwards.

Installation


13. Install the starter onto the engine. On V6 and V8 engines, install washers between the starter and the cylinder block, as well as a mud shield.

14. Tighten the starter mounting bolts to a torque of 40 Nm.

15. Connect wire 1 of terminal "30" to the starter, tightening the fastening with a torque of 15 N·m, and wire 2 of terminal "50", tightening the fastening with a torque of 5 N·m.

16. Install the 4 wire bracket.

V8 engine manufactured before 08.1997.


17. Lower the engine and secure the right front support to it.

18. Secure the starter protective screen.

V6 Engine


19. Secure the cardan shaft protective screen in the starter area.

All engines


20. Install the lower engine compartment cover.

21. Connect the cable to the negative terminal of the battery.

22. Set the clock and enter the anti-theft code for the radio.
This article is available at: russian, bulgarian, belarusian, ukrainian, serbian, croatian, romanian, polish, slovak, hungarian
The article has been verified: Polyakov Zakhar Grigorievich
Share with friends:
◀ Previous
E-Class W210 / Power devices
Next ▶

Removal the generator
Possible battery malfunctions, their causes and solutions
Checking the voltage regulator
Detection of a faulty consumer
Removal the battery
Possible starter malfunctions, their causes and solutions
More similar articles for repairing other models

☛ Starter — removal and installation Mercedes W168 (1997-2004)
☛ Starter — General Description Mercedes W202 (1993-2000)
☛ Removal and installation the starter Mercedes W463 (1999-2019)
☛ Removal and installation the starter Mercedes W163 (1997-2005)
☛ Removal and installation the starter lock switch sensor Mercedes W140 (1991-1998)
☛ Starter — General Information Mercedes Sprinter (1995-2000, diesel)
Link in different formats to this article
Comments and feedback from visitors
No comments yet


How much will 14 + 23 ?


W210 (1996-2002) 
  • General information
  • Vehicle description
  • Working conditions and tools
  • Car care
  • Diesel engines
  • Engine repair
  • Lubrication system
  • Cooling system
  • Injection system
  • Supply system
  • Exhaust system
  • Gasoline engines
  • Engine repair
  • Lubrication system
  • Cooling system
  • Control system
  • Power and exhaust system
  • Transmission
  • Clutch
  • Mechanical gearbox
  • Automatic gearbox
  • Drive shafts
  • Chassis
  • Car suspension
  • Steering
  • Tires and wheels
  • Brake system
  • Body
  • Exterior (external elements)
  • Interior (internal elements)
  • Doors and windows
  • Heating and ventilation
  • Electrical equipment
  • Equipment and devices
  • Power devices
  • Lighting and signaling
  • Electrical circuits
W124 (1984-1995) 
  • General information
  • Governing bodies
  • Driving and operation
  • Weekly care
  • Maintenance (gasoline)
  • Maintenance (diesel)
  • Troubleshooting
  • Power unit
  • I4 petrol engine
  • V6 petrol engine (SOHC)
  • V6 petrol engine (DOHC)
  • Diesel engines
  • Engine overhaul
  • Cooling system
  • Heating and ventilation
  • Fuel system (carburetor)
  • Injection system «Bosch CIS-E»
  • Injection system «Bosch HFM»
  • Diesel fuel system
  • Supply system
  • Starting and charging system
  • Ignition system (I4)
  • Ignition system (V6)
  • Preheating
  • Transmission
  • Clutch
  • Mechanical gearbox
  • Automatic gearbox
  • Drive shafts
  • Chassis
  • Brake system
  • Car suspension
  • Steering
  • Body
  • Exterior (external elements)
  • Interior (internal elements)
  • Doors, locks and windows
  • Electrical equipment
  • Equipment and devices
  • Switches
  • Headlights and lighting
  • Electrical circuits
W123 (1976-1985) 
  • General information
  • Introduction to the guide
  • Power unit
  • Engine device
  • Repair M102 engines
  • Repair M110 and M123 engines
  • Cooling and lubrication (M102)
  • Cooling (M110 and M123)
  • Ignition system
  • Power system «Stromberg»
  • Power system «Solex 4A1»
  • Fuel injection «K-Jetronic»
  • Fuel injection «L-Jetronic»
  • Transmission
  • Clutch
  • Mechanical gearbox
  • Automatic gearbox
  • Cardan and rear axle
  • Chassis
  • Front suspension
  • Rear suspension
  • Steering
  • Brake system
  • Body
  • Exterior (external elements)
  • Interior (internal elements)
  • Doors, locks and windows
  • Electrical equipment
  • Equipment and devices
  • Power devices
  • Electrical circuits
 
MercedesMan.ru © 2017–2026 · Mobile version · Read about Mercedes · Sitemap: EN BG BY UA RS HR RO PL SK HU · Feedback · Site search · Bookmark A-Class (W168) · C-Class (W201) · C-Class (W202) · C-Class (W203) · E-Class (W123) · E-Class (W124) · E-Class (W210) · G-Class (W463) · M-Class (W163) · S-Class (W116, petrol) · S-Class (W126, petrol) · S-Class (W140) · S-Class (W220) · Sprinter · Vito 1 · Vito 2 · Vario 814D ·
 
We only use cookies without which some of the site's features may not be available.