
Removing
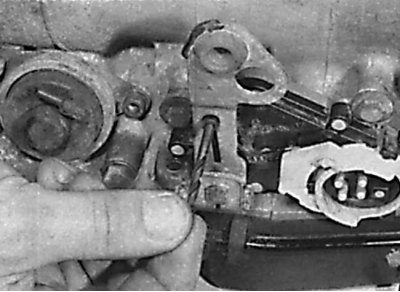
Removing the electrical connector bracket (arrow) starter lock switch and reversing lights on all models except models with 722.4 gearbox
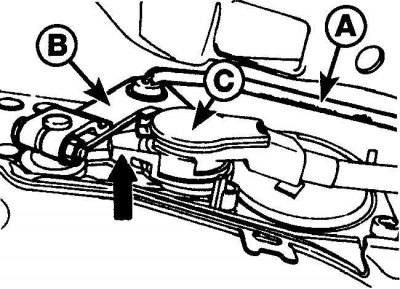
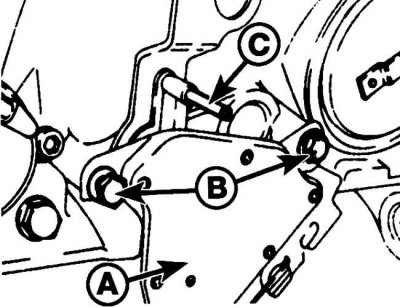
A – draft of a gear change;
B - gear selection lever;
C - electrical connector
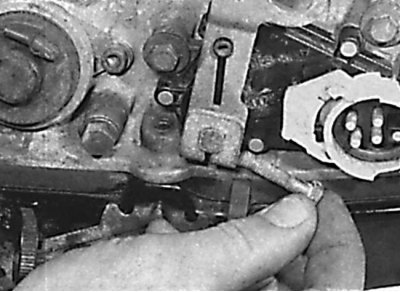
Removing the screw securing the gear selector to the gearbox
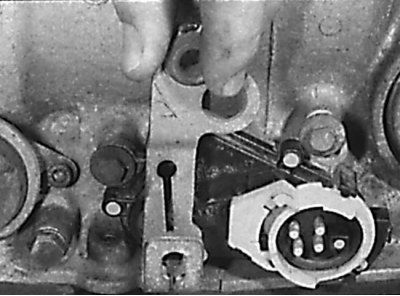
Removing the gear selector from the gearbox
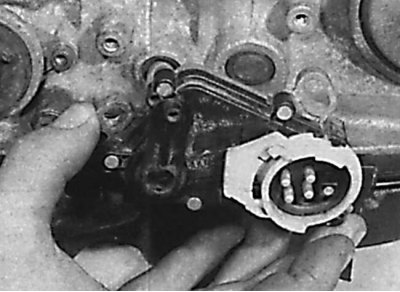
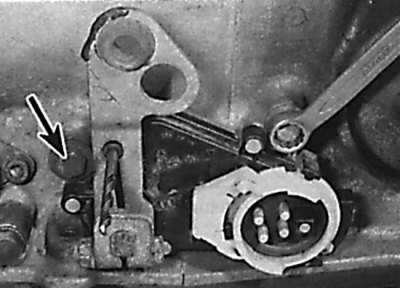
Removing the starter interlock switch and reversing lights from the gearbox
1. Remove the ground wire from the battery.
2. Apply the handbrake, then raise the front of the vehicle and support it on stands.
3. Release the bracket for the electrical connector of the starter interlock switch and reversing lights (see fig. Removing the bracket for the electrical connector of the starter interlock switch and reversing lights on all models except models with a gearbox 722.4).
4. Remove the bracket and disconnect the rod from the gear selector on the gearbox.
5. Using two screwdrivers and being careful, remove the electrical connector from the starter interlock switch and reversing lights.
6. Unscrew the screw and nut securing the lever and remove the lever from the gearbox (see fig. Removing the screw securing the gear selector to the gearbox, Removing the gear selector from the gearbox).
7. Unscrew the screws and remove the starter and reversing lamp interlock switch from the gearbox (see fig. Removing the starter interlock switch and reversing lights from the gearbox).
Installation and adjustment
Installing a 4 mm drill shank into the hole in the lever and reference of the starter interlock switch and reversing lights
An arrangement of screws of fastening of the switch of blocking of a starter and lanterns of a backing
1. Reinstall the starter and reversing light switch, insert and tighten the screws without fully tightening them.
2. Install the selector lever on the transaxle so that the reference on the switch fits into the appropriate hole in the selector lever. Check that the gear selector is in position N. The position markings are on the gearbox housing. Secure the selector lever with the screw and nut.
3. Insert a drill shank or steel rod with a diameter of 4 mm into the hole of the lever and switch reference. In this case, the steel rod must enter the hole in the switch housing (see fig. Installing a 4 mm drill shank into the hole in the lever and reference of the starter interlock switch and reversing lights).
4. In this position, finally tighten the screws securing the switch, then remove the drill or rod (see fig. An arrangement of screws of fastening of the switch of blocking of a starter and lanterns of a backing).
5. Connect the rod to the gear selector and secure it with the bracket.
6. Connect the electrical connector to the switch and secure it with the bracket.
7. Lower the car and connect a weight wire.
Models with gearbox 722.4
Removing
1. Open the hood and place it in a vertical position. Place a thin sheet of steel over the engine room bulkhead to protect the bulkhead during further work.
2. Apply the handbrake, then raise the front of the vehicle and support it on stands.
3. Release the rear of the exhaust system from the rubber hangers and, using a soft wire, tie up the exhaust system 500 mm below its original position.
4. On models with an additional heater, when carrying out further work, be careful not to damage the coolant hose located at the rear of the engine compartment.
5. Set the selector lever to position N.
6. Working under the vehicle, remove the mounting bracket and remove the linkage from the gear selector lever.
7. Unscrew and remove the exhaust mounting bracket from the gearbox.
8. Place a jack with a piece of wood under the power unit's rear support and raise the jack until the weight of the power unit is supported by the jack.
9. Unscrew the rear support of the power unit from the bottom of the car.
10. Being careful, lower the jack just enough so that the lowered rear of the transmission provides access to the starter override switch and reversing lights. When lowering the gearbox, do not damage the parts and assemblies located at the rear of the engine compartment.
11. Release the bracket that secures the speedometer cable to the transmission.
12. Rotate the retaining clip up, then disconnect the electrical connector from the starter override switch and reversing lights.
13. Remove the two screws and remove the starter and reversing light interlock switch from the transmission.
Installation
A – the switch of blocking of a starter and lanterns of a backing;
B - screws for fastening the switch;
C - drill with a diameter of 4 mm
1. Install the starter and reverse light interlock switch on the transmission so that the switch reference is in the corresponding hole in the lever (see picture). Check that the gear selector is in position N. The position markings are located on the gearbox housing.
2. Insert a drill shank or a 4 mm diameter steel rod into the hole in the lever and reference and into the hole in the switch body.
3. Tighten the screws securing the starter interlock switch and reversing lights, and remove the drill bit or steel rod.
4. Connect the electrical connector to the switch and secure it with the bracket.
5. Raise the transmission with a jack and screw the rear power unit support to the bottom of the vehicle.
6. Install the exhaust bracket to the gearbox.
7. Install the speedometer cable retainer.
8. Install the linkage on the gear selector and secure with the bracket.
9. Raise and secure with rubber hangers the rear of the exhaust system.
10. Lower the vehicle onto its wheels and remove the thin steel sheet from the bulkhead of the engine compartment.